Extending the UIScene Delegate
To customize and manage your iOS app’s lifecycle, use the voltmxAppDelegateClassFactory object.
In all apps built before Volt MX 9.5.55, the VMAppDelegate class serves as the main entry point. It manages key app logic and handles application state transitions. Starting with Volt MX 9.5.55, the implementation of SceneDelegate splits the responsibilities of AppDelegate between AppDelegate and SceneDelegate. The platform provides the voltmxAppDelegateClassFactory object to give you control over application lifecycle events.
Customizing the UISceneDelegate protocol methods is an iOS-specific feature that extends your app's functionality. This customization must be written in Objective-C and is not portable to other platforms. However, it allows you to integrate third-party libraries or perform custom initialization steps in the iOS version of your app.
To customize the UISceneDelegate protocol methods, create a class that implements the Volt Iris VMSceneDelegate protocol. Use this custom class with the voltmxAppDelegateClassFactory object, as outlined in the following procedure.
Extending UISceneDelegate in an App Developed with Volt Iris
- Export your Volt Iris app to Xcode.
-
In Xcode, create a new class that is a subclass of the VMSceneDelegate class. The following image illustrates this process.
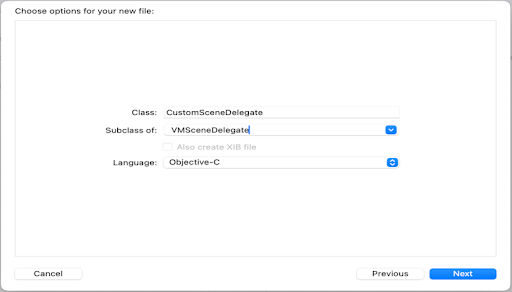
In the Class field, enter the name of your custom class. In the example above, it is CustomSceneDelegate, but you can name your class as desired.
Ensure your custom class is a subclass of VMSceneDelegate and that you have selected Objective-C as the programming language. When Xcode creates your custom class, it generates a header file (.h) and an implementation file (.m), then adds them to your project.
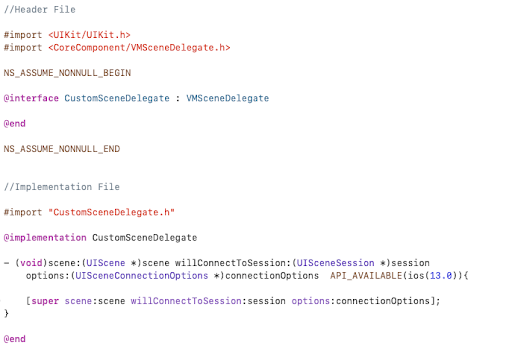
For example, if you name your class CustomSceneDelegate, Xcode creates the header and implementation files as CustomSceneDelegate.h and CustomSceneDelegate.m, as displayed in the following illustration.
-
Open the header and implementation files for your custom app delegate class. These files will contain code similar to the following.
-
Override any UISceneDelegate methods you want to customize. Ensure that all overridden methods call their parent implementations. Failing to do so will result in undefined behavior.
-
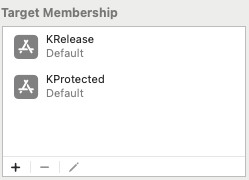
Select KRelease and KProtected as the target memberships for your new class.
Migrating from Extended UIAppDelegate functionality to UISceneDelegate
This document provides a structured approach for migrating iOS applications that extend UIAppDelegate to extend UISceneDelegate. It covers compatibility considerations, key lifecycle differences, integration strategies, and best practices for maintaining backward compatibility when needed. This guidance is essential for applications adopting the scene-based architecture introduced in Volt Iris 9.5 and later.
Note: Since extending UIAppDelegate is developer-controlled, Iris cannot automate this process.
The following table maps commonly used extended UIAppDelegate methods to their corresponding UISceneDelegate methods.
| UIAppDelegate | UISceneDelegate | Description |
|---|---|---|
| application:didFinishLaunchingWithOptions: | scene:willConnectToSession:options: | App launch initialization |
| applicationDidBecomeActive: | sceneDidBecomeActive: | App becomes active |
| applicationWillResignActive: | sceneWillResignActive: | App is about to become inactive |
| applicationDidEnterBackground: | sceneDidEnterBackground: | App enters the background |
| applicationWillEnterForeground: | sceneWillEnterForeground: | App is about to enter the foreground |
| applicationWillTerminate: | sceneDidDisconnect: | App is about to terminate (scene lifecycle) |
For more delegate methods, please refer to the Apple documentation for UIAppDelegate and UISceneDelegate.
Transitioning from UIAppDelegate to UISceneDelegate
Example Code for extending UIAppDelegate
Header File:
//CustomAppDelegate.h

#import "VMAppDelegate.h"

NS_ASSUME_NONNULL_BEGIN

@interface CustomAppDelegate : VMAppDelegate

@end

NS_ASSUME_NONNULL_END
Implementation File:
//CustomAppDelegate.m
#import "CustomAppDelegate.h"

@implementation CustomAppDelegate

- (BOOL)application:(UIApplication *)application didFinishLaunchingWithOptions:(NSDictionary *)launchOptions {
    // Your existing App initialization logic
    return [super application:application didFinishLaunchingWithOptions:launchOptions];
}

- (void)applicationDidBecomeActive:(UIApplication *)application {
    // Your existing app becomes active logic
    [super applicationDidBecomeActive:application];
}

- (void)applicationWillResignActive:(UIApplication *)application {
    // Your existing app about to enter background logic
    [super applicationWillResignActive:application];
}

- (void)applicationDidEnterBackground:(UIApplication *)application {
    // Your existing app entered background logic
    [super applicationDidEnterBackground:application];
}

- (void)applicationWillEnterForeground:(UIApplication *)application {
    // Your existing app entering foreground logic
    [super applicationWillEnterForeground:application];
}

- (void)applicationWillTerminate:(UIApplication *)application {
    // Your existing app termination logic
    [super applicationWillTerminate:application];
}

@end
To migrate from extending UIAppDelegate to extending UISceneDelegate, modify the code as follows:
Header File:
//CustomSceneDelegate.h

#import <CoreComponent/VMSceneDelegate.h>

NS_ASSUME_NONNULL_BEGIN

@interface CustomSceneDelegate : VMSceneDelegate

@end

NS_ASSUME_NONNULL_END
Implementation File:
//CustomSceneDelegate.m

#import "CustomSceneDelegate.h"

@implementation SampleSceneDelegate

- (void)scene:(UIScene *)scene willConnectToSession:(UISceneSession *)session options:(UISceneConnectionOptions *)connectionOptions {
    // Your existing App initialization logic
    [super scene:scene willConnectToSession:session options:connectionOptions];
}

- (void)sceneDidBecomeActive:(UIScene *)scene{
    // Your existing app becomes active logic
    [super sceneDidBecomeActive:scene];
}

- (void)sceneWillResignActive:(UIScene *)scene{
    // Your existing app about to enter background logic
    [super sceneWillResignActive:scene];
}

- (void)sceneDidEnterBackground:(UIScene *)scene{
    // Your existing app entered background logic
    [super sceneDidEnterBackground:scene];
}

- (void)sceneWillEnterForeground:(UIScene *)scene {
    // Your existing app entering foreground logic
    [super sceneWillEnterForeground:scene];
}

@end
Configuring CustomSceneDelegate in info.plist
Select the KRelease target, open the Info.plist file, and update the UISceneDelegateClassName key with the value CustomSceneDelegate like this:
<key>UIApplicationSceneManifest</key>
<dict>
    <key>UIApplicationSupportsMultipleScenes</key>
    <true/>
    <key>UISceneConfigurations</key>
    <dict>
        <key>UIWindowSceneSessionRoleApplication</key>
        <array>
            <dict>
                <key>UISceneDelegateClassName</key>
                <string>CustomSceneDelegate</string> // Update here
                <key>UISceneClassName</key>
                <string>UIWindowScene</string>
            </dict>
        </array>
    </dict>
</dict>