Configuring Domino as an OIDC provider
To prepare a Domino server to be an OIDC identity provider, you must configure it in Domino's IdP Catalog application and in the Domino Directory's Internet Site document. You can then configure Domino as a clustered OIDC provider.
Information specific to this feature in Domino Early Access Drop 2 is also provided.
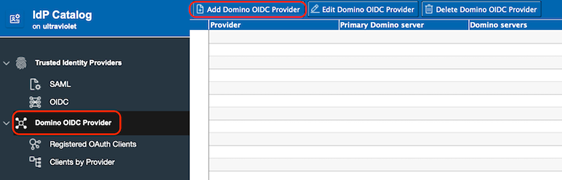
Create a Domino OIDC provider
- Open the IdP Catalog application (idpcat.nsf).
- Select the Domino OIDC Provider tab in the navigation,
and then click the Add Domino OIDC Provider button in the
header.
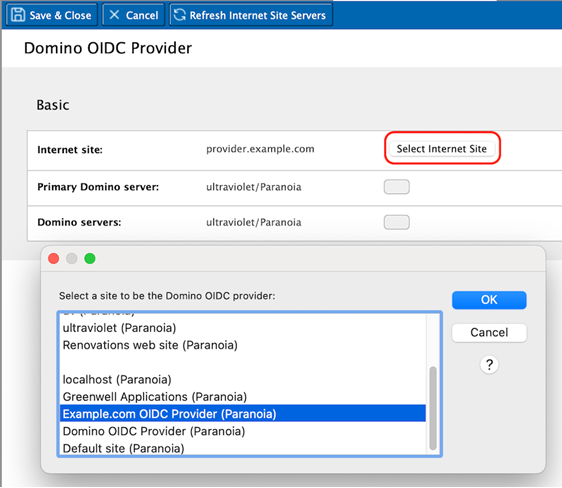
- Click Select Internet Site button beside the
Internet site field, and select the internet site
that will host the Domino OIDC provider. This will also pre-populate the Primary
Domino server and Domino servers fields.
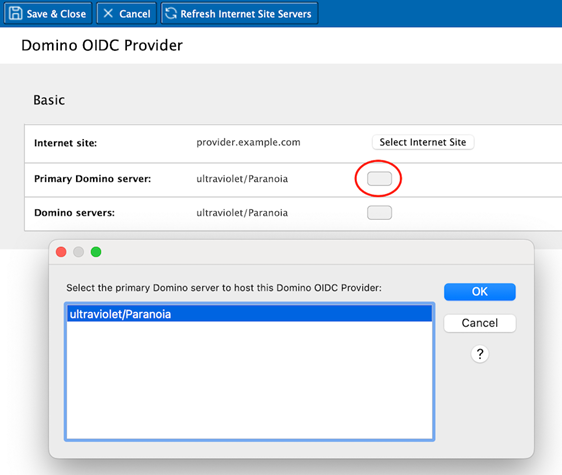
- If you want to change which Domino server will be the primary OIDC provider
server, click the button beside the Primary Domino server
field and select the desired server.
- If you want to change the set of Domino servers that will host the OIDC provider, click the button beside the Domino servers field and select the desired servers.
- Save and close the document.
Register a new OAuth client
- Open the IdP Catalog application (idpcat.nsf)
- Click the Registered OAuth Clients tab or the
Clients by Provider tab in the navigation, and
then click the Add OAuth Client button in the
header.
- Click the button beside the Domino OIDC provider
field and select the host name of the OIDC Provider that you just
created.
- Enter a user friendly (display) name for this client.
- Enter the OAuth client_id for this application. The client_id is required and is limited to the b64token / token68 character set. This permits alphanumeric characters, plus "-", ".", "_", "~", "+", and "/". The Domino OIDC provider supports client_ids up to 255 characters long. As of EAP Drop 2 there is no input validation for this field. A future EAP Drop might include input validation plus a method of randomly generating and auto-populating a valid client_id value.
- Client secret field:
- The Client secret basic option is the most widely supported authentication method. The Client secret basic and Client secret post options use password-equivalent values. For client_secret_basic and client_secret_post the client_secret is limited to the b64token / token68 character set. This permits alphanumeric characters, plus "-", ".", "_", "~", "+", and "/". The Domino OIDC Provider supports client secrets up to 255 characters long. As of EAP Drop 2 there is no input validation for this field. A future EAP Drop may include input validation plus a method of randomly generating and auto-populating a valid client_secret value.
- The Private key JWT option uses a PEM or JWK-encoded public key.
- In a later drop, the JWKS URI field shown in the following screenshot could be used to dynamically fetch the signing key from a client that exposes a jwks_uri endpoint.
Note: The numbering in the screenshot's callouts corresponds to the steps in this procedure. - Enter one or more allowed redirect URIs. For Domino's Web login with OIDC, this will consist of the base server URL (for example, https://www.renovations.com) plus the path component "/auth/protocol/oidc" as shown in the screenshot.
- Enter one or more allowed audience values. These will be application-specific. Applications requesting access tokens for use against Domino HTTP should include the Domino HTTP server's base URL (https://apps.renovations.com) in this list. When configuring Web federated login with OIDC, the first audience must be the ID vault server's Org name plus "-O=" plus the name of the ID vault. For example, with a vault server named ultraviolet/Paranoia and a vault named ParanoiaVault, the first audience value should be Paranoia-O=ParanoiaVault. See the doc for Web Federated Login with OIDC for more information on how to configure that feature.
- Enter one or more scope values. Unlike the other lists, this list must be separated by spaces. The "openid" scope is required for OIDC login, such as Domino's Web Login with OIDC feature. For Web Federated Login with OIDC, this list must include a specially constructed scope starting with "Domino.vault." and followed by the vault audience from step 8 above. For example, with a vault server named ultraviolet/Paranoia and a vault named ParanoiaVault, the list of scopes must include Domino.vault.Paranoia-O=ParanoiaVault. See Enabling Web federated login with OIDC for more information on how to configure that feature.
-
- The Require user consent field defaults to No for administrative consent, which is typical of a corporate environment. For external-facing applications where end users might want to approve or reject individual client applications themselves, set this value to Yes.
- If user consent is required, the Custom consent text field can be used to override the default text presented to the end user.
- Configure the JWS signing algorithms used for (a.) Access tokens and (b.) ID tokens . If an old OAuth client cannot verify the tokens issued by the Domino OIDC provider, setting one or both of these values to RS256 might work around that limitation.
- PKCE is a critical component of the security of OAuth and OIDC and is required by default. We highly recommend against making PKCE optional.
- Some authenticating proxies do not generate or use tokens of their own, but are capable of introspecting tokens passing through them to block unauthenticated traffic. These proxies can be configured as a registered OAuth client with Introspection only set to Yes in order to limit their access to the introspection endpoint.
- The lifetimes or durations of tokens issued by the Domino OIDC provider can be configured in the Maximum session lifetime field. Current security best practices call for using short-lived (5-15 minutes) access tokens. The maximum session lifetime setting configures the maximum amount of time that a client can remain authenticated before needing to acquire a new authorization grant. Setting this value to 0 allows unlimited duration sessions.
- Optional: Configure one or more URLs to which this OAuth client is allowed to redirect web browsers after logout from the logout (end_session) endpoint.
- Optional: Configure a single URI to which back-channel logout requests should be sent for this OAuth client.
- Optional: Configure CORS allowed web origins for this OAuth client.
- By default, the Domino OIDC provider's logout endpoint requires end-user verification of logout if a valid id_token_hint was not received, and does not require end-user verification if a valid id_token_hint was received. This drop-down can be used to require end-user verification even if a valid id_token_hint was received.
- Save and close the document.
Enabling the Domino OIDC Provider
- Open the Domino Directory (names.nsf).
- Open the Internet Site document for the site hosting the Domino OIDC provider.
- Under the Domino Web Engine tab and the HTTP
Sessions section, click the drop-down arrows next to
Session Authentication and select Single
Server, and then set all of the TLS-related options in that section
to Yes. The OIDC and OAuth specifications mandate use of TLS to
encrypt all network traffic. We also highly recommend setting the notes.ini
variable DominoSessionCookieUniqueName=1 to prevent clustered Domino servers
hosting the same website from over-writing each other's session cookies.
- On the Security tab, in the TCP Authentication section, set Redirect TCP to TLS to Yes and the other circled fields to No.
- In the TLS Authentication section, set
Anonymous to No and enable at least
one form of authentication to this internet site.
- On the Basics tab, click the drop-down next to the
Domino OIDC provider hostname field and select the
DNS hostname for the Domino OIDC provider. Setting this value to "None" and
rebooting the Domino HTTP task will disable the Domino OIDC provider.
- Save and close the document.
- Restart the Domino server.
Clustered provider configuration
Domino 14.5 EAP Drop 2 does not support dynamic configuration updates, so configuring
clustered OIDC providers requires a few extra steps:
- Start by performing all of the preceding configuration steps on the Domino server configured as the primary OIDC provider.
- Restart that Domino server, which causes it to read the new configuration, generate signing and encryption keys, and save them in idpcat encrypted for the list of configured OIDC provider servers.
- Replicate the idpcat and pubnames changes to the secondary OIDC provider servers.
- Restart each of those secondary OIDC provider servers so they will read the configuration and keys and enable the OIDC provider functionality.
Things to know /current limitations
- Anonymous access must be disabled on the internet site serving the OIDC provider.
- The Authorization Code flow with PKCE is the only authentication flow recommended by current security best practices, and as such it is the only flow supported by the Domino OIDC provider.
- Rotation of the OIDC provider's signing keys is not supported in 14.5 EAP Drop 2.
- Dynamic configuration updates are not supported in 14.5 EAP Drop 2; the Domino server will need to be restarted to read any configuration changes. In a clustered environment, the primary OIDC provider server should be restarted first, and then idpcat should be pushed from that server to the secondary OIDC provider servers before they are restarted.
- In a clustered environment, token revocation is local to each Domino server in 14.5 EAP Drop 2 and session state might not be completely retained across server restarts.
- There are a handful of notes.ini variables that can be used to enable tracing to track down issues, including DEBUG_OIDC_PROVIDER, DEBUG_OIDCP_CLIENT_CACHE, and DEBUG_OIDC_CONFIG. Setting these to a value of 1 should display only errors, and increasing that value will trace increasingly verbose information to the server console.