Deploying an HA Kubernetes platform
This guide describes how to use the kubeadm tool to set up a full highly available Kubernetes infrastructure for hosting all HCL Connections™ Component Pack services (Orient Me, Customizer and Elasticsearch).
Before you begin
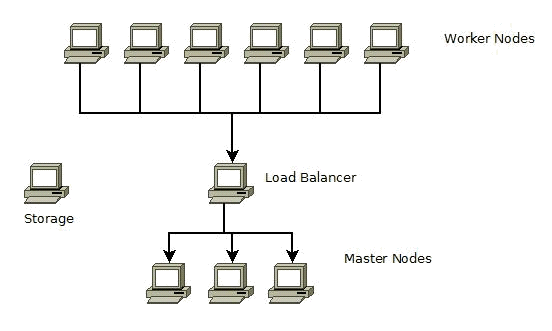
- Eleven machines running RHEL 7.6 or CentOS 7.6 (or later). See Component Pack installation roadmap and requirements for recommended specs.
1 load balancer / reverse proxy, 3 masters, 6 workers, and 1 dedicated storage. Three of the worker machines will be used as generic workers, and the other three as infrastructure workers (hosting only Elasticsearch pods). For simplicity, the three master machines will be referred to as master0, master1 and master2 throughout this guide.
- An unconfigured block device (for example, /dev/xvdf) must be set up on every master and worker node so that you can configure Docker with devicemapper direct-lvm mode.
- Yum must be working on all servers to install the required packages.
- SSH access from master0 to all nodes in the system.
- You must have sudo privileges on all servers.
- Full network connectivity must be configured between all servers in the cluster (can use either a public network or a private network).
- Each server must have a unique host name, MAC address, and product_uuid; see the Verify the MAC address and product_uuid are unique for every node section of the Kubernetes installation documentation for details.
- Required ports must be open on the servers, as described in Checking the ports, in the Kubernetes installation documentation.
About this task
The steps in this guide host the etcd cluster on the master nodes themselves. It is possible to host the etcd cluster on separate compute nodes (for better performance and hardware isolation); however that model is more expensive and requires an additional support burden.
- 6 worker nodes communicate with a Kubernetes master through the load balancer.
- The load balancer routes requests to the api-server onto a master node in round-robin fashion.
- The load balancer can also function as a reverse proxy server for the IBM Connections™ Customizer component.
Procedure
In this example, Calico is used as the Pod networking provider. If you run another networking provider, make sure to replace any default values as needed.
-
Install Docker on each server.
- If you are a Docker CE customer, it is recommended that you install/upgrade to 18.06.2+. This is due to the runc vulnerability: CVE-2019-5736 .
- If you are a Docker EE customer, it is recommended that you install/remain on 17.03.x.
Installing 18.06 CE (recommended):
The following commands will install Docker 18.06 CE and will disable the yum docker repository so that Docker will not be updated.
yum-config-manager --add-repo https://download.docker.com/linux/centos/docker-ce.repo
yum-config-manager --disable docker*
Yum-config-manager --enable docker-ce-stable
yum install -y --setopt=obsoletes=0 docker-ce-18.06*
yum makecache fast
sudo systemctl start docker
sudo systemctl enable docker.service
yum-config-manager --disable docker*
NB: If docker does not start, execute the command 'rm -rf /var/run/docker.sock' and rerun the command: 'sudo systemctl start docker'
Installing 17.03 (CE or EE):
The following commands will install Docker 17.03 CE and will disable the yum docker repository so that Docker will not be updated. If you have a Docker EE license, follow the instructions that come with that product instead.
yum-config-manager --add-repo https://download.docker.com/linux/centos/docker-ce.repo
yum-config-manager --disable docker*
yum-config-manager --enable docker-ce-stable
yum install -y --setopt=obsoletes=0 docker-ce-17.03*
yum makecache fast
sudo systemctl start docker
sudo systemctl enable docker.service
yum-config-manager --disable docker*
NB: If docker does not start, execute the command 'rm -rf /var/run/docker.sock' and rerun the command: 'sudo systemctl start docker'
-
Run the following commands on each of the Docker servers to ensure that the required
sysctl knobsetting, which controls kernel behavior, is set: (17.03 only - set by default with 18.06)echo 1 > /proc/sys/fs/may_detach_mounts echo fs.may_detach_mounts=1 > /usr/lib/sysctl.d/99-docker.conf -
Configure Docker with the devicemapper storage driver (direct-lvm).
Device Mapper is a kernel-based framework that underpins many advanced volume management technologies on Linux®. Docker’s devicemapper storage driver leverages the thin provisioning and snapshot capabilities of this framework for image and container management.
Production hosts using the devicemapper storage driver must use direct-lvm mode. This mode uses block devices to create the thin pool. This is faster than using loopback devices, uses system resources more efficiently, and block devices can grow as needed.
The following steps create a logical volume configured as a thin pool to use as backing for the storage pool. It assumes that you have a spare block device at /dev/xvdf.- Identify the block device you want to use.
The device is located under /dev/ (for example, /dev/xvdf) and needs enough free space to store the images and container layers for the workloads that the host runs. A solid state drive is ideal.
- Stop Docker by running the following command:
sudo systemctl stop docker - Install the following packages:
RHEL / CentOS: device-mapper-persistent-data, lvm2, and all dependencies
- Create a physical volume on your block device from step 1, using the
pvcreatecommand and substituting your device name for /dev/xvdf.Important: The next few steps are destructive, so be sure that you have specified the correct device.sudo pvcreate /dev/xvdf - Create a docker volume group on the same device, using the vgcreate
command:
vgcreate docker /dev/xvdf - Create two logical volumes named
thinpoolandthinpoolmetausing thelvcreatecommand.The last parameter specifies the amount of free space to allow for automatic expanding of the data or metadata if space runs low, as a temporary stop-gap. These are the recommended values.sudo lvcreate --wipesignatures y -n thinpool docker -l 95%VG sudo lvcreate --wipesignatures y -n thinpoolmeta docker -l 1%VG - Convert the volumes to a thin pool and a storage location for metadata for the thin pool, using
the
lvconvertcommand:sudo lvconvert -y \ --zero n \ -c 512K \ --thinpool docker/thinpool \ --poolmetadata docker/thinpoolmeta - Configure autoextension of thin pools using an lvm
profile:
sudo vi /etc/lvm/profile/docker-thinpool.profile - Specify
thin_pool_autoextend_thresholdandthin_pool_autoextend_percentvalues:thin_pool_autoextend_thresholdis the percentage of space used before lvm attempts to autoextend the available space (100 = disabled, not recommended).thin_pool_autoextend_percentis the amount of space to add to the device when automatically extending (0 = disabled).
The following example adds 20% more capacity when the disk usage reaches 80%:
activation {
  thin_pool_autoextend_threshold=80
  thin_pool_autoextend_percent=20
}
Save the file.
- Apply the lvm profile using the
lvchangecommand:sudo lvchange --metadataprofile docker-thinpool docker/thinpool - Enable monitoring for logical volumes on your
host:
sudo lvs -o+seg_monitorWithout this step, automatic extension does not occur even in the presence of the lvm profile.
- If you have ever run Docker on this host before, or if the /var/lib/docker/
directory exists, move the directory so that Docker can use the new lvm pool to store the contents
of image and
containers:
mkdir /var/lib/docker.bk
mv /var/lib/docker/* /var/lib/docker.bk
Note: If any of the following steps fail and you need to restore, you can remove /var/lib/docker and replace it with /var/lib/docker.bk. - Edit /etc/docker/daemon.json and configure the options needed for the
devicemapper storage driver. If the file was previously empty, it should now contain the following contents:
{ "storage-driver": "devicemapper", "storage-opts": [ "dm.thinpooldev=/dev/mapper/docker-thinpool", "dm.use_deferred_removal=true", "dm.use_deferred_deletion=true" ] } - Start Docker:
- systemd:
sudo systemctl start docker - service:
sudo service docker start
- systemd:
- Verify that Docker is using the new configuration using the
docker infocommand.If Docker is configured correctly, the Data file and Metadata file are blank, and the pool name is
docker-thinpool. - After you have verified that the configuration is correct, you can remove the
/var/lib/docker.bk directory which contains the previous
configuration:
rm -rf /var/lib/docker.bk
- Identify the block device you want to use.
-
Disable swap on each server.
On each of your servers, you must disable swap to ensure that the kubelet component functions correctly.
- Disable swap by running the following command:
swapoff -a - Edit the /etc/fstab file and comment out the following statement to ensure
that swap is not enabled after an operating system restart:
# /dev/mapper/rhel-swap swap
swap defaults 0 0
If the statement does not appear in the file, skip to step 5.
- If you made any changes to the /etc/fstab file, run the following command
to apply the change:
mount -a
- Disable swap by running the following command:
-
Install kubeadm, kubelet, and kubectl on each server.
On each server, you will install the following packages:
- kubeadm: the command to bootstrap the cluster
- kubelet: the component that runs on all of the machines in your cluster and manages tasks such as starting pods and containers
- kubectl: the command line utility used for communicating with the cluster
Install the packages by running the following commands:sudo bash -c 'cat << EOF > /etc/yum.repos.d/kubernetes.repo [kubernetes] name=Kubernetes baseurl=https://packages.cloud.google.com/yum/repos/kubernetes-el7-x86_64 enabled=1 gpgcheck=1 repo_gpgcheck=1 gpgkey=https://packages.cloud.google.com/yum/doc/yum-key.gpg https://packages.cloud.google.com/yum/doc/rpm-package-key.gpg exclude=kube* EOF' setenforce 0 yum install -y kubelet-1.11.9* kubeadm-1.11.9* kubectl-1.11.9* --disableexcludes=kubernetes systemctl enable kubelet && systemctl start kubeletNote: Thesetenforce 0command disables SELinux to allow containers to access the host file system (required by pod networks, for example). You must include this command until SELinux support is improved in the kubelet component.Ensure that the packages do not upgrade to a later version by running the following command to disable the kubernetes yum repo:yum-config-manager --disable kubernetes*Some users on RHEL/CentOS 7 have reported issues with traffic being routed incorrectly due to iptables being bypassed. To avoid this problem, run the following commands to ensure thatnet.bridge.bridge-nf-call-iptablesis set to 1 in your sysctl config:sudo bash -c 'cat << EOF > /etc/sysctl.d/k8s.conf net.bridge.bridge-nf-call-ip6tables = 1 net.bridge.bridge-nf-call-iptables = 1 EOF' sysctl --system -
Create the load balancer for kube-apiserver.
-
There are many applications and configurations for load balancing. The approach and application you wish to use depends on your environment needs.
-
The health check for an apiserver is a TCP check on the port the kube-apiserver listens on (default value :6443). The load balancer must be able to communicate with all master nodes on the apiserver port. It must also allow incoming traffic on its listening port.
-
After adding the first master node to the load balancer, a connection refused error is expected because the apiserver is not yet running. A timeout, however, means the load balancer cannot communicate with the master node. If a timeout occurs, reconfigure the load balancer to communicate with the master node
- Different services will require different ports to be open between the load balancer and all
masters. Configure the ports listed in Table 1 for the deployment you require:
Table 1. Ports to open between the load balancer and all masters for Orient Me Port Mode Service Stacks 30379 tcp haproxy-redis orientme, customizer 30301 tcp mw-proxy customizer 30099 tcp elasticsearch elasticsearch 32333 tcp kibana elasticstack 32080 tcp ingress (http) orientme, customizer, sanity
-
-
(Optional) Create SSH access.
To copy files between servers without being prompted for a password, you must enable SSH access for scp. This step is optional; however if you skip it, you will have to enter a password in later steps every time a file needs to be copied between servers.
- Generate some SSH keys for the servers by running the following command on master1 and
master2:
ssh-keygen -t rsa -b 4096 -C emailMake sure to replace
emailwith your email, a placeholder, or an empty string. Keep pressing Enter until files exist in the ~/.ssh directory. - Output the contents of the public key file for master1 and
master2:
cat ~/.ssh/id_rsa.pub - Copy the output for each, and paste it into master0’s
~/.ssh/authorized_keys file.
This will permit master1 and master2 to SSH in to master0.
- Generate some SSH keys for the servers by running the following command on master1 and
master2:
-
Bootstrap master0.
- On master0, create a kubeadm-config.yaml template file with the following
contents: The contents of the file will vary depending on whether or not you want to enable the
PodSecurityPolicy admission plugin. Refer to Pod Security Policies.
To enable the PodSecurityPolicy admission plugin, create the file with the following contents:
cat >kubeadm-config.yaml <<EOF
apiVersion: kubeadm.k8s.io/v1alpha2
kind: MasterConfiguration
apiServerExtraArgs:
  enable-admission-plugins: PodSecurityPolicy
kubernetesVersion: v1.11.9
apiServerCertSANs:
- "LOAD_BALANCER_DNS"
api:
    controlPlaneEndpoint: "LOAD_BALANCER_DNS:6443"
etcd:
  local:
    extraArgs:
      listen-client-urls: "https://127.0.0.1:2379,https://master0_ip_address:2379"
      advertise-client-urls: "https://master0_ip_address:2379"
      listen-peer-urls: "https://master0_ip_address:2380"
      initial-advertise-peer-urls: "https://master0_ip_address:2380"
      initial-cluster: "master0_hostname=https://master0_ip_address:2380"
    serverCertSANs:
     - master0_hostname
      - master0_ip_address
    peerCertSANs:
      - master0_hostname
      - master0_ip_address
networking:
    # This CIDR is a Calico default. Substitute or remove for your CNI provider.
    podSubnet: "192.168.0.0/16"
EOF
If you do not want to enable the PodSecurityPolicy admission plugin, create the file with the following contents:
cat >kubeadm-config.yaml <<EOF
apiVersion: kubeadm.k8s.io/v1alpha2
kind: MasterConfiguration
kubernetesVersion: v1.11.9
apiServerCertSANs:
- "LOAD_BALANCER_DNS"
api:
    controlPlaneEndpoint: "LOAD_BALANCER_DNS:6443"
etcd:
  local:
    extraArgs:
      listen-client-urls: "https://127.0.0.1:2379,https://master0_ip_address:2379"
      advertise-client-urls: "https://master0_ip_address:2379"
      listen-peer-urls: "https://master0_ip_address:2380"
      initial-advertise-peer-urls: "https://master0_ip_address:2380"
      initial-cluster: "master0_hostname=https://master0_ip_address:2380"
    serverCertSANs:
      - master0_hostname
      - master0_ip_address
    peerCertSANs:
      - master0_hostname
      - master0_ip_address
networking:
    # This CIDR is a Calico default. Substitute or remove for your CNI provider.
    podSubnet: "192.168.0.0/16"
EOF
Replace the following variables in the file:LOAD_BALANCER_DNS-- Replace with the DNS name of the load balancermaster0_ip_address-- Replace with the IPv4 of master0master0_hostname-- Replace with the value that is output on master0 when you run thehostnamecommand
- On master0, run the
kubeadm initcommand:kubeadm init --config=kubeadm-config.yaml - As instructed by the output of the kubeadm init command, run the following
commands:
mkdir -p $HOME/.kube sudo cp -i /etc/kubernetes/admin.conf $HOME/.kube/config sudo chown $(id -u):$(id -g) $HOME/.kube/config - Make a record of the
kubeadm joincommand that kubeadm init outputs. You need this command to join nodes to your cluster in a later step.
- On master0, create a kubeadm-config.yaml template file with the following
contents: The contents of the file will vary depending on whether or not you want to enable the
PodSecurityPolicy admission plugin. Refer to Pod Security Policies.
-
If you enabled the PodSecurityPolicy admission plugin in the previous step,
then you need to download the Component Pack installation zip to master0, extract the file
privileged-psp-with-rbac.yaml and apply it so that system pods are able to
start in the kube-system namespace:
unzip -p IC-ComponentPack-6.0.0.8.zip microservices_connections/hybridcloud/support/psp/privileged-psp-with-rbac.yaml > privileged-psp-with-rbac.yaml kubectl apply -f privileged-psp-with-rbac.yaml -
Copy required files to the other masters.
The following certificates and other required files were created when you ran kubeadm init on master0. Copy these files to the other masters by running the following commands on both master1 and master2, where
master0-ip-addresscorresponds to the public or private IPv4 of master0mkdir -p /etc/kubernetes/pki/etcd scp root@master0-ip-address:/etc/kubernetes/pki/ca.crt /etc/kubernetes/pki scp root@master0-ip-address:/etc/kubernetes/pki/ca.key /etc/kubernetes/pki scp root@master0-ip-address:/etc/kubernetes/pki/sa.key /etc/kubernetes/pki scp root@master0-ip-address:/etc/kubernetes/pki/sa.pub /etc/kubernetes/pki scp root@master0-ip-address:/etc/kubernetes/pki/front-proxy-ca.crt /etc/kubernetes/pki scp root@master0-ip-address:/etc/kubernetes/pki/front-proxy-ca.key /etc/kubernetes/pki scp root@master0-ip-address:/etc/kubernetes/pki/etcd/ca.crt /etc/kubernetes/pki/etcd scp root@master0-ip-address:/etc/kubernetes/pki/etcd/ca.key /etc/kubernetes/pki/etcd scp root@master0-ip-address:/etc/kubernetes/admin.conf /etc/kubernetes mkdir -p $HOME/.kube sudo cp -i /etc/kubernetes/admin.conf $HOME/.kube/config sudo chown $(id -u):$(id -g) $HOME/.kube/config -
Add master1.
- On master1, create a new kubeadm-config.yaml. The contents of the file will
vary depending on whether or not you want to enable the PodSecurityPolicy
admission plugin. Refer to Pod Security Policies.
To enable the PodSecurityPolicy admission plugin, create the file with the following contents:
If you do not want to enable the PodSecurityPolicy admission plugin, create the file with the following contents:cat >kubeadm-config.yaml <<EOF apiVersion: kubeadm.k8s.io/v1alpha2 kind: MasterConfiguration kubernetesVersion: v1.11.9 apiServerExtraArgs: enable-admission-plugins: PodSecurityPolicy apiServerCertSANs: - "LOAD_BALANCER_DNS" api: controlPlaneEndpoint: "LOAD_BALANCER_DNS:6443" etcd: local: extraArgs: listen-client-urls: "https://127.0.0.1:2379,https://master1_ip_address:2379" advertise-client-urls: "https://master1_ip_address:2379" listen-peer-urls: "https://master1_ip_address:2380" initial-advertise-peer-urls: "https://master1_ip_address:2380" initial-cluster: "master0_hostname=https://master0_ip_address:2380,master1_hostname=https://master1_ip_address:2380" initial-cluster-state: existing serverCertSANs: - master1_hostname - master1_ip_address peerCertSANs: - master1_hostname - master1_ip_address networking: # This CIDR is a calico default. Substitute or remove for your CNI provider. podSubnet: "192.168.0.0/16" EOFcat >kubeadm-config.yaml <<EOF apiVersion: kubeadm.k8s.io/v1alpha2 kind: MasterConfiguration kubernetesVersion: v1.11.9 apiServerCertSANs: - "LOAD_BALANCER_DNS" api: controlPlaneEndpoint: "LOAD_BALANCER_DNS:6443" etcd: local: extraArgs: listen-client-urls: "https://127.0.0.1:2379,https://master1_ip_address:2379" advertise-client-urls: "https://master1_ip_address:2379" listen-peer-urls: "https://master1_ip_address:2380" initial-advertise-peer-urls: "https://master1_ip_address:2380" initial-cluster: "master0_hostname=https://master0_ip_address:2380,master1_hostname=https://master1_ip_address:2380" initial-cluster-state: existing serverCertSANs: - master1_hostname - master1_ip_address peerCertSANs: - master1_hostname - master1_ip_address networking: # This CIDR is a calico default. Substitute or remove for your CNI provider. podSubnet: "192.168.0.0/16" EOFReplace the following variables in the file:LOAD_BALANCER_DNS-- Replace with the DNS name of the load balancermaster0_ip_address-- Replace with the IPv4 of master0master0_hostname-- Replace with the value that is output on master0 when you run thehostnamecommandmaster1_ip_address-- Replace with the IPv4 of master1master1_hostname-- Replace with the value that is output on master1 when you run thehostnamecommand
- On master1, run the
kubeadm phasecommands to bootstrap the kubelet:kubeadm alpha phase certs all --config kubeadm-config.yaml kubeadm alpha phase kubelet config write-to-disk --config kubeadm-config.yaml kubeadm alpha phase kubelet write-env-file --config kubeadm-config.yaml kubeadm alpha phase kubeconfig kubelet --config kubeadm-config.yaml systemctl daemon-reload systemctl start kubelet - On master1, set the following environment variables in preparation for running the command to
add the node to the etcd
cluster:
export MASTER0_IP=master0_ip_address
export MASTER0_HOSTNAME=master0_hostname
export MASTER1_IP=master1_ip_address
export MASTER1_HOSTNAME=master1_hostname
export KUBECONFIG=/etc/kubernetes/admin.conf
Replace the following variables in the commands:master0_ip_address-- Replace with the IPv4 of master0master0_hostname-- Replace with the value that is output on master0 when you run thehostnamecommandmaster1_ip_address-- Replace with the IPv4 of master1master1_hostname-- Replace with the value that is output on master1 when you run thehostnamecommand
Run the following commands to add the node to the etcd cluster:
This command causes the etcd cluster to become unavailable for a brief period, after the node is added to the running cluster, and before the new node is joined to the etcd cluster.kubectl exec -n kube-system etcd-${MASTER0_HOSTNAME} -- etcdctl --ca-file /etc/kubernetes/pki/etcd/ca.crt --cert-file /etc/kubernetes/pki/etcd/peer.crt --key-file /etc/kubernetes/pki/etcd/peer.key --endpoints=https://${MASTER0_IP}:2379 member add ${MASTER1_HOSTNAME} https://${MASTER1_IP}:2380 kubeadm alpha phase etcd local --config kubeadm-config.yaml - On master1, deploy the control plane components and mark the node as a
master:
kubeadm alpha phase kubeconfig all --config kubeadm-config.yaml
kubeadm alpha phase controlplane all --config kubeadm-config.yaml
kubeadm alpha phase mark-master --config kubeadm-config.yaml
- On master1, create a new kubeadm-config.yaml. The contents of the file will
vary depending on whether or not you want to enable the PodSecurityPolicy
admission plugin. Refer to Pod Security Policies.
-
Add master2.
- On master2, create a new kubeadm-config.yaml template file. The contents of
the file will vary depending on whether or not you want to enable the
PodSecurityPolicy admission plugin. Refer to Pod Security
Policies.
If you do not want to enable the PodSecurityPolicy admission plugin, create the file with the following contents:cat >kubeadm-config.yaml <<EOF apiVersion: kubeadm.k8s.io/v1alpha2 kind: MasterConfiguration apiServerExtraArgs: enable-admission-plugins: PodSecurityPolicy kubernetesVersion: v1.11.9 apiServerCertSANs: - "LOAD_BALANCER_DNS" api: controlPlaneEndpoint: "LOAD_BALANCER_DNS:6443" etcd: local: extraArgs: listen-client-urls: "https://127.0.0.1:2379,https://master2-ip-address:2379" advertise-client-urls: "https://master2_ip_address:2379" listen-peer-urls: "https://master2_ip_address:2380" initial-advertise-peer-urls: "https://master2_ip_address:2380" initial-cluster: "master0_hostname=https://master0_ip_address:2380,master1_hostname=https://master1_ip_address:2380,master2_hostname=https://master2_ip_address:2380" initial-cluster-state: existing serverCertSANs: - master2_hostname - master2_ip_address peerCertSANs: - master2_hostname - master2_ip_address networking: # This CIDR is a calico default. Substitute or remove for your CNI provider. podSubnet: "192.168.0.0/16" EOFcat >kubeadm-config.yaml <<EOF apiVersion: kubeadm.k8s.io/v1alpha2 kind: MasterConfiguration apiServerExtraArgs: enable-admission-plugins: PodSecurityPolicy kubernetesVersion: v1.11.9 apiServerCertSANs: - "LOAD_BALANCER_DNS" api: controlPlaneEndpoint: "LOAD_BALANCER_DNS:6443" etcd: local: extraArgs: listen-client-urls: "https://127.0.0.1:2379,https://master2-ip-address:2379" advertise-client-urls: "https://master2_ip_address:2379" listen-peer-urls: "https://master2_ip_address:2380" initial-advertise-peer-urls: "https://master2_ip_address:2380" initial-cluster: "master0_hostname=https://master0_ip_address:2380,master1_hostname=https://master1_ip_address:2380,master2_hostname=https://master2_ip_address:2380" initial-cluster-state: existing serverCertSANs: - master2_hostname - master2_ip_address peerCertSANs: - master2_hostname - master2_ip_address networking: # This CIDR is a calico default. Substitute or remove for your CNI provider. podSubnet: "192.168.0.0/16" EOFReplace the following variables in the file:LOAD_BALANCER_DNS-- Replace with the DNS name of the load balancermaster0_ip_address-- Replace with the IPv4 of master0master0_hostname-- Replace with the value that is output on master0 when you run thehostnamecommandmaster1_ip_address-- Replace with the IPv4 of master1master1_hostname-- Replace with the value that is output on master1 when you run thehostnamecommandmaster2_ip_address-- Replace with the IPv4 of master2master2_hostname-- Replace with the value that is output on master2 when you run thehostnamecommand
- On master2, run the
kubeadm phasecommands to bootstrap the kubelet:kubeadm alpha phase certs all --config kubeadm-config.yaml kubeadm alpha phase kubelet config write-to-disk --config kubeadm-config.yaml kubeadm alpha phase kubelet write-env-file --config kubeadm-config.yaml kubeadm alpha phase kubeconfig kubelet --config kubeadm-config.yaml systemctl daemon-reload systemctl start kubelet - On master2, set the following environment variables in preparation for running the command to
add the node to the etcd
cluster:
export MASTER0_IP=master0_ip_address
export MASTER0_HOSTNAME=master0_hostname
export MASTER2_IP=master2_ip_address
export MASTER2_HOSTNAME=master2_hostname
export KUBECONFIG=/etc/kubernetes/admin.conf
Replace the following variables in the commands:master0_ip_address-- Replace with the IPv4 of master0master0_hostname-- Replace with the value that is output on master0 when you run thehostnamecommandmaster2_ip_address-- Replace with the IPv4 of master2master2_hostname-- Replace with the value that is output on master2 when you run thehostnamecommand
Run the following commands to add the node to the etcd cluster:
This command causes the etcd cluster to become unavailable for a brief period, after the node is added to the running cluster, and before the new node is joined to the etcd cluster.kubectl exec -n kube-system etcd-${MASTER0_HOSTNAME} -- etcdctl --ca-file /etc/kubernetes/pki/etcd/ca.crt --cert-file /etc/kubernetes/pki/etcd/peer.crt --key-file /etc/kubernetes/pki/etcd/peer.key --endpoints=https://${MASTER0_IP}:2379 member add ${MASTER2_HOSTNAME} https://${MASTER1_IP}:2380 kubeadm alpha phase etcd local --config kubeadm-config.yaml - On master2, deploy the control plane components and mark the node as a
master:
kubeadm alpha phase kubeconfig all --config kubeadm-config.yaml
kubeadm alpha phase controlplane all --config kubeadm-config.yaml
kubeadm alpha phase mark-master --config kubeadm-config.yaml
- On master2, create a new kubeadm-config.yaml template file. The contents of
the file will vary depending on whether or not you want to enable the
PodSecurityPolicy admission plugin. Refer to Pod Security
Policies.
-
Install a pod network add-on so that your pods can communicate with each other.
The network must be deployed before any applications. An internal helper service, kube-dns, will not start up before a network is installed. As mentioned already, Calico is the network add-on chosen in this guide. The version of Calico is v3.3. To install Calico, run the following commands on all masters:
kubectl apply -f https://docs.projectcalico.org/v3.3/getting-started/kubernetes/installation/hosted/rbac-kdd.yaml kubectl apply -f https://docs.projectcalico.org/v3.3/getting-started/kubernetes/installation/hosted/kubernetes-datastore/calico-networking/1.7/calico.yaml -
Join your worker nodes to the cluster.
The worker nodes are where your workloads (containers and pods, etc) run. From each worker node, run the command that was output by kubeadm init command. For example:
kubeadm join --token Token Master_IP_address:Master_Port --discovery-token-ca-cert-hash sha256:HashThe output looks like the following snippet:
[preflight] Running pre-flight checks... (log output of join workflow) ...Node join complete:* Certificate signing request sent to master and response received.* Kubelet informed of new secure connection details.Run 'kubectl get nodes' on the master to see this machine join.A few seconds later, you will see this node in the output when you run the
kubectl get
nodes
command on master0. -
Control your cluster from the worker nodes.
To get kubectl on the worker nodes to talk to your cluster, copy the administrator kubeconfig file from master0 to your workers by running the following commands on every worker:
mkdir -p $HOME/.kube scp root@master-ip-address:$HOME/.kube/config $HOME/.kube sudo chown $(id -u):$(id -g) $HOME/.kube/config -
Install Helm.
Helm is the Kubernetes package manager that is required for installing IBM Connections™ Component Pack services. Helm version 2.11.0 is the recommended version for Kubernetes v1.11. To install Helm, run the following commands on each master:
wget https://storage.googleapis.com/kubernetes-helm/helm-v2.11.0-linux-amd64.tar.gz tar -zxvf helm-v2.11.0-linux-amd64.tar.gz sudo mv linux-amd64/helm /usr/local/bin/helm helm init kubectl create clusterrolebinding add-on-cluster-admin --clusterrole=cluster-admin --serviceaccount=kube-system:default sudo rm -f helm-v2.11.0-linux-amd64.tar.gz -
Verify the deployment.
To verify that the Kubernetes deployment is fully functional and ready to host services, run the following command on any master and make sure that all pods are listed as "Running":
kubectl get pods -n kube-systemIf you encounter problems with kubeadm, consult the "Troubleshooting kubeadm" section of the Kubernetes Setup documentation.