JSON and XML formats are supported by default by the HCL Commerce REST framework. You can extend the default JAX-RS
resource handlers to customize REST services to support new custom
response formats.
Before you begin
Ensure that you are aware of the following assumptions
for this customization scenario:
- The new custom response format is of type
application/custom+xml for
the default com.ibm.commerce.rest.search.handler.ProductViewHandler
resource handler class.
- The following URL pattern is used:
- store/storeID/productview/partNumber
For example, http://host_name/wcs/resources/store/10101/productview/MW-0090
- The
application/custom+xml response format is
the same as the custom XML format. However, for the purposes of this
customization scenario, it is referred to as the custom response format.
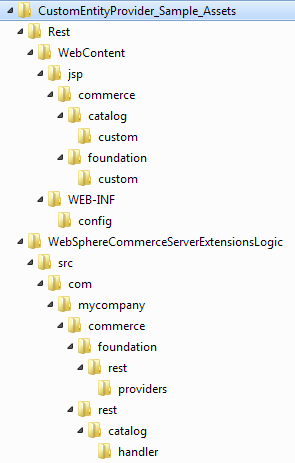
The following sample code archive illustrates the tasks described in this topic
CustomEntityProvider_Sample_Assets. The sample code archive contains the following directory
structure:
Procedure
- Open HCL Commerce Developer and switch to the Enterprise Explorer
view.
-
Add an entity provider to support the custom response format:
Each entity provider formats an entity into a specific response format. Since the customization
is about adding a response format, a new entity provider must be added to format the entity in the
new custom response format.
-
In the WebSphereCommerceServerExtensionsLogic project, create a class that is called
com.mycompany.commerce.foundation.rest.providers.CustomXMLEntityProvider that
extends com.ibm.commerce.foundation.rest.providers.AbstractEntityProvider.
-
Add the following annotation in the
entity class to register the entity
provider for the application/custom+xml response format in the JAX-RS run
time:
@Produces(value = { "application/custom+xml" })
For
more information, see the provided sample class. The sample class contains inline comments to help
you implement the entity provider.
-
Save your changes and close the file.
-
Add the entity provider class name in the
Rest/WebContent/WEB-INF/config/providers-ext.properties file to register the new
entity provider.
-
Save your changes and close the file.
-
Add a response format shortcut for the custom response format or use Accept HTTP request
header:
Response format shortcuts are requested media type shortcuts that can be easily specified by a
client in the request URL as a query parameter. You add a response format shortcut for your new
custom response format application/custom+xml, by creating the file if it does not exist. Otherwise,
you add the custom format shortcut.
-
Create the following file
Rest/WebContent/WEB-INF/config/com.ibm.commerce.rest-ext/wc-rest-responseformat.xml
-
Add a shortcut for the
"application/custom+xml" response format to the file as
shown in the following code snippet.
<responseFormatMappings>

  <!-- Define response format and Internet media type mapping. -->
  <!-- Internet media type was originally called a MIME type. -->
  <!-- When default attribute is defined to true, the response format is the default format -->

  <formatMapping responseFormat="custom" mediaType="application/custom+xml"/>

</responseFormatMappings>
-
Save your changes and close the file.
If a response format shortcut is not specified, you can specify the response format that uses the
Accept HTTP request header, instead of using the responseFormat query parameter. In the Accept
request header, you must specify the response format in the full form, for example
application/custom+xml. However, using Accept request header requires the following steps to extend
the existing REST resource handler. To simplify the procedure, it is recommended that you add a
custom response format shortcut to
wc-rest-responseFormat.xml so that a client
can use the responseFormat query parameter to get the custom response format:
- In the WebSphereCommerceServerExtensionsLogic project, create a new
com.mycompany.commerce.rest.catalog.handler.ProductViewHandlerExt class that extends
com.ibm.commerce.rest.search.handler.ProductViewHandler.
- In the ProductViewHandlerExt class, ensure that you add the same Path annotation that exists in
the super class. This ensures that when the default URL is invoked, the custom resource handler
ProductViewHandlerExt is used instead of the default resource handler. Overwrite the
findProductByPartNumber super class method with the following
content:
@GET
@Path("{partNumber}")
@Produces( { "application/json", "application/xml", "application/custom+xml" })// additionally add custom response format
@Override
public Response findProductByPartNumber(
@PathParam("storeId") String storeId,
@PathParam("partNumber") String partNumber,
@QueryParam(value = "responseFormat") String responseFormat)
{
// write custom logic here
return super.findProductByPartNumber(storeId, partNumber, responseFormat);
}
For
more information, see the sample class provided in the CustomEntityProvider_Sample_Assets archive.
The sample class contains inline comments that help you extend the default resource
handler.
- Implement a new JSP file to format the data objects into
the custom response format:
JSP files can be used to
format an entity. See com.ibm.commerce.foundation.rest.providers.AbstractEntityProvider for
more information. In this customization, JSP files are used due to
the dynamic nature of the custom XML format.
- Create a new JSP file to format the data object in the
following location:
- Rest/WebContent/jsp/commerce/catalog/custom/SerializeShowCatalogNavigationViewDataAreaTypeCustom.jsp
The JSP file coding guideline is identical to the storefront
JSP files that format a data object. The JSP file can include other
JSP fragments, such as SerializeShowCatalogEntryViewCustom.jspf, which
formats parts of the noun in the data object. See the provided sample
JSP files for more information.
- Save your changes and close the file.
- Add a struts action in the
Rest/WebContent/WEB-INF/struts-extension.xml struts
file to register the JSP. For example:
<action path="/ShowCatalogNavigationViewCustom/0"
forward="/jsp/commerce/catalog/custom/SerializeShowCatalogNavigationViewDataAreaTypeCustom.jsp"/>
Note: The struts action format must match the formatting
group name that is returned in the custom
ProductViewHandlerExt resource
handler. See the
IResourceHandler interface for more information.
When you launch the default URL indicating the
application/custom+xml custom
response format:
- http://localhost/wcs/resources/store/10101/productview/MW-0090?responseFormat=custom
It runs
/jsp/commerce/catalog/custom/SerializeShowCatalogNavigationViewDataAreaTypeCustom.jspWhich
formats the
ShowCatalogNavigationViewDataAreaType data object in the
application/custom+xml custom format.
- Save your changes and close the file.
- Implement a new error JSP file for the custom response
format:
In case of any errors, the REST framework runs
an error JSP file specific to the response format, passing the error
parameters.
-
Create a JSP file to format the error response in the following location
Rest/WebContent/jsp/commerce/foundation/custom/Error.jsp
- Save your changes and close the file.
-
Add a struts action in the
Rest/WebContent/WEB-INF/struts-extension.xml struts
file to register the JSP.
<action path="/ErrorCustom/0" forward="/jsp/commerce/foundation/custom/Error.jsp"/>
Note: The struts action format must match the formatting group name that is returned in the custom
ProductViewHandlerExt resource handler.
When you launch the default URL indicating the
application/custom+xml custom
response format:
- http://localhost/wcs/resources/store/10101/productview/MW-0090?responseFormat=custom
It runs:
- /Rest/WebContent/jsp/commerce/foundation/custom/Error.jsp in the case of any errors or
exceptions.
Which formats the
Error parameters that are passed to the error JSP file in
the
application/custom+xml custom format.
-
Verify your customization by restarting the HCL Commerce server and starting the URLs
created in this task.