Deploying HCL Commerce Version 9 on Kubernetes
This sample solution illustrates how to deploy an HCL Commerce Version 9 environment based on Helm Charts on Kubernetes, or IBM Cloud Private (ICP).
- The environment that you create should not be used for a live
production site without further consideration toward
security hardening, load balancing, ingress routing, and
performance tuning. To operate HCL Commerce
Version 9.1 in a live production environment, you must
commit further time and resources to both performance and
security considerations.
With load balancing and ingress routing specifically, you can configure which services you want to expose externally, and restrict the remaining services within the cluster network. This configuration limits their access from and exposure to the wider Internet.
Before you begin
Starting from Version 9, HCL Commerce has been separated into different application services. These services are running within Docker containers. By leveraging the Kubernetes and Helm Charts based technology, the deployment process for HCL Commerce containers is significantly simplified.
This sample solution is provided as is and is meant to be used as a reference. Learn how you can use Helm Charts to deploy an HCL Commerce runtime system that includes an authoring environment and a live environment. For more information about the servers and interactions between an authoring and live environment, see HCL Commerce runtime environment overview.
To quickly deploy HCL Commerce Version 9 on Kubernetes, it is suggested that you use IBM Cloud Private, which includes all necessary components for deploying HCL Commerce Version 9 on Kubernetes. However, you can also set up all necessary components on Kubernetes manually. Details will be illustrated in the following sections.
Before you customize the source script for your own purposes or even create your own Helm Charts and customize the deployment logic, it is highly recommended that you review the deployment script that is embedded in the sample package while you complete the procedure. This reference solution will not cover the advanced topics regarding how to customize the reference deployment package.
- Prepare the hardware. To deploy HCL Commerce Version 9, the minimum hardware requirements
are the following:
Table 1. Node type Quantity Requirement per node Master node 1 4 CPU; 8 GB memory Subordinate node 2 4 CPU; 8 GB memory - Prepare a Kubernetes environment.
- If you are going to use ICP, refer to Installing IBM Cloud Private for the detailed steps.
Note: The tested steps are created based on ICP 2.1.0.3 Cloud Native Edition. If you are using any other ICP versions, this procedure is provided for your reference only.
- If you are going to start deploying a new Kubernetes environment, you need to:
- Install Kubernetes version 1.27 to 1.28. For more information, see Creating a single master cluster with kubeadm.
- Deploy an Ingress resource for load balancing. Record the IP address of the node on which the ingress-lb is deployed. You will need the IP address later. For more information, see NGINX Ingress Controller for Kubernetes
- If you are going to use ICP, refer to Installing IBM Cloud Private for the detailed steps.
- Prepare the Helm and kubectl clients.
- Locate the master node of Kubernetes or ICP. kubectl should be already on this node.
- Run the following command to validate both the Kubernetes server and client:
The following are returned if the Kubernetes server and client are installed successfully:#kubectl version[root@svt100 ~]# kubectl version Client Version: version.Info{Major:"1", Minor:"7+", GitVersion:"v1.7.3-11+f747daa02c9ffb", \ GitCommit:"f747daa02c9ffba3fabc9f679b5003b3f7fcb2c0", GitTreeState:"clean", \ BuildDate:"2017-08-28T07:04:45Z", GoVersion:"go1.8.3", Compiler:"gc", Platform:"linux/amd64"} Server Version: version.Info{Major:"1", Minor:"8", GitVersion:"v1.8.3+icp+ee", \ GitCommit:"5bf8ff102c9cd883604f1902d01745c73b44fe6c", GitTreeState:"clean", \ BuildDate:"2017-12-12T23:16:45Z", GoVersion:"go1.8.3", Compiler:"gc", Platform:"linux/amd64"}Note: ICP environment has predefined context configuration. The token for the context expires everyday. If you encounter authentication error while you run kubectl or Helm, follow these steps to refresh the token:- Open the ICP admin portal: https://masterNodeIP: 8443/console/
- Click
- Execute the following commands in your terminal window, in the environment where kubectl is
installed.
kubectl config set-cluster mycluster.icp --server=https://9.112.226.101:8001 --insecure-
kubectl config set-context mycluster.icp-context --cluster=mycluster.icp
kubectl config set-credentials admin --token=eyJhbGciOiJSUzI1NiJ9.eyJzdWIiOkJhZG1pt
kubectl config set-context mycluster.icp-context --user=admin --namespace=default
kubectl config use-context mycluster.icp-context
- Download Helm 3.13+ from https://github.com/helm/helm/releases.
- Unpack the Helm client with the following
command:
tar –zxvf Helm-vx.x.x-linux-amd64.tgz - Locate the Helm binary in the unpacked directory, and move it to the desired
destination:
mv unpacked-directory/linux-amd64/helm /usr/local/bin/helm - If you are not using IBM Cloud Private, install the Helm server with the following
command:
#helm init - Run the following command to validate both the Helm server and Helm
client:
The following is returned if Helm server and Helm client are installed successfully:#helm version[root@svt100 ~]# Helm version Client: &version.Version{SemVer:"v2.6.0", \ GitCommit:"5bc7c619f85d74702e810a8325e0a24f729aa11a", GitTreeState:"clean"} Server: &version.Version{SemVer:"v2.6.0", \ GitCommit:"5bc7c619f85d74702e810a8325e0a24f729aa11a", GitTreeState:"clean"}
- Download the appropriate Helm Chart package before deployment. HCL Commerce is
delivered and refreshed the configurations in a monthly basis. To ensure a success deployment,
choose the appropriate Helm Chart package according to your application version. Note: Ensure that you deploy the Helm Chart under the default namespace on Kubernetes.
Table 2. Release Helm Chart packages and assets 9.0.0.0 only WCSV9_HelmChartsDeploy.zip Download and extract this ZIP onto the machine that has kubectl and Helm client installed. The ZIP includes the following packages:
Package Name Purpose Vault Deploy Package. To deploy Vault and Consul which used as CA to issue certification to container internal communication and as Configuration Center to store environment related data WCSV9Auth Helm Package. To deploy Commerce V9 Auth environment WCSV9Live Helm Package. To deploy Commerce V9 Live environment init-wcs-1.4.zip This image is used as an initial container to control the HCL Commerce Docker container start up sequence. For this sample solution, it is used to demonstrate how to check the Version 9 Docker container status to ensure that they start in the correct order.
9.0.0.1 to 9.0.1.8 WCSV9_HelmChartsDeploy_advanced.zip Download and extract WCSV9_HelmChartsDeploy_Advance.zip onto the machine that has kubectl and Helm client installed. The ZIP includes the following packages:
Package name Purpose Vault Deploy Package. To deploy Vault and Consul which used as CA to issue certification to container internal communication and as Configuration Center to store environment related data. WCSV9 Helm Package. To deploy HCL Commerce Version 9 environment (Auth and Live Helm Chart have been integrated). SupportContainer_2.0.0.tar.gz This image is used as an initial container (
init-container) to control the HCL Commerce Docker container startup sequence. For this sample solution, it is used to demonstrate how to check the Version 9 Docker container status to ensure that they start in the correct order.9.0.1.9 or higher WCSV9_HelmChartsDeploy_advanced_9019.zip Important: This is a sample file, and must be customized to suit your environment.Download and extract WCSV9_HelmChartsDeploy_Advance_9019.zip onto the machine that has kubectl and Helm client installed. The ZIP includes the following packages:
Package name Purpose HCL Commerce Version 9.0.1.9 Helm Package. To deploy HCL Commerce Version 9 environment (Auth and Live Helm Chart have been integrated). Vault Deploy Package. To deploy Vault and Consul which used as CA to issue certification to container internal communication and as Configuration Center to store environment related data. SupportContainer_2.0.0.tar.gz This image is used as an initial container (
init-container) to control the HCL Commerce Docker container startup sequence. For this sample solution, it is used to demonstrate how to check the Version 9 Docker container status to ensure that they start in the correct order.9.0.1.10 or higher commerce-helmchart-9.0.1.10.zip Important: This is a sample file, and must be customized to suit your environment.Download and extract commerce-helmchart-9.0.1.10.zip onto the machine that has kubectl and Helm client installed. The ZIP includes the following packages:
Package name Purpose HCL Commerce Version 9.0.1.10 Helm Package. To deploy HCL Commerce Version 9 environment (Auth and Live Helm Chart have been integrated). Vault Deploy Package. To deploy Vault and Consul which used as CA to issue certification to container internal communication and as Configuration Center to store environment related data. SupportContainer_2.0.0.tar.gz This image is used as an initial container (
init-container) to control the HCL Commerce Docker container startup sequence. For this sample solution, it is used to demonstrate how to check the Version 9 Docker container status to ensure that they start in the correct order.9.0.1.11 or higher commerce-helmchart-9.0.1.11.zip Important: This is a sample file, and must be customized to suit your environment.Download and extract commerce-helmchart-9.0.1.11.zip onto the machine that has kubectl and Helm client installed. The ZIP includes the following packages:
Package name Purpose HCL Commerce Version 9.0.1.11 Helm Package. To deploy HCL Commerce Version 9 environment (Auth and Live Helm Chart have been integrated). Vault Deploy Package. To deploy Vault and Consul which used as CA to issue certification to container internal communication and as Configuration Center to store environment related data. SupportContainer_2.0.0.tar.gz This image is used as an initial container (
init-container) to control the HCL Commerce Docker container startup sequence. For this sample solution, it is used to demonstrate how to check the Version 9 Docker container status to ensure that they start in the correct order. - Load the Docker image to your private Docker Repository.
- Download the server containers (such as
ts-app,search-app, andcrs-app) and utility container (ts-utils). For details, see Downloading HCL Commerce software. - Download the init container docker image:
- Version 9.0.0.0: init-wcs-1.4.zip
- Version 9.0.0.1 or higher: SupportContainer_2.0.0.tar.gz
Note: This image is used as an initial container to control the HCL Commerce Docker container start up sequence. For this sample solution, it is used to demonstrate how to check the Version 9 Docker container status to ensure that they are started in the correct order. - Run the following commands to load the docker images to your private docker repository:
docker load -i docker image tar file. For example:docker load -i SupportContainer_2.0.0.tar.gzdocker image tag SOURCE_IMAGE:[:TAG] TARGET_IMAGE[:TAG]. For example:docker image tag supportcontainer:2.0.0 \ <repository host name>/commerce/supportcontainer:2.0.0docker push TARGET_IMAGE[:TAG]. For example:docker push repository host name/commerce/supportcontainer:2.0.0
Note: Ensure that the Docker images in your private Docker Repository can be pulled on all Kubernetes or ICP node.
- Download the server containers (such as
- Because the deployment logic is to talk with a preinstalled Db2 Server for both authoring and
live environments, you need to prepare IBM Db2 Server for use with HCL Commerce. It is
recommended to set up one database for the authoring environment and one database for the live
environment.
- Install IBM Db2 Version 11.1.2.2 or higher to serve as your database.
- Prepare a database for use with HCL Commerce. You need to use a script to prepare a database for use with HCL Commerce.
- Load the HCL Commerce
database schema. You need to use DB utility to load the HCL Commerce database
schema.Note: When you run the initdb_database_sample.bat/sh script, ensure that you also publish the sample data.
- Record the following parameters that you have used in step c.Important: The parameters will be used in a subsequent step. Make sure you record them.
- The plain-text merchant key that is generated when you initialized the database. You will need to encrypt the key later.
- The
wcsadminPassword. You need this password to access Management Center and access the store front age (the default user is wcsadmin). - The plain-text spiuser password you used to initialize the Db2 instance. You will need to encrypt the password later.
About this task
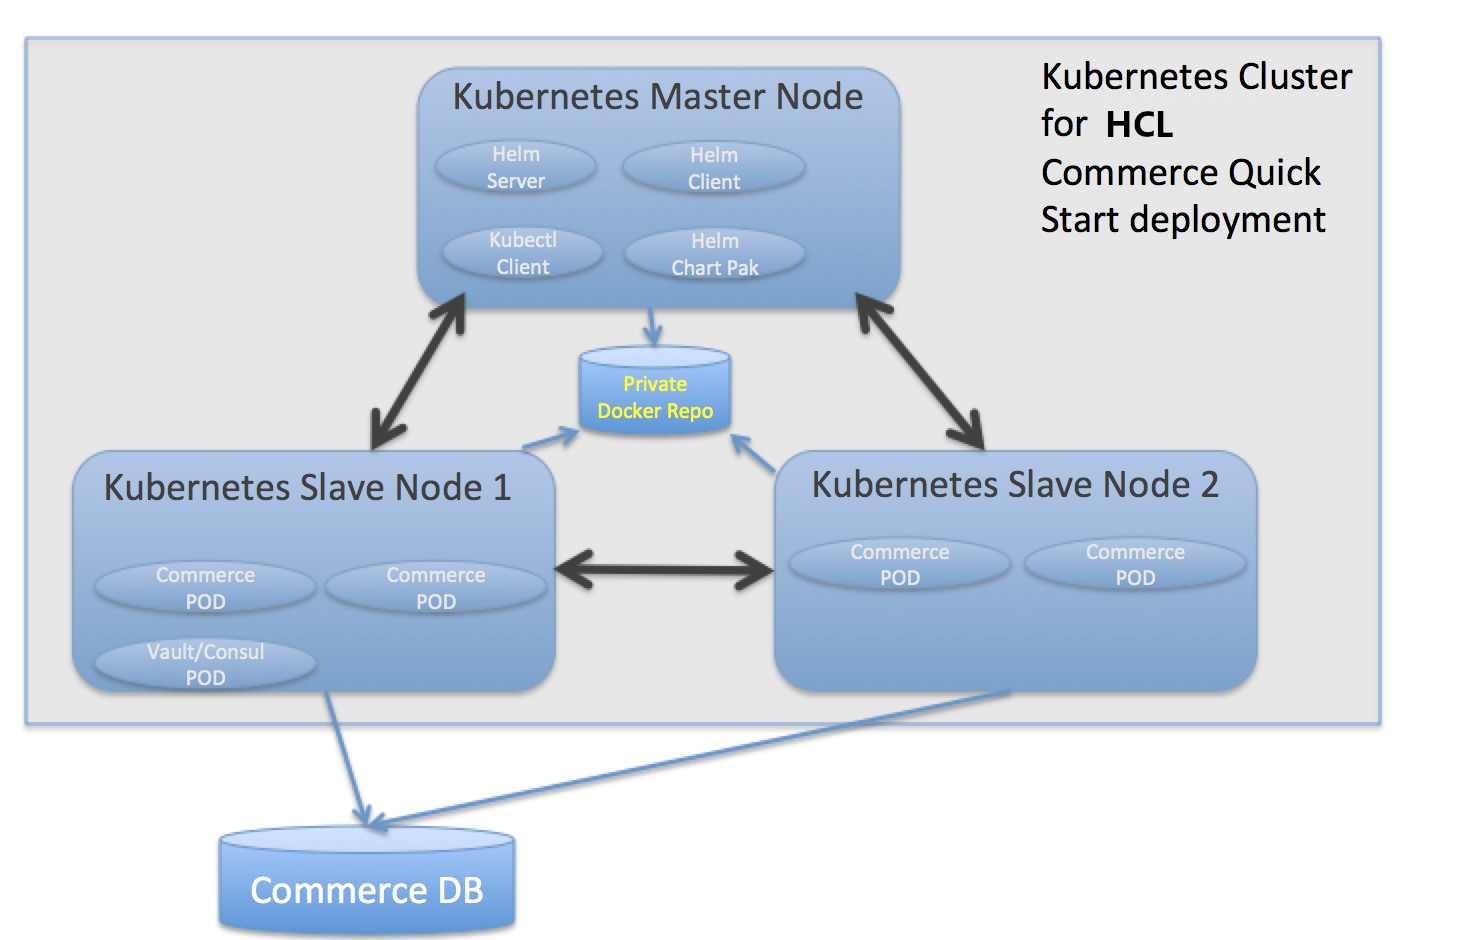
Before you start your journey to deploy an HCL Commerce version 9 environment using Helm Chart on top of a Kubernetes-based infrastructure, you should spend some time to get yourself familiar with Kubernetes or IBM Cloud Private (ICP) and HCL Commerce Version 9.
This sample solution illustrates how to deploy an HCL Commerce Version 9 environment based on Helm Charts on Kubernetes (or ICP). Sample code with predefined configurations and internal connections information can further simplify your trial experience. Use this sample as a reference to deploy your own environment on Kubernetes. Note that this article is only for your reference. You need to consider your real-life requirements when you plan and design the production environment.
Procedure
-
Deploy and initiate the Vault and Consul servers.
Vault and Consul are used as the Certificate Authority (CA) to issue certificates to containers for internal communication, and as the Configuration Center to store environment related data. For more information, see Environment data structure in Vault.
The recommended version of Vault is 1.14.4.
- Create SSL certificates for exposed services.Note: This step is for HCL Commerce 9.0.0.0 only. If you are deploying HCL Commerce V9.0.0.1 or higher, ignore this step.
Create certificates to access Management Center and your store over secured ports with the following steps:
- Go to the WCSV9_HelmChartsDeploy
Package/WCSV9Auth/secret directory and run the following commands:
kubectl create secret tls authtls-certificate --key authtls.key --cert authtls.crt kubectl create secret generic authtls-dhparam --from-file=authtls_public_key.pem - Go to the WCSV9_HelmChartsDeploy
Package/WCSV9Live/secret directory and run the following commands:
kubectl create secret tls livetls-certificate –key livetls.key --cert livetls.crt
kubectl create secret generic livetls-dhparam --from-file=livetls_public_key.pem
- Go to the WCSV9_HelmChartsDeploy
Package/WCSV9Auth/secret directory and run the following commands:
- Prepare encrypted passwords.You will need the encrypted passwords when deploying HCL Commerce.The values of the following parameters are to be encrypted in this step:
- spiuser_name
- spiuser_password
- merchantKey
To encrypt passwords:
- Launch the Utility server Docker container with the following command:
docker run –d –e LICENSE=accept utilities docker images - Log onto the Utility server Docker container to run HCL Commerce utilities with
the following command:
docker exec –it utilities container /bin/bash - For 9.0.0.1 or higher, encrypt the SPIUser password with the wcs_encrypt
utility:
cd /opt/WebSphere/CommerceServer90/bin/ ./wcs_encrypt.sh spiuser_passwordNote:- For 9.0.0.0, follow Setting the spiuser password in your Docker images to reset spiuser password by rebuilding the Docker image.
- For more information about wcs_encrypt utility, see Using wcs_encrypt.sh.
- Encrypt the Merchant key with the KeyEncryptionKey by using the
wcs_encrypt
utility.
./wcs_encrypt.sh merchantKey KeyEncryptionKeyFor example:
./wcs_encrypt.sh 1a1a1a1a1a1a1a1a2b2b2b2b2b2b2b2b 1234567890abcdef1234567890abcdefNote: You can find the KeyEncryptionKey.xml file in the /opt/WebSphere/AppServer/profiles/default/installedApps/localhost/ts.ear/xml/config/ directory. - Encode the spiuser name and spiuser password in Base64 by piping them into the Base64 system
utility with the echo system
utility:
echo –n “spiuser_namename:spiuser_password” | base64
- Deploy HCL Commerce.
- Verify the deployment of the HCL Commerce environmentComplete the following steps to verify that you HCL Commerce is deployed successfully:
- Ensure that you can log on to Management Center with the following steps:
- Go to https://cmc.demoqaauth.hcl.com/lobtools/cmc/ManagementCenter, and login with user name wcsadmin and the password that you used when you load the HCL Commerce database schema. If you forget the password of user wcsadmin, refer to Resetting the wcsadmin to reset the password. user password
- Go to https://accelerator.demoqaauth.hcl.com/webapp/wcs/tools/servlet/ToolsLogon?XMLFile=common.mcLogon and log in as user wcsadmin to access Commerce Accelerator.
- Go to https://admin.demoqaauth.hcl.com/webapp/wcs/admin/servlet/ToolsLogon?XMLFile=adminconsole.AdminConsoleLogon and log in as user wcsadmin to access Administration Console.
- Go to https://org.demoqaauth.hcl.com/webapp/wcs/orgadmin/servlet/ToolsLogon?XMLFile=buyerconsole.BuyAdminConsoleLogon and log in as user wcsadmin to access Organization Administration Console.
- Log into the following URL to verify that the Aurora sample store works:
– Authoring: https://store.demoqaauth.hcl.com/wcs/shop/en/auroraesite
– Live: https://store.demoqalive.hcl.com/wcs/shop/en/auroraesite
- Ensure that you can log on to Management Center with the following steps:
- Troubleshoot the deployment.Note: Read the following only when you encounter errors during deployment.
Issue Solution If you see the following error message:
set DOMAIN_NAME from OS environment parameter.use domain name:
default.svc.cluster.local.Vault returned errors when trying to generate
a certificate: [ “no handler for route
‘selfserve_production_pki/issue/generate-cert'”
It means your vault PKI was not set correctly so that the PKI on vault was not enabled.
Fix the errors during deploying deploy_vault.sh and run deploy_vault.sh again.
Failed to deploy HCL Commerce. Perform the following steps:
- Get the pod list with the following command:
#kubectl get pod
- Get the pod detail status with the following command and locate the pod with errors:
#kubectl describe <pod_name>
- Check the logs of the pod with errors and fix the errors:
#kubectl logs <pod_name> -f
- Run the following command to get the helm release:
helm list
- Delete the helm release with the following command:
helm delete –purge <helm_release>
For example:
helm delete –purge demoauth
- Run the helm deployment command again.
502 or 503 error code is displayed when you access the HCL Commerce V9 environment through Ingress with the dedicated hostname. Your ingress version is higher than our tested version. Follow these steps:
1. In WCSV9/Template/ingress.yaml, update
ingress.kubernetes.io/secure-backends: “true”tonginx.ingress.kubernetes.io/secure-backends: “true”.2. Delete the annotation configuration in ingress-lb-controller pod by following Enable Ingress Controller to use a new annotation prefix.
- Get the pod list with the following command:
The following information is for reference only.
Exposed services (Load balance)
The Helm package creates an Ingress record to expose services. The ingress-lb should be deployed as host mode on a dedicated Kubernetes node. In this sample solution, we have exposed all the HCL Commerce tools. To access HCL Commerce tools and services, bind the following domain names with the IP address of the node where Ingress is deployed. By doing this, you can share the same Ingress-lb with different domain names.
The helm chart in this topic will expose the following hostnames:
- cmc.demoqaauth.hcl.com: To access Management Center in the authoring environment
- cmc.demoqalive.hcl.com: To access Management Center in the live environment
- accelerator.demoqaauth.hcl.com: To access Commerce Accelerator in the authoring environment
- accelerator.demoqalive.hcl.com: To access Commerce Accelerator in the live environment
- admin.demoqaauth.hcl.com: To access Administration Console in the authoring environment
- admin.demoqalive.hcl.com: To access Administration Console in the live environment
- org.demoqaauth.hcl.com: To access Organization Administration Console in the authoring environment
- org.demoqalive.hcl.com: To access Organization Administration Console in the live environment
- store.demoqaauth.hcl.com: To access the Aurora sample store in the authoring environment
- store.demoqalive.hcl.com: To access the Aurora sample store in the live environment
- tsapp.demoqaauth.hcl.com: To trigger build index
- searchrepeater.demoqalive.hcl.com: To trigger search index replication
- search.demoqaauth.hcl.com: To check build index status
For example, after you add the following mapping to the host file:
<Ingress_IP> cmc.demoqaauth.hcl.com
You can access Management Center in the authoring environment with the following URL:
https://cmc.demoqaauth.hcl.com/lobtools/cmc/ManagementCenter
To access services through load balance, ensure to use the HTTPS protocol.
The sample code configures the TLS protocol in Ingress for access to Management Center and your store. Those Ingress configurations are bundled with the Kubernetes Secret through certifications. The common name in the certification matches the domain name that is configured in Ingress.
Internal services (Service discovery and Service register)
The Docker containers deployed by this package leverages Kubernetes Service to implement service discovery and service access.
Internal service enables SSL connection on the HCL Commerce foundation layer. It verifies the request domain name. To simplify SSL configuration, HCL Commerce supports resetting the certification dynamically. Using Vault and Consul is the default solution. Thus, in this package the Vault and Consul deployment packages are also provided.
HCL Commerce requires the environment to be organized in a three level hierarchy (Group /Environment / Environment Type). With this model, you can easily identify one environment. For example, Group=demo Environment=qa Environment Type= auth.
HCL Commerce supports retrieving environment-related configuration values from a remote configuration center, as long as the data is organized with the three-tier model. In this package, we configure each container with this model. All pre-defined environment values will be loaded to Vault when you initialize Vault and Consul with the /HelmChats/Vault/Vault_Consul/vault.sh script.