Creating REST services for the custom Project and Project Collection nouns
In this lesson, you create and test REST services for both the Project and Project Collection nouns. Use the Java Emitter Template (JET) RESTful Resource pattern to generate source code files that you can use to create your REST services. To use this pattern, you must create a pattern input file that contains the information that is required to generate the source code files.
About this task
The JET RESTful Resource pattern generates Java classes that retrieve feeds from web services for a specific URL. To generate these files, you must create a pattern input file that contains specifications that are required for retrieving the feed. One Java class generates the REST service for the Project noun, and the other Java class generates the REST service for the ProjectCollection noun.
For information about the JET RESTful Resource pattern, see Creating and customizing REST services using the BOD mapping framework.
Procedure
- Start WebSphere Commerce Developer.
-
Create an XML file to use as a pattern input file for the JET Transformation.
The pattern input XML file that you create is used by the JET Transformation to
create the REST services source code files by using the properties and
attributes that you specify within the file.
- Right-click the WebSphereCommerceServerExtensionsLogic project within the Enterprise Explorer view. Select New > File.
-
In the New File wizard, enter a File
name for the pattern input XML file.
For example, RESTPattern.xml.
- Click Finish.
- Right-click your new pattern input XML file. Select Open With > XML Editor.
-
Copy the following code into the file:
<?xml version="1.0" encoding="UTF-8"?> <rest componentName="Project" internal="false" packageNamePrefix="com.mycompany.commerce" projectName="WebSphereCommerceServerExtensionsLogic"> <noun defaultAccessProfile="MyCompany_Store_Summary" name="Project" pluralNounName="Project" resourceName="Project"> <findBy accessProfile="MyCompany_Store_Summary" expression='/Project[ProjectIdentifier[(UniqueID={0})]]' name="ProjectId"/> </noun> <noun defaultAccessProfile="MyCompany_Store_Details" name="ProjectCollection" pluralNounName="ProjectCollection" resourceName="ProjectCollection"> <findBy accessProfile="MyCompany_Store_Details" expression='/ProjectCollection[ProjectCollectionIdentifier[(UniqueID={0})]]' name="ProjectCollectionId"/> </noun> </rest> - Save and close the file.
-
Use the JET Transformation to generate the source code files for creating your
REST services.
- Right-click the RESTPattern.xml pattern input XML file and click validate. Ensure that there are no errors.
- Right-click the RESTPattern.xml pattern input XML file and select Run as > Run Configurations.
- In the Run Configurations wizard, double-click JET Transformation from the list of filters. The configuration options for the JET Transformation display.
- Ensure that the value of the Name field is the name of your pattern input XML file.
- In the Main tab, ensure that the value of the Transformation Input field is the file path within your workspace to the pattern input XML file.
- In the Transformation section, select com.ibm.commerce.toolkit.internal.pattern.rest for the value of the ID field.
- Click Apply > Run. The JET Transformation generates the file directories and files for your REST services.
-
Verify that the JET Transformation created the following directories and output
files within the WebSphereCommerceServerExtensionsLogic
project.
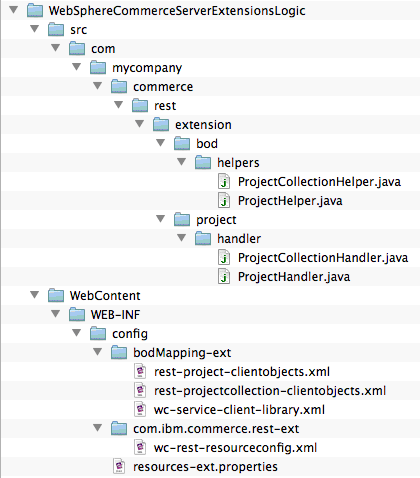
- All resource helper classes are generated under the src folder within the {package}.rest.extension.bod.helpers package. These helper utility classes are used to make the OAGIS calls and get the data area for constructing the response.
- All resource handler classes are generated under the src folder within the {package}.rest.extension.{resource}.handler package. These classes are used to provide RESTful services to retrieve the noun details.
- All BOD mapping XML files are generated within the WebContent\WEB-INF\config\bodMapping-ext folder. These configuration files are used to transform data between a BOD noun and REST data.
- The service client library XML file is generated within the WebContent\WEB-INF\config\bodMapping-ext folder. This XML file defines the document root factory, class, methods, noun index suffix, and action expression suffix for a noun so that REST services can automatically create a BusinessObjectDocument.
- The resource properties file is generated within the WebContent\WEB-INF\config folder. This file contains the file path to the resource handler class, for instance, {package}.rest.extension.project.handler.ProjectHandler
- The resource configuration XML file is generated within the WebContent\WEB-INF\config\{package}.rest-ext folder. This XML file defines the OAGIS services that are related to the configuration data for rest services
-
Copy the generated Java files for the Project and Project Collection nouns to
the appropriate locations within the REST project.
REST services use the Rest.war/WEB-INF/config/bodMapping and bodMapping-ext directories to locate the rest-resourceName-clientobjects.xml file. If an XML file is not included within one of these directories, the REST services do not load the file.
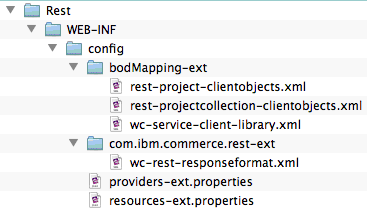
- Copy the bodMapping-ext and com.ibm.commerce.rest-ext directories from the WebSphereCommerseServerExtensionsLogic\WebContent\WEB-INF\config directory.
-
Add the directories to the
Rest\WebContent\WEB-INF\config directory.
The Business Object Document (BOD) mapping is used to map the BOD noun attributes to XPath queries. REST services are built on top of OAGIS services, which requires that each REST resource is mapped to a BOD noun. An XML configuration file is provided to transform data between a BOD noun and REST data. The REST services framework then uses this configuration file to generate REST response data from a BOD object or construct a BOD object from REST request data. The following sample code shows an example of the BOD mapping of the REST resources to a BOD noun.
<!-- BOD mapping -->
<_config:URLParameter name="ProjectId" nounElement="/ProjectIdentifier/UniqueID" key="true" return="true" />
<_config:URLParameter name="tool" nounElement="/Tool" key="false" return="true" />
<_config:URLParameter name="name" nounElement="/ProjectIdentifier/ExternalIdentifier/Name" key="false" return="true" />
<_config:URLParameter name="time to complete" nounElement="/TimeToComplete" key="false" return="true" />
<_config:URLParameter name="difficulty" nounElement="/Difficulty" key="false" return="true" />
<_config:URLParameter name="material" nounElement="/Material" key="false" return="true" />
<_config:URLParameter name="collection" nounElement="/Collection" key="false" return="true" />
<_config:URLParameter name="description" nounElement="/Description" key="false" return="true" />
<_config:URLParameter name="instructions/description" nounElement="/Instruction/ProjectInstructionDescription/value" key="false" return="true" />
<_config:URLParameter name="instructions/sequence" nounElement="/Instruction/displaySequence" key="false" return="true" />
For more information about the BOD mapping, see Mapping REST resources to Business Object Document (BOD) nouns.
- Copy the resources-ext.properties file from the WebSphereCommerseServerExtensionsLogic\WebContent\WEB-INF\config directory.
-
Merge the copied file with the
resources-ext.properties file that is in the
Rest\WebContent\WEB-INF\config directory.
Your Rest\WebContent\WEB-INF\config directory can resemble the following image.
- Right-click the WebSphereCommerseServerExtensionsLogic project and add the Recipe Projects to the build path to clear up any compilation errors.
-
Test your customization of RESTful Services to ensure that you can retrieve
data. To test the customization, you must invoke the URI for the newly added
resource handler class. The structure of the URI can be determined by looking at
the generated configuration file,
wc-rest-resourceconfig.xml, that is within the
Rest\WebContent\WEB-INF\config\com.ibm.commerce.rest-ext
folder.
- Restart the WebSphere Commerce Test Server.
-
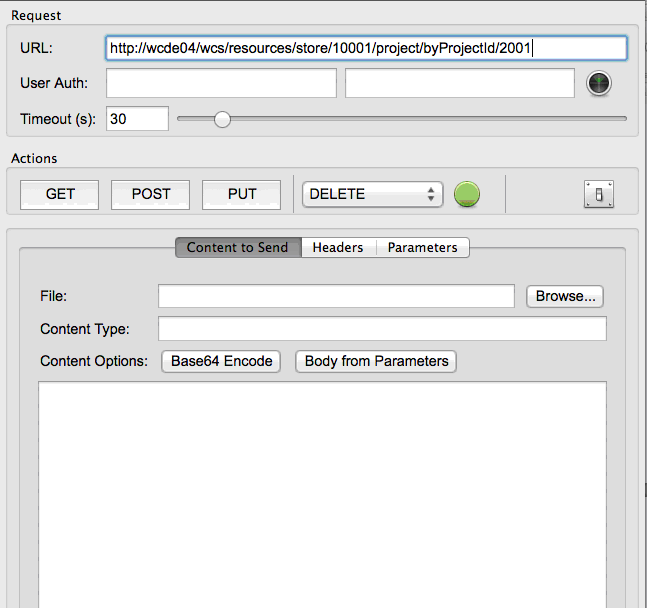
Open Poster for Firefox and enter the URL for both the Project and
Project Collection.
For example,
- Project
URL
https://localhost/wcs/resources/store/{storeId}/project/byProjectId/{projectId}
- Project Collection
URL
https://localhost/wcs/resources/store/{storeId}projectcollection/byProjectCollectionId/{projectcollectionid}
- Project
URL
-
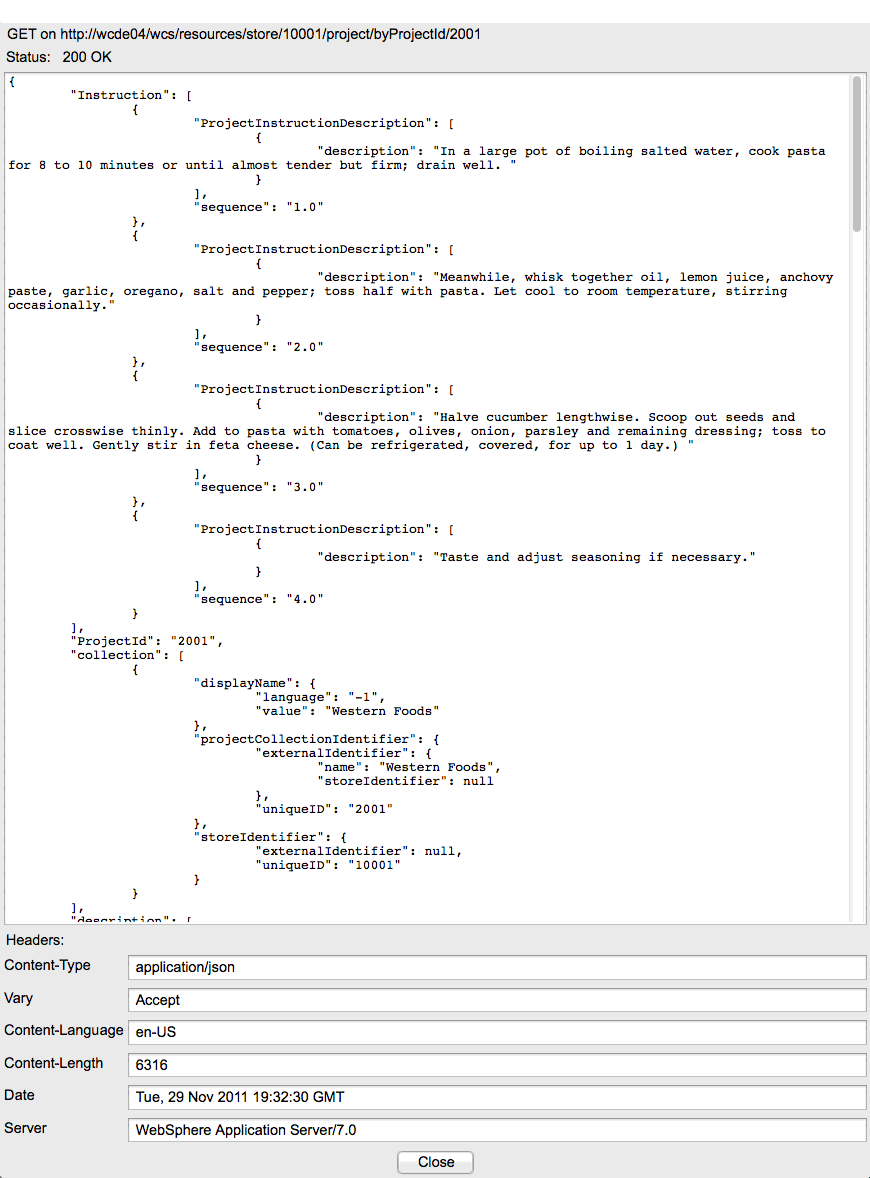
Ensure that the URL returns data for the project and displays
Status: 200 OK.


