You need to configure the following files to update an existing
environment to use IBM SDK, Java Technology Edition, Version 8.
Important: If you need to continue to receive support for
WebSphere Application Server, you must upgrade to WebSphere Application Server to version 8.5.5 with
Java 8. Earlier versions of WebSphere Application Server are no longer supported. You can only
update to use IBM SDK, Java Technology Edition Version 8 if your existing WebSphere Commerce runtime
instance is on WebSphere Commerce version 7 Feature Pack 6, 7, or 8, and has Fix Pack 9 installed.
For information about updating to Feature Pack 8, see
Installing WebSphere Commerce feature packs.
Procedure
-
Back up your current WebSphere Application Server profile.
-
Create a temporary directory to store the back up files. This directory is called
backup_dir in the remaining steps.
-
Open a command line interface.
-
Go to the WAS8_installdir/bin directory.
-
Run the following command.
WASPreUpgrade.cmd <backup_dir> <WAS7_installdir>
-
Update configuration files and property files in the your WebSphere Commerce Developer
workspace.
-
Drop the existing WebSphere Application Server profile.
- Open the profileRegistry.xml file. For
example,
oldRAD_installdir\runtimes\base_v7\properties\profileRegistry.xml
- Copy the name value. For example, WCDE_E~1_072526
- Go to oldRAD_installdir/runtimes/base_v7/bin.
- Run the following command to delete the
profile.
manageprofiles.bat -delete -profileName <name>
-
Delete the existing WCDE_installdir/wasprofile
directory.
The wasprofile directory will be recreated during the
setup.bat command that you run later.
-
Open the WCDE_installdir/bin/setenv.bat file.
-
Update the following configurations.
set RAD_HOME=<RAD9_installdir>
set WAS_HOME=<WAS8_installdir>
call setshortname WAS_HOME <WAS8_installdir>
- RAD9_installdir
- The directory where you installed Rational Application Developer Version 9.5.0.x. For example,
C:\IBM\SDP95.
- WAS8_installdir
- The directory where you installed WebSphere Application Server Version 8.5.5.x. For example,
C:\IBM\WebSphere\AppServer.
-
Open the WCDE_installdir/setup/base.prefs file.
-
Set the following configurations to 1.8.
/instance/org.eclipse.jdt.core/org.eclipse.jdt.core.compiler.codegen.targetPlatform=1.8
/instance/org.eclipse.jdt.core/org.eclipse.jdt.core.compiler.compliance=1.8
/instance/org.eclipse.jdt.core/org.eclipse.jdt.core.compiler.source=1.8
-
Open the WCDE_installdir/setup/setup.xml file.
-
Change the name of the
configureJRE task to WebSphere Application
Server v8.0 JRE, as seen in the following example.
<configureJRE id="commerce.jre"
       name="WebSphere Application Server v8.0 JRE"
       installLocation="${was_home}/java/jre"
       default="false"
    />
- Remove the existing createServer tasks from the
configureServer target.
- Add the createWSRuntime and
createWSServer tasks to the configureServer target, as
seen in the following example.
<target name="configureServer" unless="profileExists">
<createWSRuntime typeId="com.ibm.ws.ast.st.runtime.v85" path="${was_home}"
  name="WebSphere Commerce Runtime" />
<createWSServer name="WebSphere Commerce Test Server" typeId="com.ibm.ws.ast.st.v85.server.base"
  runtimeId="com.ibm.ws.ast.st.runtime.v85">
<property name="webSphereProfileName" value="${profile.name}" />
<property name="isRunServerWithWorkspaceResources" value="true" />
<property name="isZeroBinaryEnabled" value="true" />
<property name="isOptimiziedForDevelopmentEnv" value="true" />
<property name="isOptimiziedForDevelopmentEnv" value="true" />
<property name="isHotMethodReplace" value="true" />
<property name="isUTCEnabled" value="true" />
<property name="auto-publish-setting" value="1" />
<property name="serverOrbBootstrapPortNum" value="2809" />
<property name="serverSoapConnectorPortNum" value="8880" />
<property name="start-timeout" value="600" />
</createWSServer>
<deleteServer name="WebSphere Application Server v6.0" failonerror="false" />
<deleteServer name="WebSphere Application Server v6.1" failonerror="false" />
<deleteServer name="WebSphere Application Server v7.0 at localhost" failonerror="false" />
</target>
-
Remove the following two copy tasks.
<copy file="${wctoolkit}/workspace/WC/xml/config/wc-server.xml.template"
            tofile="${wctoolkit}/workspace/WC/xml/config/wc-server.xml"
            filtering="true"
            overwrite="yes"/>
    <copy file="${wctoolkit}/setup/ToolkitModuleConfig.xml.template"
            tofile="${wctoolkit}/workspace/WC/xml/config/ToolkitModuleConfig.xml"
            filtering="true"
            overwrite="yes" />
-
Remove setupCloudscape tasks.
<!-- configure for cloudscape -->
	<antcall target="setupCloudscape" />
-
Move <!-- build the workspace --> task after the
“configureServer” task.
<!-- create a new server configuration -->
    <antcall target="configureServer" />
<!-- build the workspace -->
    <ejbDeploy EJBProject="WebSphereCommerceServerExtensionsData" IgnoreErrors="true" Quiet="true" />
    <workspaceBuild BuildType="full" FailOnError="false" DebugCompilation="true" ShowErrors="false" />
-
Update runtime name, java version, and
websphere version in the
workspace_dir/<projectname>/.setting/org.eclipse.wst.common.project.facet.core.xml
file for each project that exists in your workspace.
For example, in
workspace_dir/CommerceAccelerator/.setting/org.eclipse.wst.common.project.facet.core.xml
update the following code that is in
bold.
<faceted-project>
  <runtime name="com.ibm.ws.ast.st.runtime.v85"/>
  <fixed facet="jst.java"/>
  <fixed facet="jst.web"/>
  <installed facet="jst.java" version="1.8"/>
  <installed facet="jst.web" version="2.5"/>
  <installed facet="com.ibm.websphere.coexistence.web" version="8.5"/>
  <installed facet="com.ibm.websphere.extended.web" version="8.5"/>
  <installed facet="web.jstl" version="1.1"/>
  <installed facet="web.struts" version="1.2"/>
</faceted-project>
-
Update the JRE library and Server Library in Java Build Path
(workspace_dir/<projectname>/.classpath)
for each project.
For example, in
workspace_dir/CommerceAccelerator/.classpath update to the
following
code.
<classpathentry kind="con" path="org.eclipse.jdt.launching.JRE_CONTAINER/org.eclipse.jdt.internal.debug.ui.launcher.StandardVMType/WebSphere Application Server v8.0 JRE"/>
	<classpathentry kind="con" path="org.eclipse.jst.server.core.container/com.ibm.ws.ast.st.runtime.runtimeTarget.v85/com.ibm.ws.ast.st.runtime.v85"/>
-
Reconfigure WebSphere Commerce Developer to work with the new versions of Rational Application
Developer, WebSphere Application Server, and IBM SDK Java.
-
In a command line interface, go to
WCDE_installdir/bin.
-
Run the following command.
-
Then run the following command.
setup.bat
Ensure that the command finishes successfully.
-
Start WebSphere Commerce Developer by running the following command.
-
Verify that the WebSphere Application Server profile (wasprofile) was created.
-
Open
WAS_installdir/properties/pofileRegistry.xml.
- Verify that the name value resembles the WebSphere Commerce Developer
directory.
- Verify that the path value includes the wasprofile
directory.
For
example,
<?xml version="1.0" encoding="UTF-8"?><profiles>
    <profile isAReservationTicket="false" isDefault="true" name="WCDE_E~1_152252" path="C:\IBM\WCDE_E~1\wasprofile" template="W:\IBM\WAS855\profileTemplates\default"/>
</profiles>
-
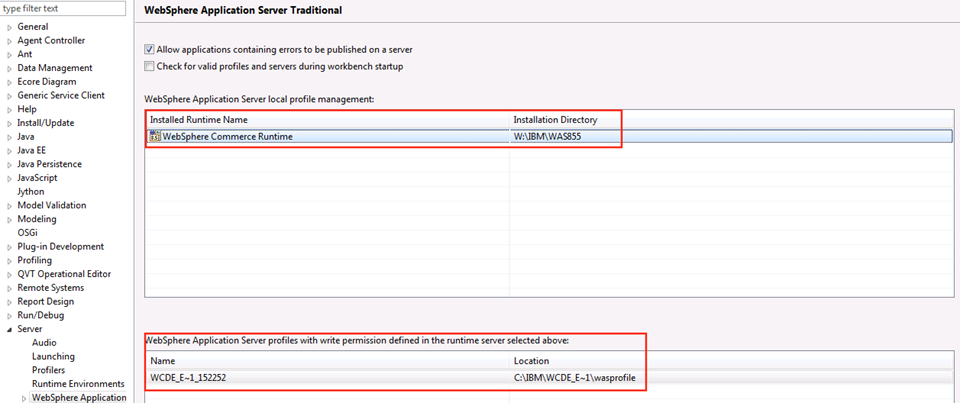
In WebSphere Commerce Developer, click .
-
Verify that the new WebSphere Commerce Runtime is created and that the WebSphere Application
Server profile is associated to the new Runtime.
-
Restore the previous WebSphere Application Server profile configurations from the back up that
you completed in step 1.
-
Open a command line interface.
-
Go to the WAS8_installdir/bin directory.
-
Run the following command.
WASPostUpgrade.bat <backup_dir> -oldProfile <profile_name> -profileName <WAS85_profile_name>
 Add the search project into the Test server and publish the application.
-
In the Servers view, right-click WebSphere Commerce Test server and
select Add and remove.
-
Select search from the left menu (Available).
-
Click Add to move search to the right menu
(Configured).
-
Click Finish.
-
Right click the WebSphere Commerce Test server and select Publish.
-
Add and set a custom JVM property
org.apache.el.parser.SKIP_IDENTIFIER_CHECK to true on
the WebSphere Application Server JVM that will relax the variable identifier checks.
-
Right click the WebSphere Commerce Test server and select .
-
Go to .
-
Click New to create a custom property.
-
Enter org.apache.el.parser.SKIP_IDENTIFIER_CHECK in the Name
field.
-
Enter true in the Value field.
-
Click OK.
-
Repeat the steps to add two custom JVM properties for the search application.
| Name |
Value |
| solr.allow.unsafe.resourceloading |
true |
| solr.solr.home |
<Path to solr\home> For
example, C:\IBM\WCDE_ENT70\search\solr\home |
-
Delete the file xercesImpl.jar under
workspace_dir/search/lib.
-
Update classloader mode to “PARENT_LAST” for both WC project and search project.
-
Open
workspace_dir\WC\META-INF\ibmconfig\cells\defaultCell\applications\defaultApp\deployments\defaultApp\deployment.xml.
-
Set the mode to PARENT_LAST.
For
example,
<classloader mode="PARENT_LAST" xmi:id="Classloader_1171840684437"/>
-
Open
workspace_dir\Search\META-INF\ibmconfig\cells\defaultCell\applications\defaultApp\deployments\defaultApp\deployment.xml.
-
Set the mode to PARENT_LAST.
For
example,
<classloader mode="PARENT_LAST" xmi:id="Classloader_1371574097936"/>
-
Open the following two files.
- WCDE_installdir/properties/version/update/config/commerceear/updateStoreArchives.xml
- WCDE_installdir/properties/version/update/config/toolkit.native.commerce.base\updateStoreArchives.xml
-
Search for {RAD_HOME}/runtimes/base_v7 and replace with the explicit
path to the new WAS8_installdir.
For example,
change
<condition property="WAS_HOME" value="${RAD_HOME}/runtimes/base_v7">
To
<condition property="WAS_HOME" value="C:\IBM\WAS855">
Note: You
can also change the value to use the variable, ${WAS_HOME} instead of specifying the full path
(C:\IBM\WAS855). But if you use the ${WAS_HOME} variable, then you need to also search and remove
all instances of the string <striplinebreaks/>.
-
Install the following WebSphere Commerce fixes to enable your environment to support Java
8.
-
Republish the WC and search application, and then restart the WebSphere Commerce Test
server.
-
Verify that your environment is fully configured and working by completing a shopping flow in
your store.
 JR59276Note: If you are on Fix Pack 7, there is a dependency between JR59276 and JR48723. After applying JR59276 on Fix Pack 7, you must enable the JR48723 fix. For more information, see Enabling interim fix JR48723.
 JR59294