If you have access to physical media, you can use the instructions
in this topic to create the central repository.
Before you begin
- Ensure that you have the following product CD/DVDs available:
- Rational Application Developer Version V7.5.4. To download the latest supported
version, Rational Application Developer Version 8.5.5.3, or a higher fix pack
for Version 8.5.5, see
WebSphere Commerce eAssemblies.
- WebSphere Application Server Test Environment (WTE) V7.0.
- WebSphere Commerce Developer Version V7.0.
- The most recent WebSphere Commerce Developer feature pack you
want to install.
- WebSphere Commerce Developer V7.0 Fix Packs are not available
in physical media format; you must download them from Passport Advantage. Download the most recent WebSphere
Commerce Developer V7.0 fix pack supported at your site and extract
it to a temporary location. For example, FP_image_location.
- Download the latest version of IBM Installation Manager and extract
it to a temporary location. For example: IM_image_location.
Procedure
- Insert the CD labeled IBM WebSphere Commerce V7.0 - WebSphere
Commerce Rational Application Developer V7.5.4 Set Up Multilingual
into the CD/DVD drive of the server.
- Run the IBM Packaging Utility.
- Click Copy Packages.
- Click Open Repository.
- Add the latest version of the Installation Manager to the
central repository:
- Browse to IM_image_location and
select repository.config.
- Optional: Enter a name in the Repository
Name field to replace the default.
- Click OK.
- Add the Rational Application Developer V7.5.4 and WebSphere
Application Server Test Environment (WTE) V7.0 repositories to the
central repository:
- Browse to the CD/DVD drive and select diskTag.inf.
- Optional: Enter a name in the Repository
Name field to replace the default.
- Click OK.
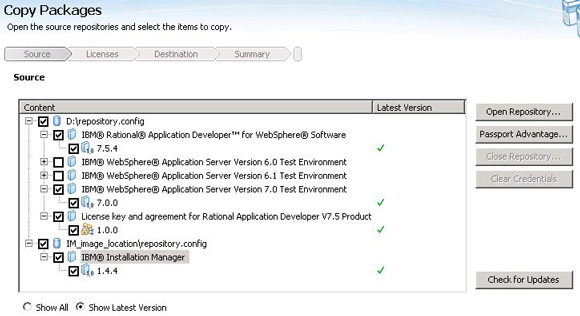
- Select all the required products to be copied to the central
repository, as shown in the following example:
- Click Next.
- Review the license agreements and click Accept.
- Select a location on the server where you want to create
the central repository. This location is referred to using the common_repo variable
in subsequent topics.
- Click Next.
- Review the summary page and click Copy to
begin creating the central repository. Insert appropriate disks as
prompted by the utility.
- After the repository is successfully created, click Finish and
close the IBM Packaging Utility.
- Insert the DVD for WebSphere Commerce Developer V7.0 into
the DVD drive.
- Click Copy Packages.
- The source window includes repositories that you opened
previously. You can choose to close them or leave them unchecked.
Click Open Repository.
- Add the WebSphere Commerce Developer V7.0 repository into
the central repository:
- Browse to the DVD drive and select repository.config.
- Optional: Enter a name in the Repository
Name field to replace the default.
- Click OK.
- Add the WebSphere Commerce Developer V7.0 fix pack repository
to the central repository:
- Browse to the FP_image_location and
select repository.config.
- Optional: Enter a name in the Repository
Name field to replace the default.
- Click OK.
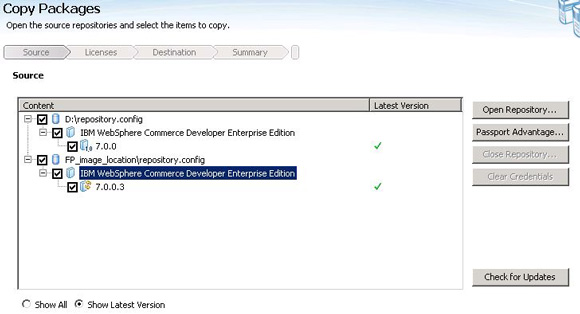
- Select all the required products to be copied to the central
repository, as shown in the following example:
- Click Next.
- Review the license agreements and click Accept.
- Browse to the common_repo directory
and click Next.
- Review the summary page and click Copy to
begin creating the central repository.
- After the repository is successfully created, click Finish and
close the IBM Packaging Utility.
- Insert the DVD for the WebSphere Commerce V7.0 feature
pack into the DVD drive.
- Click Copy Packages.
- Click Open Repository.
- Add the WebSphere Commerce Developer V7.0 feature pack
repository into the central repository:
- Browse to DVD drive/developer and
select repository.config.
- Optional: Enter a name in the Repository
Name field to replace the default.
- Click OK.
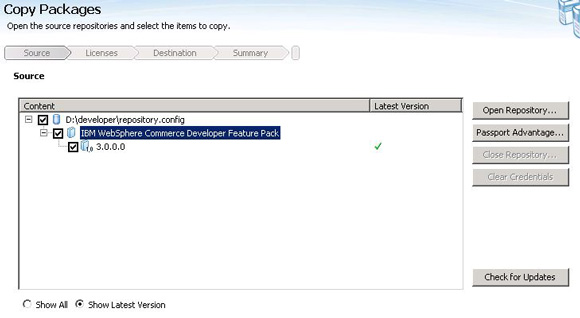
- Select all the required products to be copied to the central
repository, as shown in the following example:
- Click Next.
- Review the license agreements and click Accept.
- Browse to the common_repo directory
and click Next.
- Review the summary page and click Copy to
begin creating the central repository.
- After the repository is successfully created, click Finish.