

CyberFOCUS remediation flow
The CyberFocus Remediation Flow streamlines the process of identifying and addressing security vulnerabilities (CVEs) efficiently.
From the CyberFOCUS dashboard, to initiate remediation and set up your custom remediation flow, complete the following steps.
1. Accessing the Remediate widget from CyberFOCUS dashboard
- From the CyberFOCUS CISA KEV table that lists the CVEs, select one or more CVEs. The Remediate button becomes active.
- Click the Remediate button to open the Remediate widget.
2. Setting up remediation flow
To configure a custom remediation flow, complete the following steps:
- Fixlets - In this step, you filter and select the
Fixlets you want to remediate.
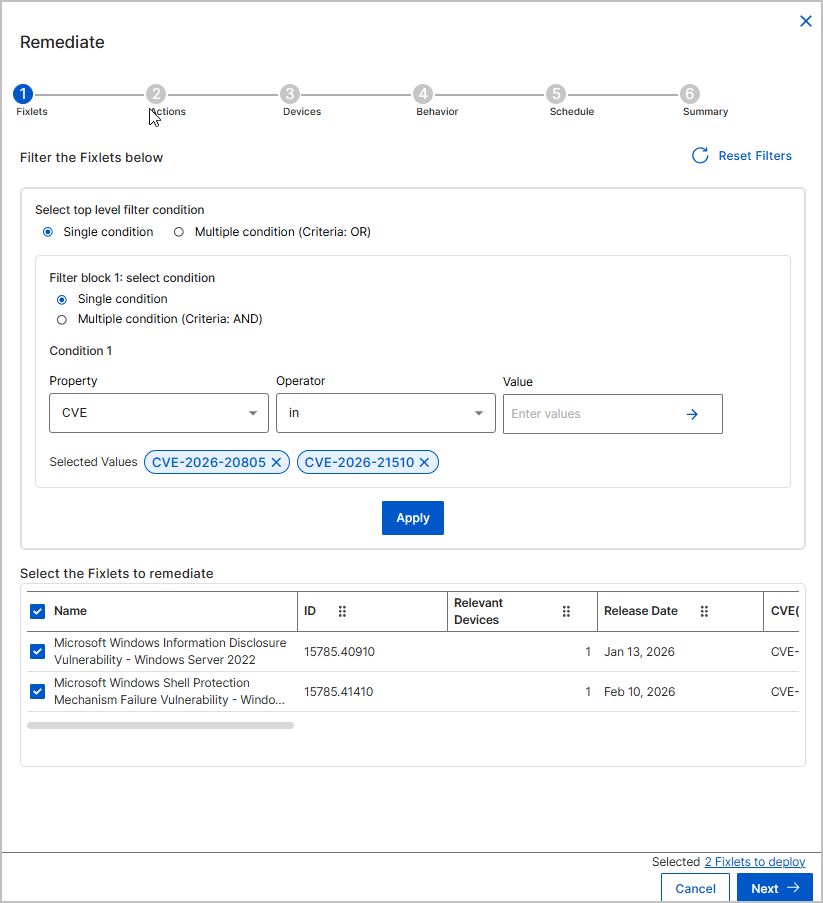
- All selected Fixlets are listed in a table
- You can apply filters using Single condition or Multiple condition (Criteria: AND/OR) options to refine the Fixlet list. You can click on Reset Filters to clear filters. For more information, see filtering data section.
-
Fixlet Table – Review the list of Fixlets.
-
Select Fixlets – Use checkboxes to choose one or more Fixlets for remediation. A counter shows how many are selected.
-
Next/Cancel – Click Next to continue to Actions, or Cancel to exit.
-
Actions - Review or update Fixlet actions. In this tab, confirm the actions you want the Fixlets you have selected to perform. This is important because not every Fixlet has a single, default action. It is also possible to remove Fixlets that do not have any actions that can be performed on the devices selected in the prior tab.
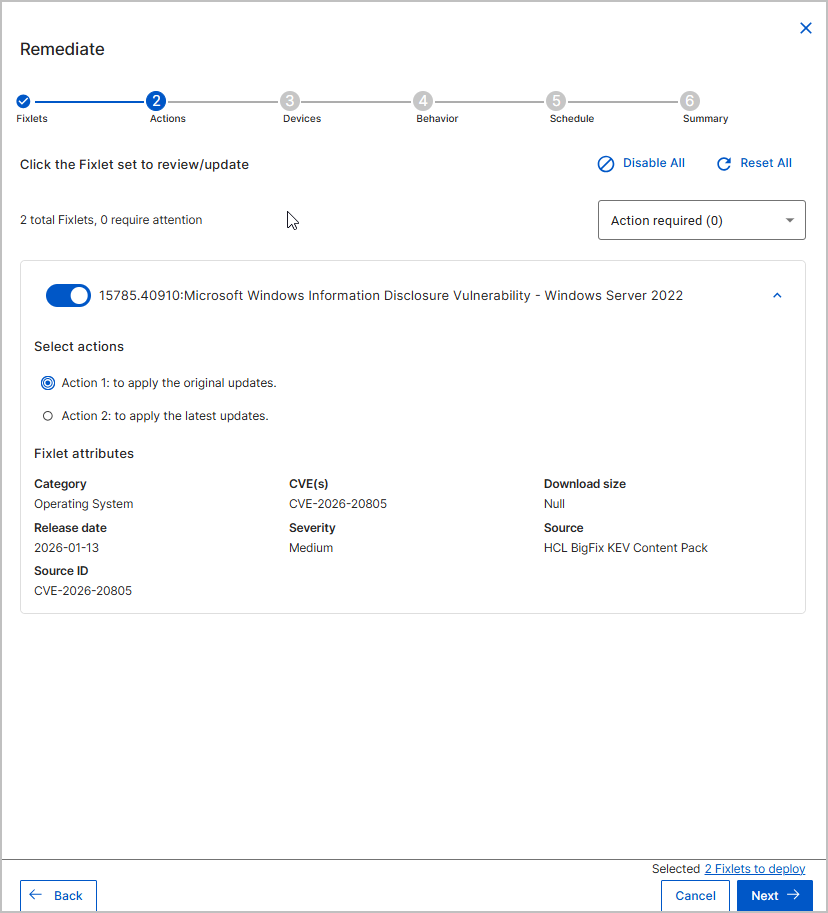
- The Actions step lists all selected Fixlets.
- Action filter drop-down – Allows you to refine which Fixlets are
shown in the list. Available filter options:
- All Fixlets – Displays all Fixlets in the remediation set.
- Fixlets that are not actionable – Displays Fixlets that cannot be acted upon.
- Fixlets with no-default action – Shows Fixlets that do not have a predefined default action.
- Action required – Filters Fixlets that require immediate attention.
-
Under Select actions, choose the appropriate radio button for the remediation:
-
Action 1: To apply the original updates.
-
Action 2: To apply the latest updates.
-
- Review the Fixlet attributes provided in the details pane to confirm accuracy.
- Each Fixlet has a toggle switch to enable or disable its deployment.
- Ensure the toggle switch next to the Fixlet is set to On.
- You can use Disable All or Reset All options as needed.
- Verify the deployment summary link at the bottom right (e.g., Selected 2 Fixlets to deploy).
Once this information is provided, click Next to proceed to the Devices tab.
-
Devices - This step allows you to confirm the devices for the deployment. Choose to deploy to all applicable devices or utilize various filters to narrow down the deployment size. Since filtering is optional, it is possible to skip this step by clicking Next. you select which devices will be included in the deployment. You have three main approaches:
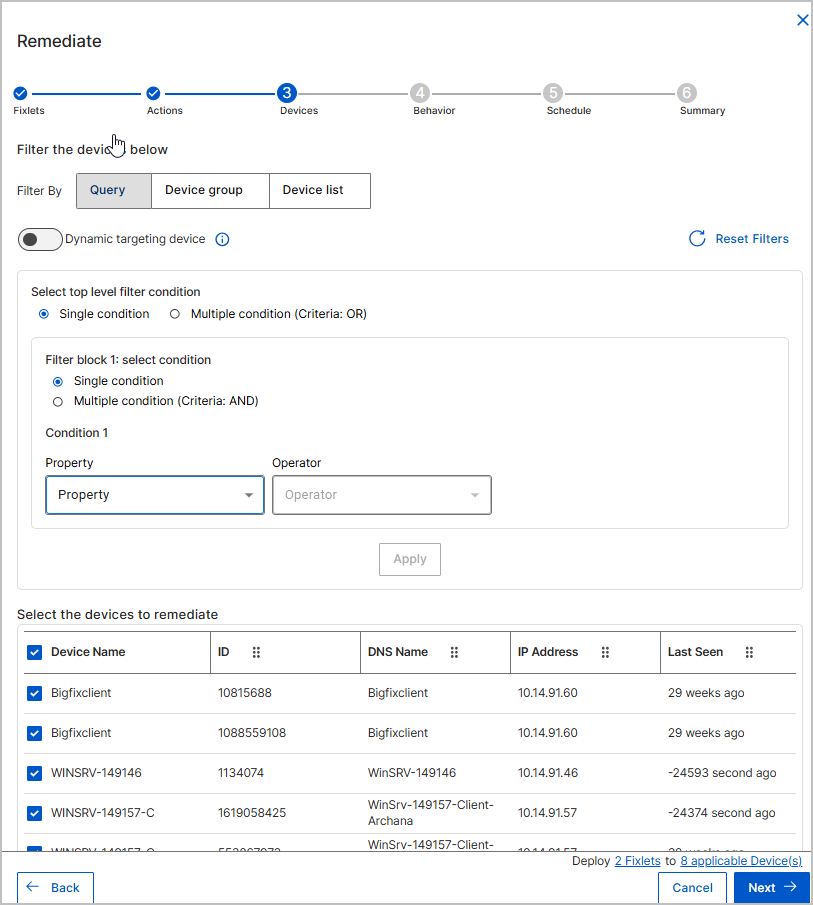
- Filter by Query
- You can apply filters using Single condition or Multiple condition (Criteria: AND/OR) options to refine the Fixlet list. You can click on Reset Filters to clear filters. For more information, see filtering data section.
- By default, the device table displays all devices that match the query, with details such as Device Name, ID, DNS Name, IP Address, Last Seen, OS Family, Operating System, and Device Type.
- Dynamic Targeting device Option:
- Within this approach, you can enable the Dynamic Targeting Device toggle.
- Dynamic filters define a matching criteria for devices to evaluate continuously until the deployment ends. Any device that matches this filter after the deployment has been created, will have this deployment applied.
-
New devices that match the criteria are automatically added.
- A Preview of dynamically applicable targeted devices is shown to confirm eligibility.
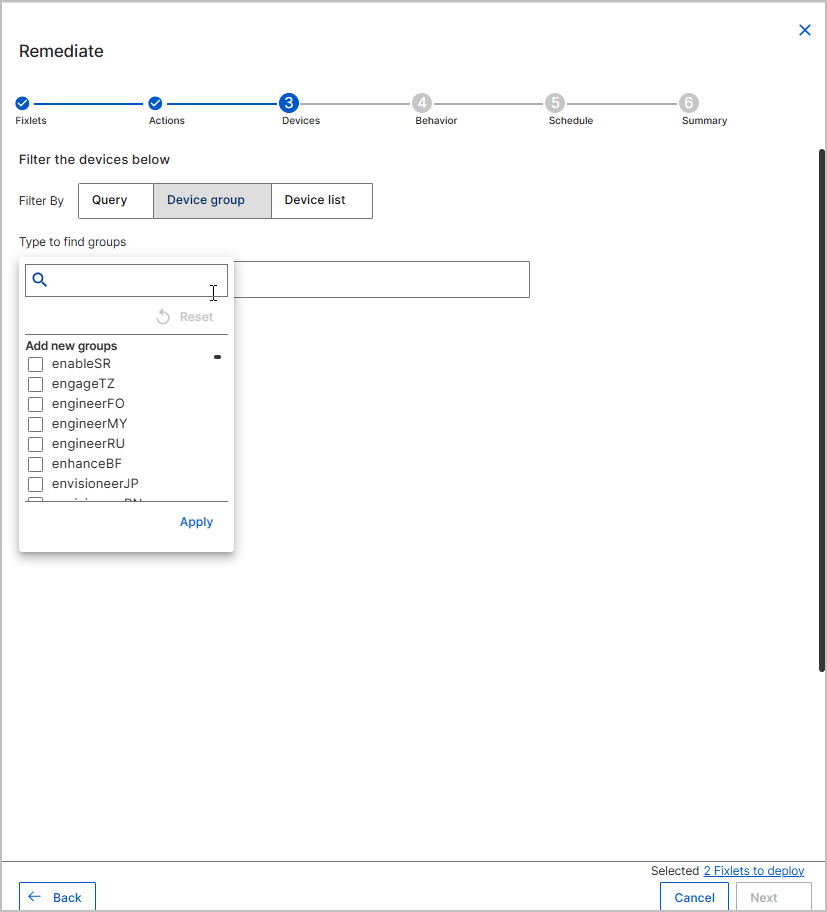
- Filter by Device group- Select a pre-defined device group to
target.
-
Locate and select your target groups:
-
Search: Use the search bar to type and quickly find specific groups by name.
-
Select: Check the box next to one or more groups under the Add new groups list.
-
Reset: Click Reset if you need to clear your current selections within the menu.
- Click Apply within the dropdown menu to confirm your group selection.
-
-
- Filter by Device List - This option allows to
input a fixed list of devices where the deployment will be applied.
Devices can be identified using their name, DNS, and IP
address.

- Regardless of how they are identified, each device must be in a separate row.
- A maximum of 1,000 devices can be added in a single device list. If you intend to target more than 1,000 devices using device lists for filtering, create separate deployments.
- Use Verify List to confirm the entries before proceeding.
- The Preview area shows the final static list that will be targeted.
- Once the appropriate filters have been selected, or if no filter is needed, click Next.
- Filter by Query
-
Behavior - Some deployments can affect many devices simultaneously. The sequence tab provides you with control over deployment timing, display of alerts indicating Fixlet deployment availability for devices, and actions upon deployment completion. Note that selecting any of the provided options is not mandatory.
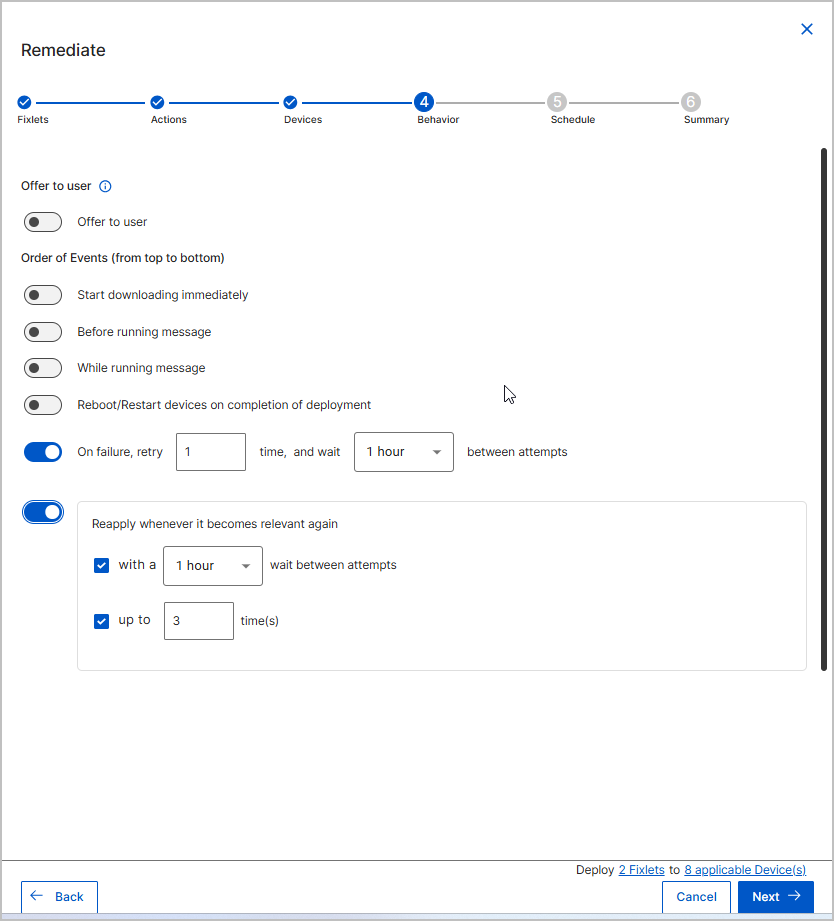
Offer to user: Enable this toggle to deploy the action as a BigFix "Offer".
Note: An Offer allows end-users to choose and install software, patches, or other actions themselves through a self-service application, rather than having them automatically deployed by an administrator.The behavior tab has a number of toggle switches users can turn on or off. They are presented as an order of events from top to bottom. The sequence order is as follows:
- Start download immediately - Some Fixlets can contain large files. This option allows users to control whether all applicable devices should begin downloading the Fixlet as soon as the deployment is created.
- Before running message - As a device may become unresponsive while a Fixlet is being deployed, this gives users the option to display a warning for an amount of time before the Fixlet is applied. This may also be useful if a restart is required, so end users can save work.
- While running message - As a device may be unresponsive while a Fixlet is being deployed, this allows users to write a message that will be displayed on the screen until the deployment is complete.
- Reboot/restart device on deployment completion - This determines whether the device will be forced to restart after the deployment is complete.
- On failure retry - Occasionally, deployments fail to complete successfully on a device. Should this occur, this allows users to determine if they would like BigFix to automatically try the deployment again. Users may also specify the maximum number of retries and the time interval between retry attempts.
-
Reapply When Relevant - This option automatically reapplies a Fixlet if it becomes relevant again after the initial deployment.
After selecting the desired sequence, click Next to proceed to the schedule tab.
-
Schedule - not required. Determining a deployment’s start and end time gives BigFix users a tool to control their deployments. Typically, deployments do not happen immediately. Some devices may be powered down, or disconnected from the Internet, or otherwise unable to have the Fixlet applied. Scheduling allows to control how long BigFix will attempt this particular deployment.
There may be other reasons to control the end time. For example, an organization may wish to ensure that all deployments run overnight to minimize business impact.
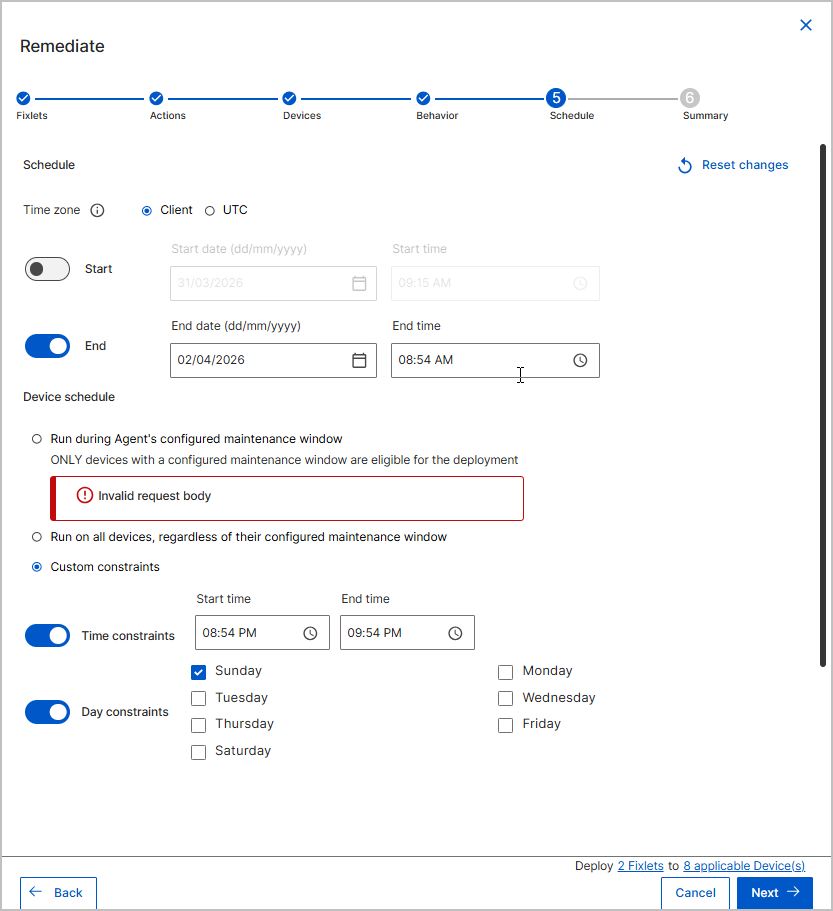
- The schedule tab has two options: Start Time and End Time. In the first, select the calendar date and the start time when BigFix will begin attempting to apply the deployment. You may also select if you want to use client time (e.g., the time zone where the device is located) or UTC.
- In the second, select the calendar date and the start time when BigFix will stop attempting to apply the deployment. You may also select if you want to use client time (e.g., the time zone where the device is located) or UTC.
- If no scheduling option is selected, BigFix will begin the deployment immediately.
- Run during agent’s configured maintenance window: Select this option, if you want to deploy the Fixlet during the set maintenance window.
- Custom Constraints - The Time Constraint
option lets you control when a deployment can run by defining
specific time ranges. This ensures Fixlets are applied only during
the approved hours or maintenance periods.
- Time Constraints: Specify the time range (for example, 11:00–23:00) when the deployment is allowed to execute.
- Day Constraints: Optionally, choose one or more days of the week to further limit deployment (for example, only weekends or weekdays).
After selecting the desired schedule, click Next to proceed to the summary tab.
-
Summary - The summary tab shows all of the choices made related to the deployment created. This allows to review all of the things the deployment will do in one location. It is also required to input a name for the deployment on the summary page.
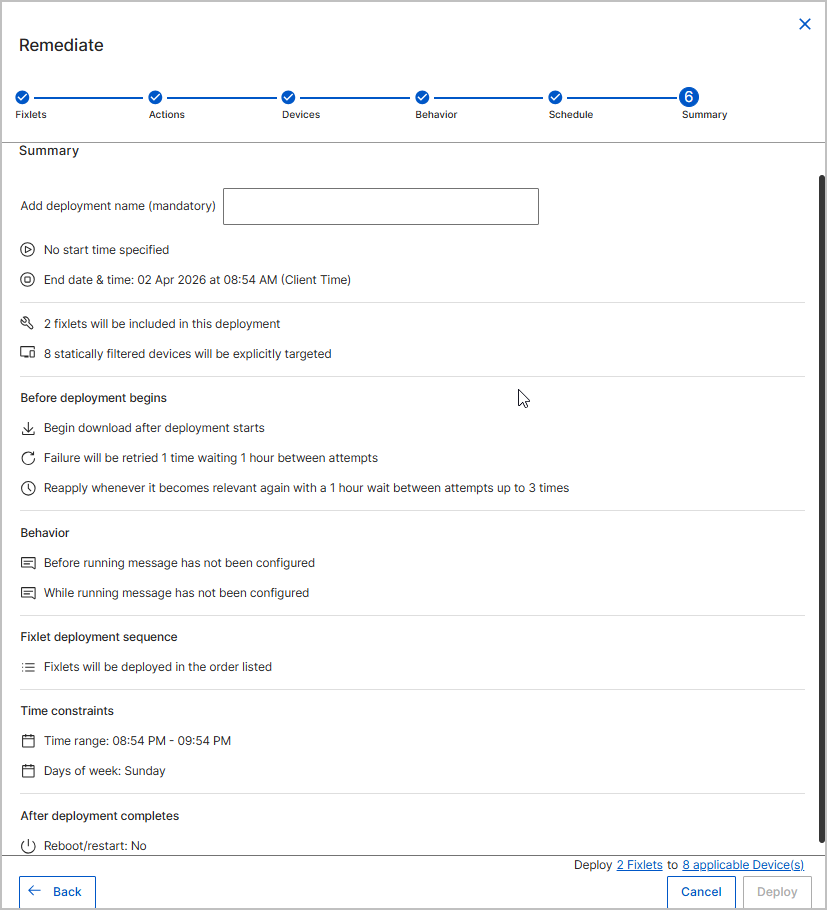
After reviewing your selections, click Deploy.
Result: The remediation flow is created and saved.
What to do next: Go to Deployments and you can see that the action is deployed. It also displays all the configured remediation flow settings. It shows the devices on which the deployment is being done, and the Fixlets that are deployed.