Configuring the basic SCC download plug-in settings
Use the Manage Download Plug-ins dashboard to configure the basic properties, such as mirroring and proxy settings, of the SUSE Customer Center (SCC) download plug-in.
About this task
Note: Ensure that the BigFix server and the BigFix client are on the same version to avoid a null error.
The
scope of this task only covers the basic SCC plug-in configuration from the BigFix console. To
configure the advanced settings for the SCC plug-in, you must edit the plugin.ini
file. For details about how to do this, see SCC download plug-in advanced
configuration.Procedure
- From the Patch Management domain, click .
- From the Servers and Relays table, select the server on which the download plug-in is to be configured.
- From the Plug-ins table, select SCC Plug-in.
-
Click Configure.
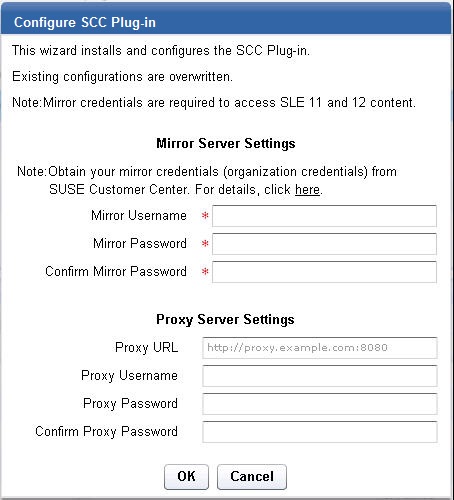
The Configure SCC Plug-in wizard displays.
Figure 1. Configure SCC download plug-in wizard 
-
Enter your SUSE Customer Care mirror credentials to download the patches from the mirrors of
the supported repositories.
Important:
The mirror credentials refer to the Organization Credentials listed in the SUSE Customer Center or Novell Customer Center. For more details, see Mirroring Credentials.
- Mirror Username
- Your user name to access the mirror of the supported SUSE repositories.
- Mirror Password
- Your password to access the mirror of the supported SUSE repositories.
- Confirm Mirror Password
- Your mirror password for confirmation.
-
Enter the proxy parameters if the downloads must go through a proxy
server.
Note: Only basic authentication is supported. Ensure that the proxy is configured to work with the Transport Layer Security (TLS) protocol.
- Proxy URL
- The URL of your proxy server. It must be a well-formed URL that contains a protocol and a host
name. The URL is usually the IP address or DNS name of your proxy server and its port, which is
separated by a colon. For example:
http://192.168.100.10:8080.
- Proxy Username
- Your proxy user name if your proxy server requires authentication. It is usually in the form of
domain\username.
- Proxy Password
- Your proxy password if your proxy server requires authentication.
- Confirm Proxy Password
- Your proxy password for confirmation.
-
Click OK.
The Take Action dialog displays.
- Select the target computer.
- Click OK.