Broken access control (Privilege escalation)
Compare scan results from sessions run with different user privileges to determine whether resources reserved for priviledged users are accessible to non-privileged users. This identifies broken access control, specifically privilege escalation, where lower-privilege users gain access to protected data or functions.
About this task
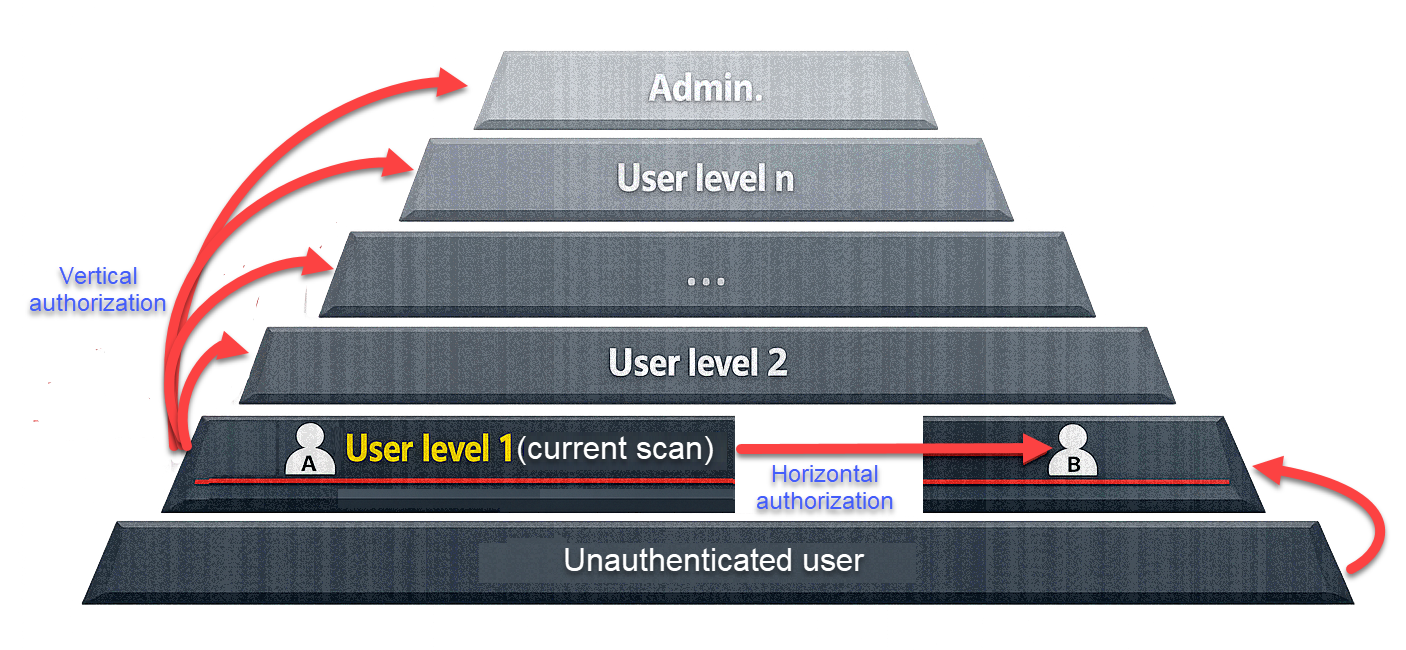
AppScan can refer to scans that were run using different user privileges, in order to investigate the extent to which privileged resources are accessible to users with insufficient access permissions. This can be done in two ways:
- By comparison with user having different privilege level: You point AppScan to scan results that were produced using a different level of access permissions than the current scan. During the scan AppScan attempts to access the additional links that were available to the different level user, using the current level access permissions. The scan results indicate where these attempts were successful.
- By comparison with a non-authenticated user: You point AppScan to scan results that were produced without user authentication. AppScan then runs a scan using the current authentication and notes the new links it accesses. It then logs out and attempts to access these new links without authentication. The scan results indicate where these attempts were successful.
Important:
Scans being compared must have the same
scan configuration, and equivalent Explore data. For example, if the site was
explored manually before testing in one of the scans, the same Manual Explore
must be performed before the Test stage in the scans being compared with it.
Procedure
- To compare with a different privileged user: In the Privileged user section, click +Add, and browse to a scan that was run with different access permissions than the current scan.
- Click Open.
-
Type in a name that represents the authentication level used in the scan (for
example Guest or Administrator), then click Save.
The selected scan is added to the list, and its role (e.g., Admin, Operator, Visitor) appears in the Role column.
-
Repeat these steps to add scans with different authentication levels, as
required.
Note:You may add more than one scan for Privileged user tests, one for each role. For example, if the current scan is configured with the Username and password of a normal user, you could add two scans to this list: one that was run with Administrator permissions, and one that was run with Supervisor permissions. The results will indicate which user's resources were found to be accessible to the normal user.
- To compare with a non-authenticated user: You can also optionally load the results of a scan run without authentication. To do this, in the Unauthenticated user section, click the Browse button, and browse to the scan results.
- After adding the relevant scans to compare (all of them need to have the same Explore data), from the top Menu bar, select . From the scan results you can discover if privileged resources are accessible to non-privileged users.