OIDC Configuration for Securing ZIETrans Web Application
OpenID Connect (OIDC) is an authentication protocol built on top of OAuth 2.0, providing a standardized and secure method for verifying user identities in web applications. Web applications like ZIETrans can be registered with the OIDC provider by sharing information such as the application URL, redirect URL, etc. When a user opens the ZIETrans URL, they are presented with the OIDC provider's login page, where they must provide credentials as configured (e.g., LDAP, Gmail). After a successful login, the OIDC provider shares details like user claims, tokens, etc.
The OIDC Configuration panel shown below allows users to enable and set up OIDC for secure authentication for the ZIETrans application (WEB ONLY). After selecting "Enable OIDC," the user must enter the required parameters: Client ID, Client Secret, Issuer URL, Redirect URL, and Scope.
These values are essential and must precisely match the configuration details provided by the Identity Provider (IdP) to ensure successful authentication flows and proper callback processing within the ZIETrans application. Consult with your IdP team to correctly obtain these values.
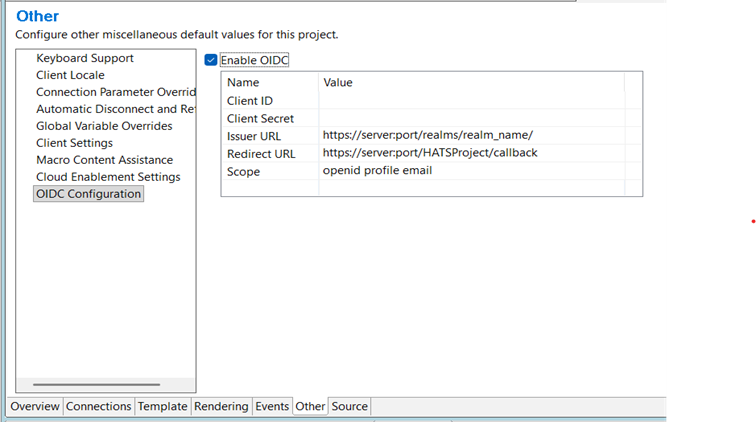
- Client ID
-
A unique identifier assigned to the ZIETrans application by the Identity Provider (IdP). The IdP uses it to recognize the application during the authentication process.
- Client Secret
-
A confidential value generated by the Identity Provider and shared only with the application. It is used together with the Client ID to authenticate the ZIETrans application when exchanging authorization codes for tokens.
- Issuer URL
-
The base URL of the Identity Provider that issues OIDC tokens. The ZIETrans application uses this URL to validate tokens and to discover the IdP’s authorization, token, and public key (JWKS) endpoints. E.g. https://<identity.yourcompany.com/oauth2/default>
- Redirect URL
-
The callback URL to which the Identity Provider redirects the user after successful authentication. This URL must exactly match the redirect URI registered with the IdP to ensure a valid and secure authentication flow. E.g. https://<myzietransapp.com>/callbackNote:The/callback path is a dedicated handler provided by the ZIETrans application to process the authentication response.
- Scope
-
A space-separated list of permissions or claims requested from the Identity Provider. Common scopes include openid, profile, and email, which determine the user information included in the ID token.
- Disable the ‘Enable OIDC’ checkbox.
- Verify the filter OIDCAuthFilter and servlet OIDCCallback are disabled in web.xml.
After installing the application on WAS, make the following changes in the ZIETrans application configuration:
Application-level class loader settings:
- Log in to the WebSphere Integrated Solutions Console (ISC)
-
Navigate to Applications → Application Types → WebSphere enterprise applications.
- Select your application ( the ZIETrans EAR).
- Click Class loading and update detection
- Set the following options
Class loader order: Classes loaded with local class loader first (Parent Last)
Class loader mode: Single class loader for application
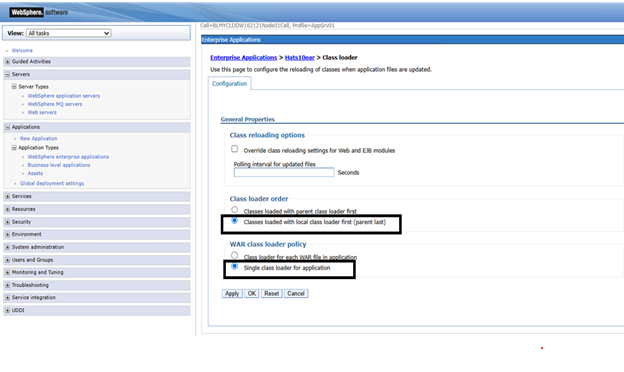
- Save the configuration and restart the EAR.