Creating an unload job
Use the Unload Job Select and Unload Job windows to create an unload job.
About this task
To create an unload job:
Procedure
-
Choose from the HPL main window.
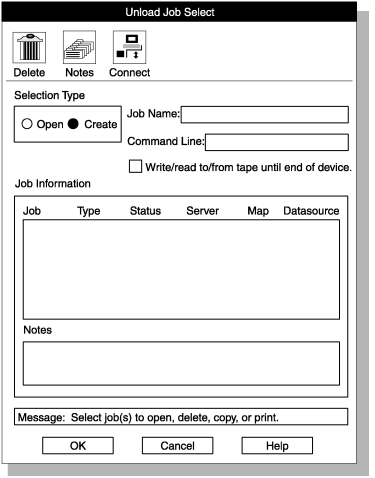
The Unload Job Select window appears, as the following figure shows.
Figure 1. The Unload Job Select window 
- Click Create in the Selection Type group.
- Choose a name for this unload job and type the name in the Job Name text box.
-
Optionally check the Write/read to/from tape
until end of device check box.
For more information, see Specify to write to the end of the tape.
-
Click OK.
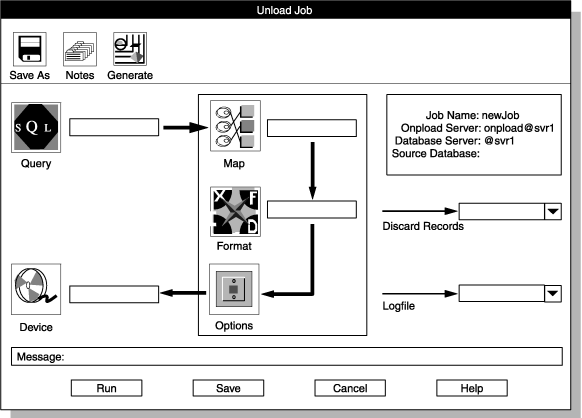
The Unload Job window appears, as the following figure shows. The ipload utility windows, provides detailed descriptions of the buttons in the Unload Job window.
Figure 2. The Unload Job window 
-
Type appropriate values for all of the unload components.
If you click a component button, the corresponding view window opens, and you can create or select the component.
-
Specify the file that contains rejected record by using
one of these methods:
- Type the name of the rejected file in the Discards Records text box.
- Click the down arrow next to the Discard Records text box to select the file name from the file-selection list.
-
Select the file that contains the
unload status log by using one of these methods:
- Type the name of the log file in the Logfile text box.
- Click the down arrow next to the Logfile text box to select a file name from the File-Selection window.
-
Click Options to change unload options.
For more information, see Changing the unload options.
-
Click Save to save this unload job.
(If you click Run to run the job immediately, the job is saved automatically.)
-
Now you can either run the unload
job or exit and run the job later.
- Click Run to run the job.
- Click Cancel to exit to the Unload Job Select window.
Results
Important: Use Ext Type String Length data type
or Ext Type Binary Length data type if you unload data that contains
null UDT values.