DXClient
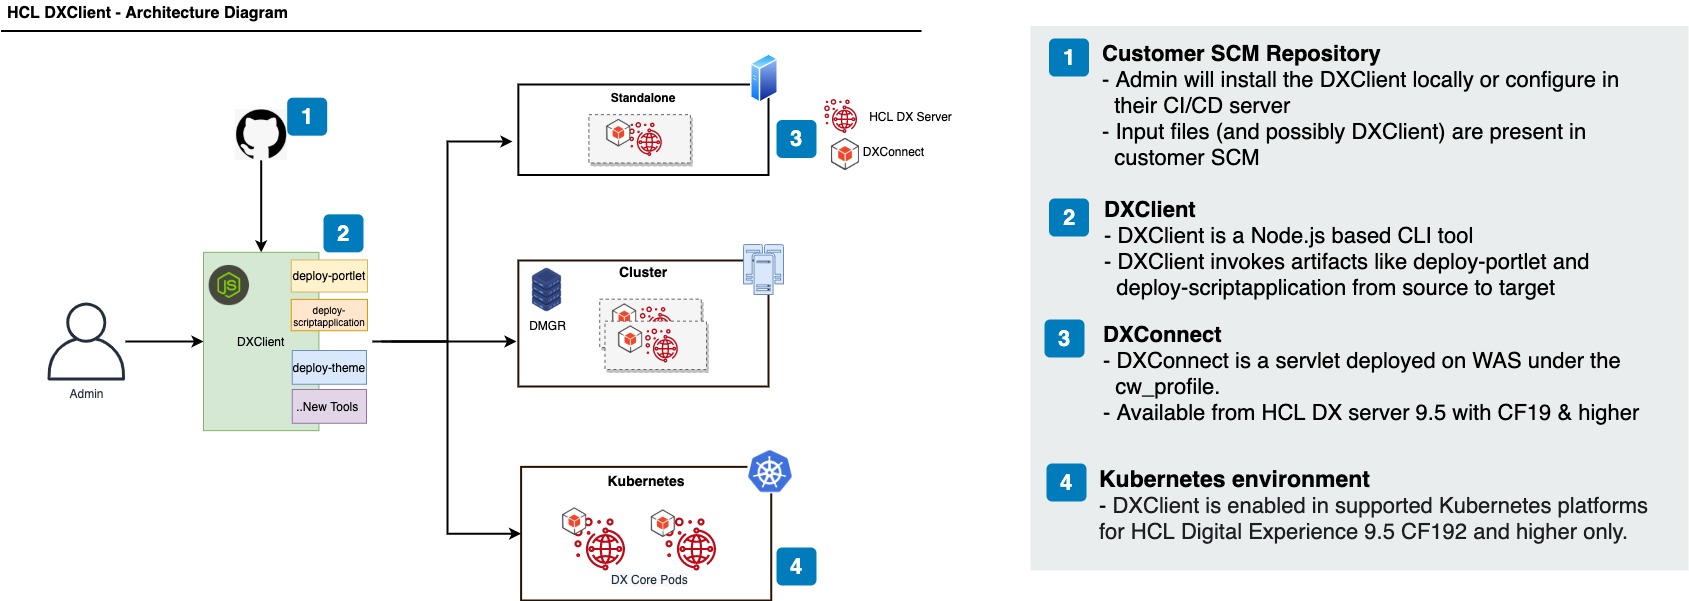
DXClient is a tool that helps developers and administrators manage tasks, such as uploading one or more portlets or Script Applications, from source development environments to target HCL DX 9.5 deployments. This tool is capable of taking artifacts developed locally and deploying them to DX 9.5 servers deployed to supported on-premises platforms in standalone, cluster, or farm-topologies and supported Kubernetes platforms.
Important
DXClient version is mostly forward and backward compatible with the DX CF versions, however, in some cases it might not work as expected if the CF versions are different. Hence, ensure that the CF versions of both DXClient and DX Core are the same in your installation.
Note
DXClient is enabled in supported Kubernetes platforms from HCL Digital Experience 9.5 CF192 and later releases: - DXClient is available as a Docker image from HCL DX 9.5 CF196 and later releases, See the Installation section below for more details. - DXClient also exists as Node.js-based CLI tool and requires Node.js to be installed as a prerequisite. However, this is deprecated in the HCL Digital Experience Container CF196 release.
DXConnect
DXConnect is a servlet-based application deployed on top of IBM WebSphere Application Server in the HCL DX 9.5 CF19 and later deployments, under the Configuration Wizard profile - cw_profile. DXConnect enables the DXClient tool to connect over an HTTP or HTTPS connection from a client development machine or remote server to a source or target HCL DX 9.5 server to execute certain tasks requested via DXClient commands.
Architecture
Note
- HCL DX 9.5 CF19 or later version is installed on target servers, on supported on premises platforms (Microsoft Windows, Linux or IBM AIX).
- Beginning with HCL DX 9.5 Container Update CF192 and later releases, the DXConnect Servlet is pre-configured and started on supported Red Hat OpenShift and Kubernetes platforms that DX 9.5 containers are deployed to.
- For supported on premises platforms with HCL DX 9.5 CF19 and later releases, the DXConnect application needs to be installed (refer to DXConnect Installation) and started under the Configuration Wizard (
cw_profile) on target servers. For more information on starting the Configuration Wizard, refer to Accessing the Configuration Wizard
Remember
Configuration Wizard Administrator credentials are required to access the DXConnect application.
Installing using the Docker image
Prerequisites: You must ensure that Docker is installed on the workstation.
Note
When you upgrade to use the Docker image DXClient, you should first uninstall the nodejs DXClient.
DXClient docker image comes with a script that you can use to run the docker image. This script creates a store directory, and copies the input files from the absolute path to the shared volume location.
See video: CI/CD – DXClient in Container
- Navigate to <working-directory> folder where you wish to use DXClient from.
-
Download the DXClient.zip file (DXClient_VX_XXXXXXXX-XXXX.zip) to a local directory on the local workstation from your HCL Digital Experience 9.5 CF196 or higher entitlements on the HCL Software License Portal.
Note
If you are upgrading from the node to Docker image version of DXClient, you must first uninstall or unlink the current version using the following command before installing the newer version.
Syntax for Linux and Apple macOS platforms:
make unlinkSyntax for Microsoft Windows platforms:
make_unlink.bat -
Extract the DXClient.zip file locally.
- To work with multiple versions of DXClient, update the
IMAGE_TAGreference in the scripts file under the/binfolder. For example,IMAGE_TAG=v95_CF200_20211201-1021. By default it will be set in the executable script. - Run docker load < dxclient.tar.gz.
-
Add the execution shell script to the bin directory to the PATH variable to be able to call dxclient from any directory.
export PATH=<working-directory>/bin:$PATHFor Microsoft Windows platforms:
use
dxclient.batscript in the bin directory to the PATH variable to be able to call DXClient from any directory. -
Set appropriate permission.
chmod xxx <working-directory>/bin -
Run 'dxclient -V' to verify that the dxclient command line is installed.
A folder named store will be created in your working directory. This is the shared volume location to your docker container.
-
Configuration, logger, output, and sample files under location - <working-directory>/store.
Common command arguments can be pre-configured inside the config.json file available under <working-directory>/store folder. A sample configuration file that could be used on-premises platforms in standalone, cluster platforms is also available under <working-directory>/store/samples/sample-configurations/default-config.json for reference.
DXClient installation configuration
Common command arguments can be pre-configured inside the config.json file available under dist/src/configuration folder. A sample configuration file that could be used for any of the supported Kubernetes platforms is also available under samples/sample-configurations.json for reference.
{
    "enableLogger": true,
    "enableBackup": "false",
    "dxProtocol": "",
    "hostname": "",
    "dxPort": "",
    "dxContextRoot":"/wps",
    "xmlConfigPath": "/wps/config",
    "dxSoapPort": "10033",
    "dxProfileName": "wp_profile",
    "dxProfilePath": "",
    "dxConnectHostname": "",
    "dxConnectPort": "10202",
    "dxConnectProtocol": "https",
    "wcmSiteArea": "",
    "wcmContentPath": "",
    "wcmContentName": "",
    "contenthandlerPath": "/wps/mycontenthandler",
    "wcmContentId": "",
    "restoreAsPublished": false,
    "wcmLibraryId": "",
    "virtualPortalContext": "",
    "projectContext": "",
    "wcmLibraryName": "",
    "lastModifiedAfter": "",
    "damAPIPort": "",
    "ringAPIPort": "",
    "damAPIVersion": "",
    "ringAPIVersion": "",
    "wcmProjectName": "",
    "targetHostname": "",
    "targetDxConnectPort": "",
    "targetDxConnectUsername":"",
    "targetDxConnectPassword":"",
    "targetDxProfileName": ""
}
Installing using the node package file (deprecated in CF196)
Prerequisites: Node.js version 12.18.3 is the minimum supported version, and must be installed on the local workstation or automation server.
Note
You are encouraged to use the DXClient Docker image package from CF196 onwards for easier installation.
-
Complete the following steps to install the DXClient tool in your local development workstation or automation server.
Note
If you are upgrading from CF19, CF191, or later releases, you should first unlink the current version using the following command before installing the newer version.
Syntax for Linux and Apple macOS platforms:
make unlinkSyntax for Microsoft Windows platforms:
make_unlink.bat -
Ensure that Node.js version 12.18.3 or later version is installed to the local workstation. The DXClient tool is supported on Microsoft Windows, Linux, and Apple macOS workstations and automation servers.
- Download the DXClient.zip file (DXClient_VX_XXXXXXXX-XXXX.zip) to a local directory on the local workstation from your DX 9.5 CF19 or later entitlements on the HCL Software License Portal. Reference the Docker topic for the latest list of HCL DX 9.5 files available for download.
- Extract the DXClient.zip file locally.
-
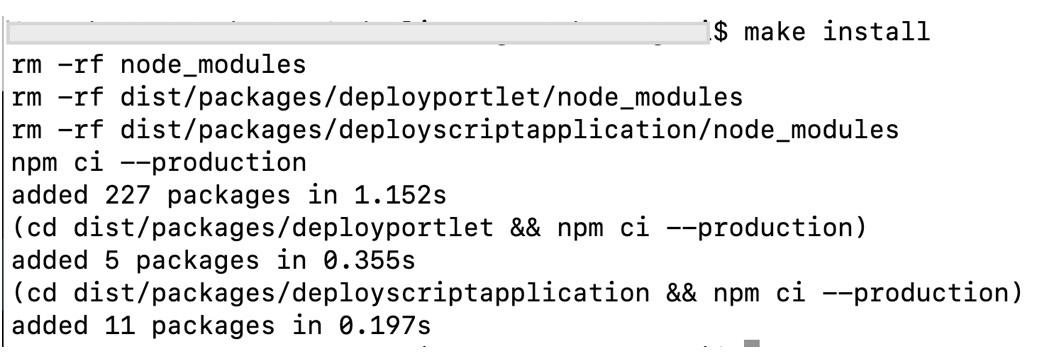
From the extracted folder, run the following command.
For Linux and Apple macOS platforms:
make installFor Microsoft Windows platforms:
make_install.batThe following commands are run:
-
Run the following command to link your application to the local npm module in your machine. Refer to the following Notes section before you proceed.
For Linux and Apple MacOS platforms:
make linkFor Microsoft Windows platforms:
make_link.batNote
- Avoid using this command when scripting deployments from an automation server (for example, in pipelines) as there is a chance of picking up the wrong dependencies during tool version upgrades.
- If the
linkcommand is not used (such as on automation servers), then use the following command to run the application:
For Linux and Apple MacOS platforms:
./bin/dxclientFor Microsoft Windows platforms:
node bin/dxclient
DXClient node uninstalling
-
To uninstall the DXClient tool, perform the following commands:
For Linux and Apple MacOS platforms:
make cleanFor Microsoft Windows platforms:
make uninstall.bat -
To unlink the DXClient tool, perform the following commands:
For Linux and Apple MacOS platforms:
make unlinkFor Microsoft Windows platforms:
make_unlink.bat
Verify the DXClient installation
Successful installation of the DXClient tool can be checked by using the "dxclient -V" command, which should show the version of the DXClient tool installed.
Once installed, commands can be executed using the DXClient tool to perform CI / CD actions on HCL DX 9.5 servers.
Note
Refer to the list of features that were released in the following HCL DX 9.5 Container releases:
- HCL DX 9.5 CF201 release:
- An optional parameter
requestIdadded to Deploy theme, Deploy application, Restart DX Core server, and Manage virtual portals. - Retrieve feature added to the Resource environment provider.
- Accessing ConfigWizard in container environment
- Note that a few parameters are deprecated and replaced with new parameters in the DX Core configuration reports. For information, see DX Core server configuration report
- An optional parameter
- HCL DX 9.5 CF200 release:
- HCL DX 9.5 CF199 release:
- HCL DX 9.5 CF198 release:
- HCL DX 9.5 CF197 release:
- HCL DX 9.5 CF196 release:
- HCL DX 9.5 CF195 release:
- HCL DX 9.5 CF193 release:
- HCL DX 9.5 CF192 release:
- Undeploy script applications
- Deploy theme (EAR and WebDAV based)
- HCL DX 9.5 CF19 release:
DXClient commands
Command syntax conventions:
dxclient [command] [options]
Use the following command to execute the deploy portlet action:
dxclient deploy-portlet [options]
Use the following command to execute the undeploy portlet action:
dxclient undeploy-portlet [options]
Use the following command to execute the xmlaccess action:
dxclient xmlaccess [options]
Use the following command to execute the pull script application action:
dxclient deploy-scriptapplication pull [options]
Use the following command to execute the push script application action:
dxclient deploy-scriptapplication push [options]
Use the following command to execute the undeploy script application action:
dxclient undeploy-scriptapplication [options]
Use the following command to execute the restore script application action:
dxclient restore-scriptapplication [options]
Use the following command to execute the deploy application action:
dxclient deploy-application [options]
Use the following command to execute the DX Core restart action:
dxclient restart-dx-core
Use the following command to execute manage-subscriber action:
dxclient manage-subscriber -h
Use the following command to execute manage-syndicator action:
dxclient manage-syndicator -h
Use the following command to execute the deploy theme action:
dxclient deploy-theme [options]
Use the following command to execute the undeploy theme action:
dxclient undeploy-theme [options]
Use the following command to execute the manage-syndicator get-syndication-report action:
dxclient manage-syndicator get-syndication-report [options]
Use the following command to execute the shared-library action:
dxclient shared-library [options]
Use the following command to execute the delete DAM schema action:
dxclient delete-dam-schema [options]
Use the following command to list all DAM schemas present:
dxclient list-dam-schemas [options]
Use the following command to export the personalization rules from the target server:
dxclient pzn-export [options]
Use the following command to import the personalization rules into the target server:
dxclient pzn-import [options]
Use the following command to manage virtual portal tasks in the DX server:
dxclient manage-virtual-portal [options]
Use the following command to register subscriber:
dxclient manage-dam-staging register-dam-subscriber [options]
Use the following command to deregister subscriber:
dxclient manage-dam-staging deregister-dam-subscriber [options]
Use the following command to trigger manual sync:
dxclient manage-dam-staging trigger-staging [options]
Use the following command to create credential vault slot in the DX server:
dxclient create-credential-vault [options]
Use the following command to create the syndication relation between syndicator and subscriber in DX server:
dxclient create-syndication-relation [options]
Use the following command to create, update, delete, export or import a custom property from an existing Resource Environment Provider:
dxclient resource-env-provider [options]
Use this command to export WCM libraries
dxclient wcm-library-export
Use this command to import WCM libraries
dxclient wcm-library-import
Use the dx-core-configuration-reports command to get a summary of the configurations of a single DX server or both source and target DX servers, which users can use to compare.
dxclient dx-core-configuration-reports [OPTIONS]
DXClient Help commands
The following commands show the Help documents for DXClient command usage.
Use the following commands to display the Help document for DXClient:
dxclient
dxclient -h, --help
Use the following command to display the DXClient version number:
dxclient -V, --version
Use the following command to display the detailed help for a specific command:
dxclient help [command]
Accessing the ConfigWizard admin console in a container environment
You can access the ConfigWizard admin console in a container environment from your local system. For more information, refer to Accessing the ConfigWizard admin console in a container environment.