Configuring dev containers
As a teamspace admin in Code, you can configure the dev containers so that they are available to the team members. These configurations follow the Dev Containers specification and are versioned by pushing them to a Control Git repository.
Before you begin
- Installed Docker and ensured that it is running on your machine.
- Installed Node.js and npm (for Dev Container CLI).
- Ensured that the Docker Hub account is enabled to push images.
- Gained access to DevOps Loop Control with permission to create repositories.
About this task
You can set up and preconfigure dev containers for users in a teamspace while using Code. You can create and configure the container environment, build an image, publish it to a registry, and make it accessible within the teamspace's configuration repository.
You can also follow the installation instructions provided on the Dev Container CLI GitHub repository page. – will go into the prereq --read and understood the installation instruction
Procedure
-
Install the Dev Container CLI tool:
- Clone the GitHub repository by running the following
command:
git clone https://github.com/devcontainers/cli.git - Navigate to the cloned directory and install the following Dev Container
CLI:
npm install -g @devcontainers/cli
- Clone the GitHub repository by running the following
command:
-
Create the devcontainer.json file:
You can create the devcontainer.json file by defining the metadata such as name, description, build or image source, and runtime Visual Studio Code customizations.Here’s a sample devcontainer.json:
{
  "name": "Java",
  "description": "Java codeserver",
  "build": {
        "Dockerfile": "./Dockerfile"
   },
  "customizations": {
    "vscode": {
      "extensions": [
        "secure-dev-ops.devops-code",
        "redhat.java"
      ]
    }
  }
}
You can also download a sample file here: devcontainer.json
Refer to the Dev Container metadata reference guide to include JSON metadata related to general settings, Docker or Docker Compose-specific options, and tool-specific properties for configuring a devcontainer.js file. -
Create the Dockerfile for custom environment setup:
You can add a Dockerfile to define the environment and behavior of your development container by specifying the base image, installing tools, setting environment variables, and configuring the container runtime.Example Dockerfile:
FROM ubuntu:20.04
ENV DEBIAN_FRONTEND=noninteractive
RUN apt-get update && \
    apt-get install -y sudo curl default-jre git && \
    apt-get clean
RUN curl -fsSL https://code-server.dev/install.sh | sh -s -- --version=4.98.0
RUN chmod -R ug+w /etc/pki/ca-trust/source /etc/pki/ca-trust/extracted
USER 1001
CMD ["tail", "-f", "/dev/null"]
Key Commands required for the Dockerfile:
- FROM: Set the base image.
- ENV: Set the environment variables.
- RUN: Install dependencies and clean cache to keep the image lean.
- USER: Run the container as a non-root user (1001) for security.
- CMD: Keep the container running by tailing a null file.
To create or customize a Dockerfile for your development container, refer to the official Dockerfile reference. This guide provides detailed explanations and examples of all supported commands. You can also explore dev container documentation for guidance on integrating your Dockerfile into a .devcontainer setup.
Note: If DevOps Loop runs using self-signed certificates or private Certificate Authorities (CAs), the admin must add the line RUN chmod -R ug+w /etc/pki/ca-trust/source /etc/pki/ca-trust/extracted in the Dockerfile before the line USER 1001.
-
Build the dev container image:
Navigate to the root .devcontainer directory and run the following command to build the dev container image.
devcontainer build --workspace-folder . --image-name devuser/java-container:1.0This command reads the devcontainer.json file and executes the Dockerfile.
-
Update the devcontainer.json file to use the image key:
{ "name": "Java", "description": "A preconfigured Java development environment with code-server support and Java runtime", "build": { "dockerfile": "./Dockerfile" }, "image": "devuser/java-container:1.0", "customizations": { "vscode": { "extensions": [ "secure-dev-ops.devops-code", "redhat.java" ] } } } -
Push the image to Docker Hub registry:
Login and push.
docker login
docker push devuser/java-container:1.0
After it is pushed, it will be available at: docker.io/devuser/java-container. -
Access DevOps Loop Control:
- Sign in to HCL DevOps Loop. Navigate to your teamspace.
- Go to the Control page. You’ll see a repository named .devopsconfig under your teamspace (e.g., teamspace-java/.devopsconfig).
-
Upload devcontainer.json and Dockerfile:
Inside the .devcontainer folder of the repo, upload devcontainer.json and Dockerfile.
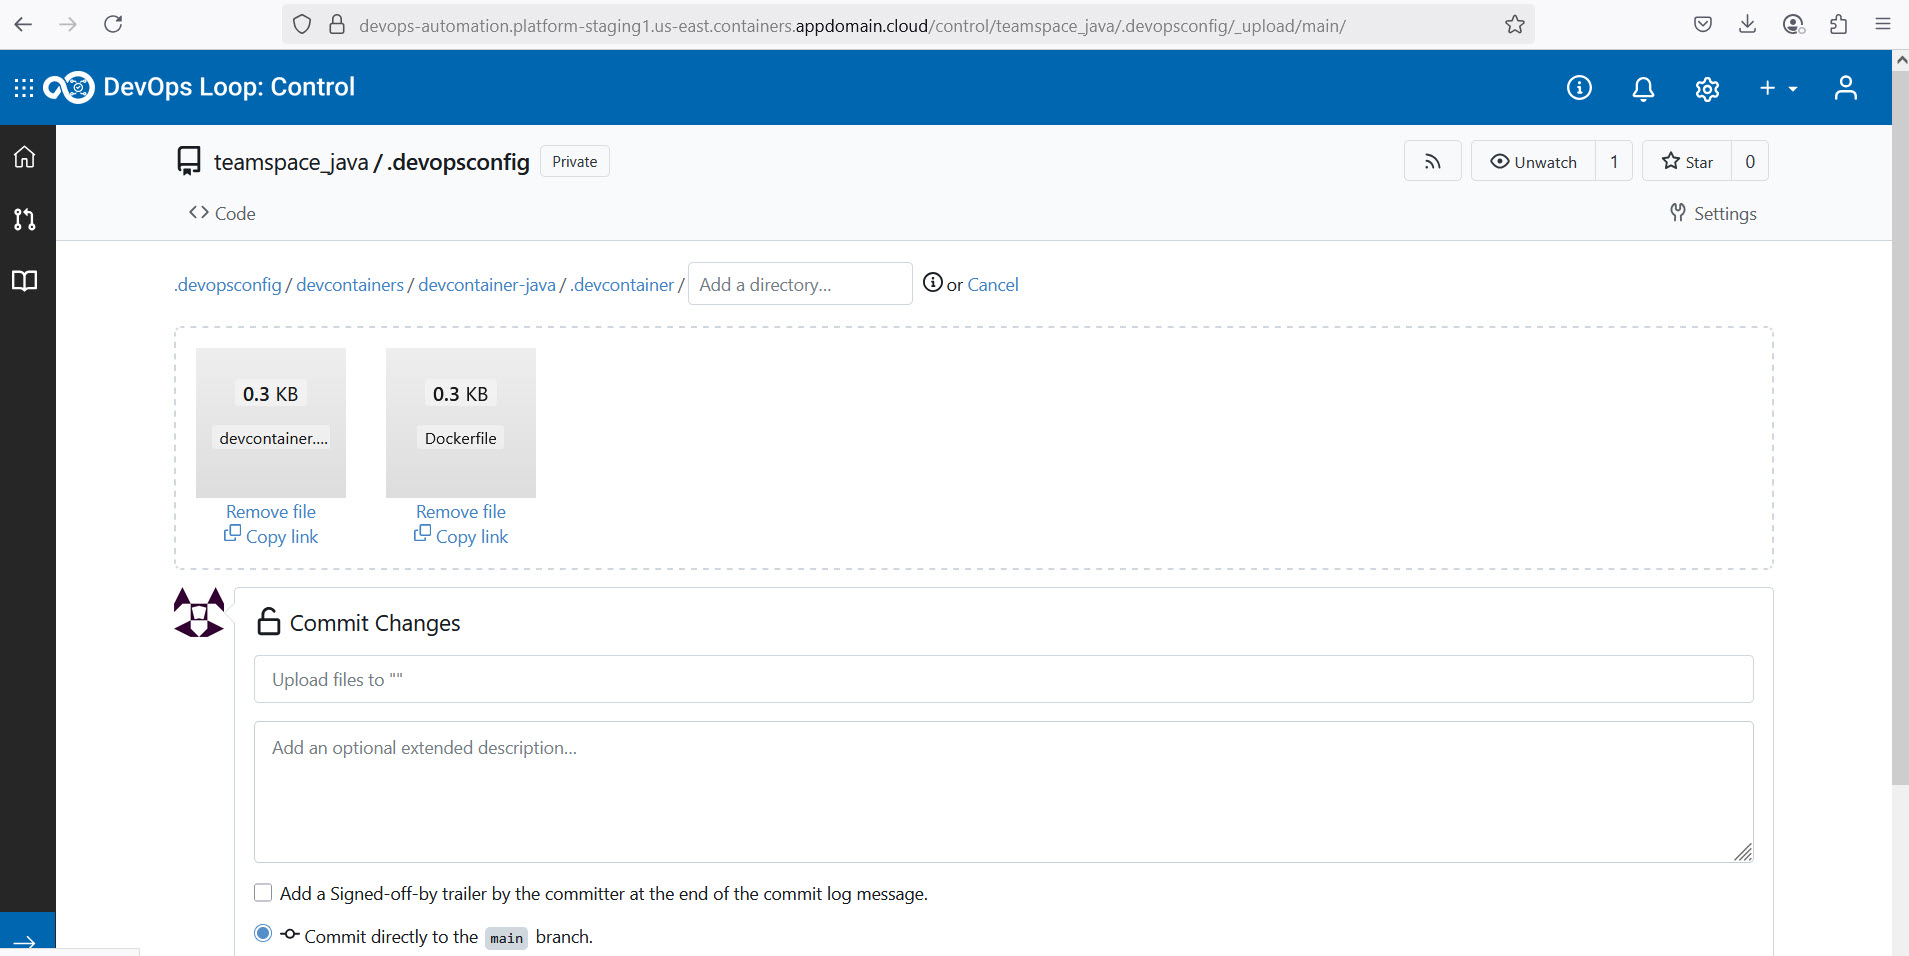 Commit the changes to the main branch.Note: You can also commit the changes to a different branch other than the main branch. In such a case, you will see different branches on the Branch menu.
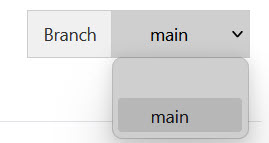
-
Verify the files:
Ensure both the devcontainer.json and Dockerfile.yml files are correctly uploaded at:teamspace-java/.devopsconfig/.devcontainer/
-
Start the Java container:
- Go to the Code landing page.
- Click the teamspace button and switch to your teamspace. Under
Dev Containers, you will see a new dev container, along with
the default Starter container that is always available for all users.
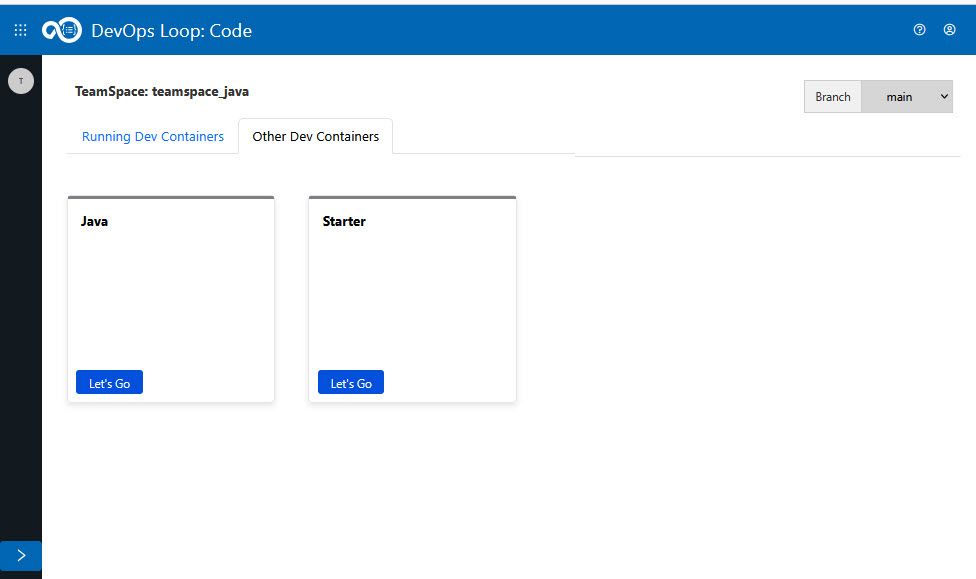
- Click Let’s Go to launch the container.
Note: The first-time launch may take a few minutes. -
View Visual Studio Code Extensions:
In the code server instance, click the Extensions button to see and verify the extensions you had configured in devcontainer.json file.
