Adding files to source control on Windows
To add a file to source control in the DevOps ClearCase® Explorer, do the following:
- In the Browser pane, select the private file that you want to add to source control.
- Right-click and select Add to source control from the shortcut menu.
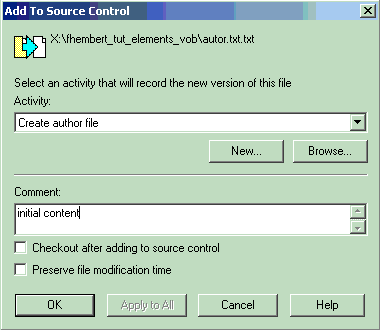
- Type an activity and a comment, and click OK.
Try it!
Note: To have a file
to use for learning to check in and out, the exercise includes creating a
small text file named author.txt.
DevOps Code ClearCase® users create the author.txt file in the VOB your-username_tut_elements_vob.vbs.
DevOps Code ClearCase® users create the author.txt file in the VOB cclt_tutorial_sources.vbs.
- Use your favorite text editor, and create a text file and type in your name.
- Save the file using the name author.txt in the your-username_tut_elements_vob folder. Then close the editor.
- Refresh your view (press F5) to see the file you created listed.
- To add the author.txt file to source control, right-click the file and select Add to source control from the shortcut menu.
- DevOps Code ClearCase® users only. As activity, type: author file. As comment, type: initial content.
- Make sure the option Check out after adding to source
control is not selected, to enable you to practice checking out later. Then, click
OK.

- Go to the ClearCase® Explorer and press F5 to update the contents of your view. DevOps Code ClearCase® has added the author.txt file to source control.