Customizing the WebSphere Commerce schema

In this lesson, you are customizing the physical layer by adding tables to contain store warranty and care instruction information to the WebSphere Commerce schema.

About this task

The following diagram outlines the changes to the WebSphere Commerce schema:
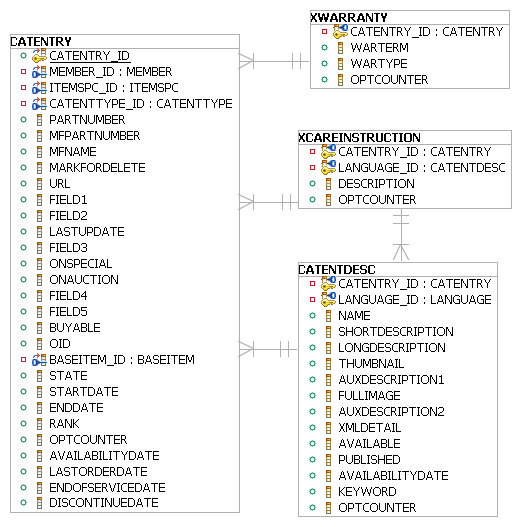
Warranty schema
The preceding diagram shows the new XWARRANTY and XCAREINSTRUCTION tables, and how they relate to the existing WebSphere Commerce tables, CATENTRY and CATENTDESC.
  • The XWARRANTY table has a foreign key to the CATENTRY table. The key allows the Data Service Layer (DSL) to populate data from the XWARRANTY table in the user data element of the CatalogEntry noun.
  • The XCAREINSTRUCTION table has a foreign key to the CATENTDESC table to allow DSL to populate data in the attribute element of the CatalogEntryDescription noun part.
  • The XCAREINSTRUCTION table has a foreign key to the CATENTRY table to provide support to the DSL search function.
To take advantage of the Data Service Layer user data (and attribute) support, the following restrictions apply when adding custom database tables:
  • The custom tables must have a foreign key to the base table for the noun or noun part that contains the data. A base table is a table that contains the unique key for the noun or noun part. For example, the CATENTRY table is the base table for the CatalogEntry noun. These relationships are used when fetching or updating a noun or noun part to access the custom data.
  • The relationship between the custom table and the base table must be a one-to-one relationship. User data is a map of name-value pairs. Each name represents a database column name and each value is the value in that database column. One-to-many relationships are not supported as each name in the map would collide.
To take advantage of the Data Service Layer parameter search support, create a foreign key to the base table for the noun when adding a custom table for a noun part. This relationship provides support to the DSL search function and this relationship is not required to be one-to-one.
Note: To enable this customizations in workspaces, you must complete the following tasks after completing this tutorial:
  1. Run the CM_updateWorkspacesSchema script to enable your modified database tables. For more information about updating the Workspaces schema, See Ant target: CM_updateWorkspacesSchema.
  2. Run the following SQL statement to register the custom access profile in the cmdreg; this SQL statement returns the locking information:
    
    insert into cmdreg (storeent_id, interfacename, classname) values 
    (0,  'com.ibm.commerce.catalog.facade.server.commands.InsertMoreCatalogEntryDataCmd+MyCompany_All.0', 
    'com.ibm.commerce.foundation.server.command.bod.bom.InsertMoreNounChangeControlMetaDataCmdImpl');
    
Note: Ensure that all foreign key relationships in the custom tables specify ON DELETE CASCADE

Procedure

  1. Connect to the development database..
  2. Create the customization tables by running the following SQL statements:
    Apache DerbyDB2
    CREATE TABLE XWARRANTY (CATENTRY_ID BIGINT NOT NULL, WARTERM INTEGER, WARTYPE VARCHAR(32), OPTCOUNTER SMALLINT, CONSTRAINT XWARRANTY_PK PRIMARY KEY(CATENTRY_ID), CONSTRAINT XWARRANTY_FK FOREIGN KEY (CATENTRY_ID) REFERENCES CATENTRY(CATENTRY_ID) ON DELETE CASCADE);
    
    CREATE TABLE XCAREINSTRUCTION (
    CATENTRY_ID BIGINT NOT NULL,
    LANGUAGE_ID INTEGER NOT NULL,
    CAREINSTRUCTION VARCHAR(254),
    OPTCOUNTER SMALLINT,
    CONSTRAINT XCAREINST_PK PRIMARY KEY (CATENTRY_ID, LANGUAGE_ID),
    CONSTRAINT XCAREINST_FK1 FOREIGN KEY (CATENTRY_ID, LANGUAGE_ID) REFERENCES CATENTDESC(CATENTRY_ID, LANGUAGE_ID) ON DELETE CASCADE,
    CONSTRAINT XCAREINST_FK2 FOREIGN KEY (CATENTRY_ID) REFERENCES CATENTRY (CATENTRY_ID) ON DELETE CASCADE
    );
    
    Oracle
    CREATE TABLE XWARRANTY (CATENTRY_ID NUMBER NOT NULL, WARTERM INTEGER, WARTYPE VARCHAR(32), OPTCOUNTER SMALLINT, CONSTRAINT XWARRANTY_PK PRIMARY KEY(CATENTRY_ID), CONSTRAINT XWARRANTY_FK FOREIGN KEY (CATENTRY_ID) REFERENCES CATENTRY(CATENTRY_ID));
    
    CREATE TABLE XCAREINSTRUCTION (
    CATENTRY_ID NUMBER NOT NULL,
    LANGUAGE_ID INTEGER NOT NULL,
    CAREINSTRUCTION VARCHAR(254),
    OPTCOUNTER SMALLINT,
    CONSTRAINT XCAREINSTRUCTION_PK PRIMARY KEY (CATENTRY_ID, LANGUAGE_ID),
    CONSTRAINT XCAREINSTRUCTION_FK1 FOREIGN KEY (CATENTRY_ID, LANGUAGE_ID) REFERENCES CATENTDESC(CATENTRY_ID, LANGUAGE_ID),
    CONSTRAINT XCAREINSTRUCTION_FK2 FOREIGN KEY (CATENTRY_ID) REFERENCES CATENTRY (CATENTRY_ID)
    );
  3. Find the CATENTRY_ID for three products to add the warranty information to during this tutorial. To determine the CATENTRY_ID for products run the following SQL statement:
    Select * from CATENTRY where MEMBER_ID = (select MEMBER_ID from CATALOG where CATALOG_ID = catalog_id_01);
    Where catalog_id_01 is the CATALOG_ID for your store. IF you do not know the CATALOG_ID for your store, you can determine the value by running the following SQL statement:
    Select * from CATALOG; 
  4. Populate the custom tables with some sample data. In the following SQL statements, replace catentry_id_01, catentry_id_02, and catentry_id_03 with the catentry_id for products in your catalog, for example: INSERT INTO XWARRANTY (CATENTRY_ID, WARTERM, WARTYPE) VALUES (10101, 60, 'LIMITED') And then run the SQL statements:
    INSERT INTO XWARRANTY (CATENTRY_ID, WARTERM, WARTYPE) VALUES (catentry_id_01, 30, 'LIMITED'); 
    INSERT INTO XWARRANTY (CATENTRY_ID, WARTERM, WARTYPE) VALUES (catentry_id_02, 45, 'COMPREHENSIVE'); 
    INSERT INTO XWARRANTY (CATENTRY_ID, WARTERM, WARTYPE) VALUES (catentry_id_03, 60, 'LIMITED');
    
    INSERT INTO XCAREINSTRUCTION (CATENTRY_ID, LANGUAGE_ID, CAREINSTRUCTION) VALUES (catentry_id_01, -1, 'Never use an abrasive cleaner or material on any finished product');
    INSERT INTO XCAREINSTRUCTION (CATENTRY_ID, LANGUAGE_ID, CAREINSTRUCTION) VALUES (catentry_id_02, -1, 'Avoid soap and water');
    INSERT INTO XCAREINSTRUCTION (CATENTRY_ID, LANGUAGE_ID, CAREINSTRUCTION) VALUES (catentry_id_03, -1, 'Never use household cleaners');
    
    
    Note: Make sure that the store is published properly, otherwise you can encounter errors when attempting to insert these data into the database.