Registering the SCC download plug-in
Use the Manage Download Plug-ins dashboard to register the SCC download plug-in on the BigFix server to install SUSE patches on x86, x86_64, and s390x endpoints.
Before you begin
- Ensure that the BigFix server and the BigFix client are on the same version to avoid a null error.
- Ensure that the Require SHA-256 Downloads option in the BigFix Administration Tool is not enabled to prevent the SCC Plug-in from failing. For more information about the SCC Plug-in, see Using the download plug-in.
- For Linux BigFix servers, install the following packages and their dependencies:
- GLIBC version 2.2.5 or later
- GLIBC version 2.3 or later
- GNU/Linux kernel version 2.6.31 or later
- Enable HTTPS access on the following URLs on port 443.
- https://scc.suse.com:443
- https://updates.suse.com:443
- Subscribe to the Patching Support site to gain access to the Manage Download Plug-ins dashboard.
- Activate the Encryption Analysis for Clients analysis, which is available from the BES Support site.
- Activate the Download Plug-in Versions analysis, which is available from the Patching Support site.
- If you want to encrypt endpoints, deploy the Enable Encryption for Clients Fixlet, which is available from the BES Support site.
Procedure
- From the Patch Management domain, click .
-
From the Servers and Relays table, select the server on which the download plug-in is to be
registered.
Important: You must always register the download plug-in on the BigFix server.
- From the Plug-ins table, select SCC Plug-in.
-
Click Register.
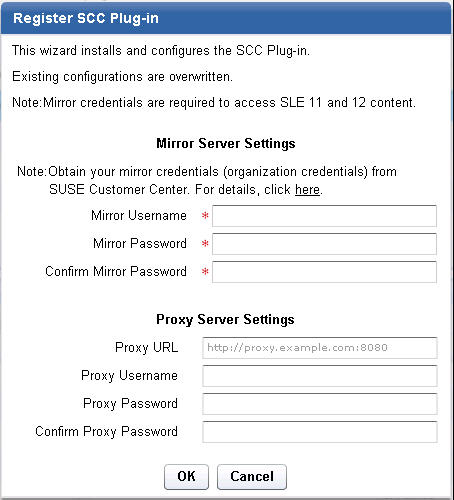
The Register SCC Plug-in wizard displays.
Figure 1. Register SCC download plug-in wizard 
-
Enter the Novell credentials that you use to log on to the Novell Customer Center.
- Novell Username
- Your Novell account user name to the Novell Customer Center. It must have a valid support identifier to download patches.
- Novell Password
- Your Novell account password to the Novell Customer Center.
- Confirm Novell Password
- Your Novell account password for confirmation.
-
Enter your SUSE Customer Care mirror credentials to download the patches from the mirrors of
the supported repositories.
Important:
The mirror credentials refer to the Organization Credentials listed in the SUSE Customer Center or Novell Customer Center. For more details, see Mirroring Credentials.
Note: Mirror credentials are required for SUSE Linux Enterprise 12 content.- Mirror URL
- The URL of your mirror server. It must be a well-formed URL, which contains a protocol and a host name.
- Mirror Username
- Your organization user name to access the mirror of the supported SUSE repositories.
- Mirror Password
- Your organization password to access the mirror of the supported SUSE repositories.
- Confirm Mirror Password
- Your mirror password for confirmation.
-
Enter the proxy parameters if the downloads must go through a proxy
server.
Note: Only basic authentication is supported. Ensure that the proxy is configured to work with the Transport Layer Security (TLS) protocol.
- Proxy URL
- The URL of your proxy server. It must be a well-formed URL that contains a protocol and a host
name. The URL is usually the IP address or DNS name of your proxy server and its port, which is
separated by a colon. For example:
http://192.168.100.10:8080.
- Proxy Username
- Your proxy user name if your proxy server requires authentication. It is usually in the form of
domain\username.
- Proxy Password
- Your proxy password if your proxy server requires authentication.
- Confirm Proxy Password
- Your proxy password for confirmation.
-
Click OK.
The Take Action dialog displays.
- Select the target computer.
- Click OK.
Results
plugin.ini
configuration file is created in the following locations:- On Windows systems
- %PROGRAM FILES%\BigFix Enterprise\BES Server\DownloadPlugins\SCCProtocol
- On Linux systems
- /var/opt/BESServer/DownloadPlugins/SCCProtocol