Creating an automation for a Fixlet Stream
An automation defines when and how a Fixlet Stream deploys Fixlets to its subscribed devices. Use the Create automation wizard to set the device schedule, the execution sequence, and the activation date. When you create the automation, the stream becomes active and starts continuous remediation.
Before you begin
- You must have permission to manage Fixlet Streams.
- The Fixlet Stream must already exist. See Create Fixlet Stream.
- The stream must have at least one subscribed device. The Create automation button stays unavailable until devices are subscribed.
- The stream must be inactive. An active stream shows Edit automation instead.
About this task
Expand Resolve from the side navigation, and then select Fixlet Streams. Each stream appears as a card with its status, ID, site, Fixlet and device counts, and Fixlets compliance.
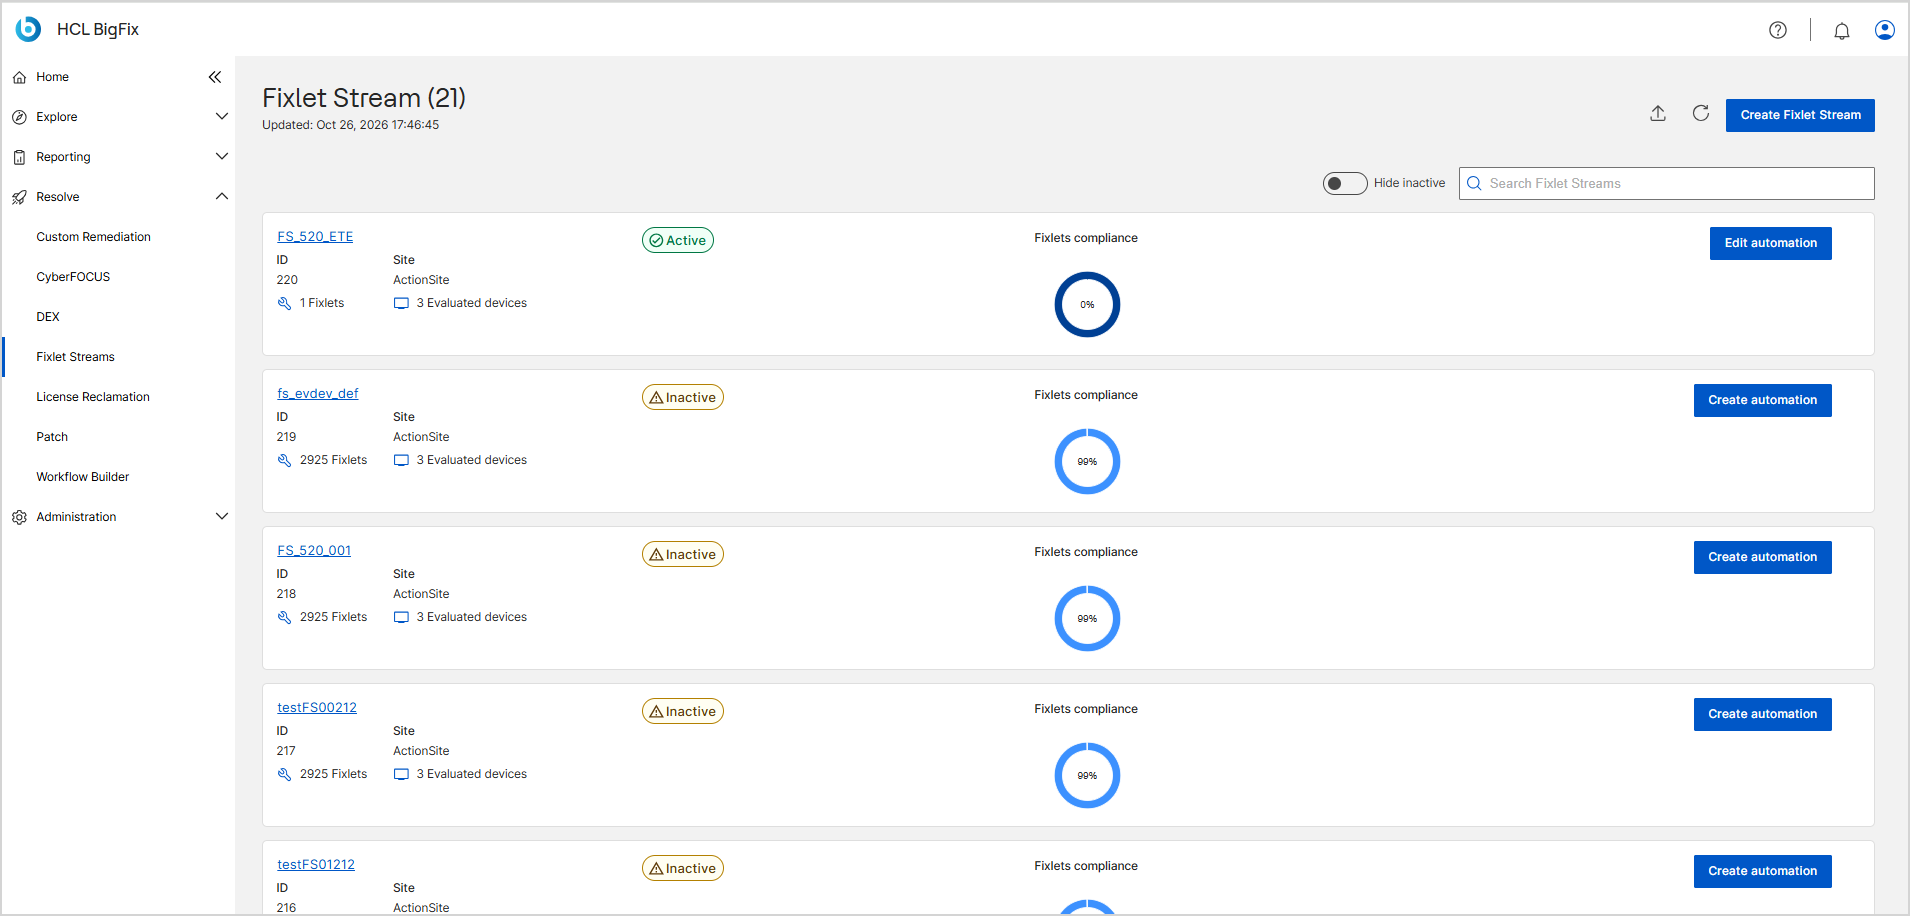
The wizard has four steps: Action schedule, Action sequence, Automation schedule, and Summary. The footer of every step reports the scope of the automation, for example Automate 925 Fixlets to 3 devices. Click Back to revise an earlier step, or Cancel to close the wizard without saving.
Procedure
-
On the card of the Fixlet Stream, click Create
automation.
The Create automation wizard opens on the Action schedule step.
-
On the Action schedule step, select when the Fixlets can
run.
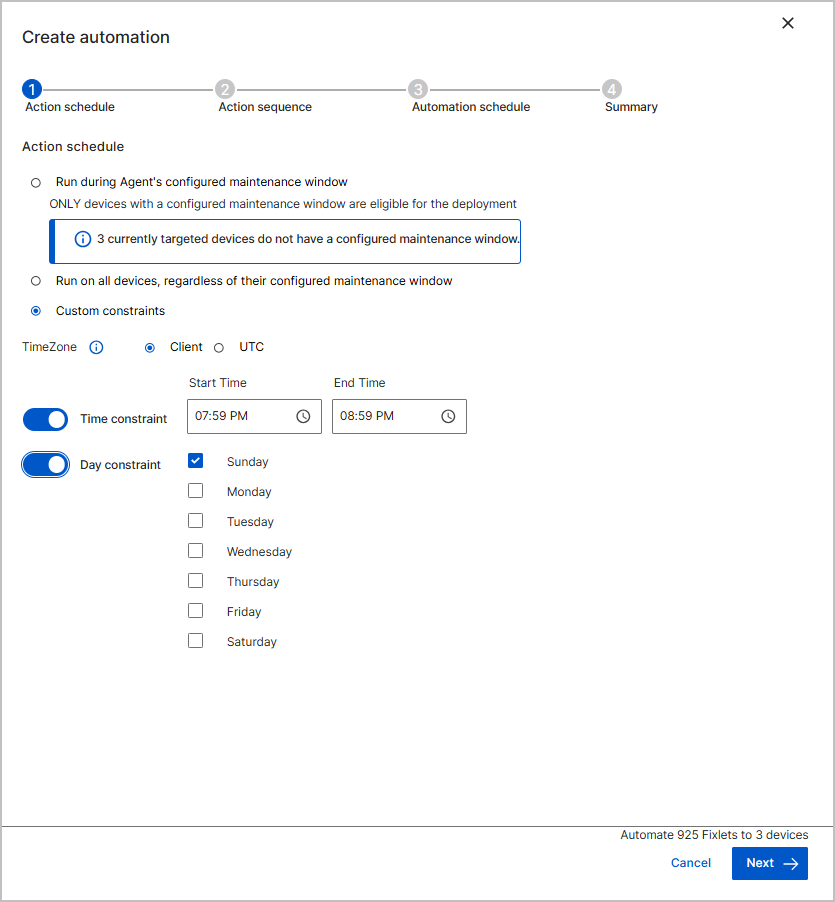
- Run during Agent's configured maintenance window: Only devices with a configured maintenance window are eligible for the deployment. The wizard reports how many targeted devices have no maintenance window, for example 3 currently targeted devices do not have a configured maintenance window. To set windows for those devices, see Managing Device Maintenance Windows.
- Run on all devices, regardless of their configured maintenance window: Deploys to every subscribed device.
- Custom constraints: Defines your own deployment window. This option enables the time zone, time, and day controls.
- Optional:
If you selected Custom constraints, define the
window.
- For TimeZone, select Client to use each device's local time, or UTC to use a single reference time.
- Turn on Time constraint, and then set the Start Time and End Time.
- Turn on Day constraint, and then select the days on which the deployment can run.
-
Click Next.
The Action sequence step opens.
- Optional:
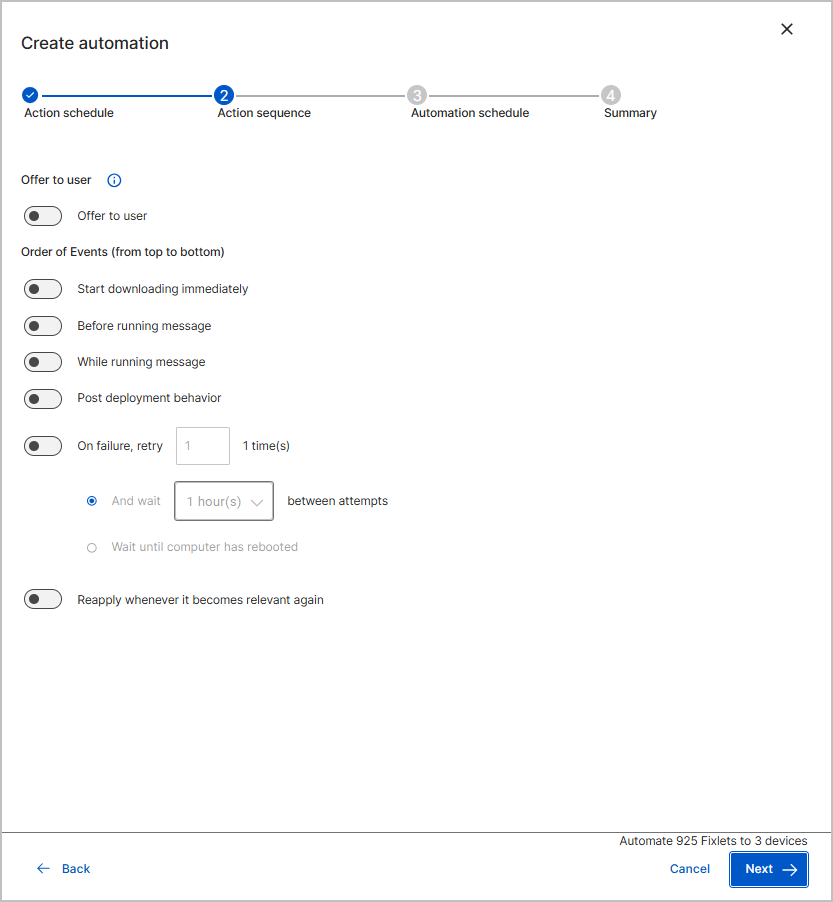
Turn on Offer to user to let users start the deployment
themselves instead of running it silently.
- Notify device owner of offer availability: Select this checkbox to alert the device owner when the offer becomes available.
- Title: Enter the title that identifies the offer to the user.
- Category: Enter the category that groups the offer in the self-service application.
- Description: Enter the text that explains what the offer does.
-
Under Order of Events (from top to bottom), configure how
the Fixlets run on the devices.
- Start downloading immediately: Downloads the payload before the deployment starts. If this option is off, the download begins after the deployment starts.
- Before running message: Shows a message to users
before the action runs. Turn on the toggle, enter the message text, and
then set the following options:
- In Notify user for, select how long the message is displayed (for example, 10 minutes), and in and then, select what happens when that time ends, such as Run action immediately.
- Allow user to save work: Select this checkbox to let users save open work before the action runs.
- Allow user to cancel: Select this checkbox to let users cancel the action.
- Show confirmation message before running action: Select this checkbox to prompt users to confirm before the action runs. In Confirmation message, keep the default text or enter your own, for example Are you sure you want to run this action now?
- While running message: Shows a message to users while the action runs. Turn on the toggle, and then enter the message text to display to the user.
- Post deployment behavior: Turn on this toggle to
control what happens on the device after the action completes, and then
select one of the following:
- Do nothing after action completes: The device stays in its current state.
- Restart computer after action completes: The device restarts when the action finishes.
- Shutdown computer after action completes: The device shuts down when the action finishes.
- In Message title (required), enter a short title, for example Shutdown now.
- In Message text (required), enter the message body that asks users to save any unsaved work.
- In Notify user for, select how long the message is displayed, and in and then, select what happens when that time ends, such as Shutdown automatically or Restart automatically.
- Allow user to cancel shutdown or Allow user to cancel restart: Select this checkbox to let users cancel the shutdown or restart.
- On failure, retry: Turn on this toggle to have
BigFix try the deployment again if it fails. Enter the number of
retries, and then select one of the following options:
- and wait: Select this option and set the interval (for example, 1 hour) that BigFix waits between attempts.
- Wait until computer has rebooted: Select this option to retry the action only after the device restarts.
- Reapply whenever it becomes relevant again: Turn on this toggle to run the action again each time the Fixlet becomes relevant on the device. Select with a to set the wait between attempts, and up to to cap the number of times.
-
Click Next.
The Automation schedule step opens.
-
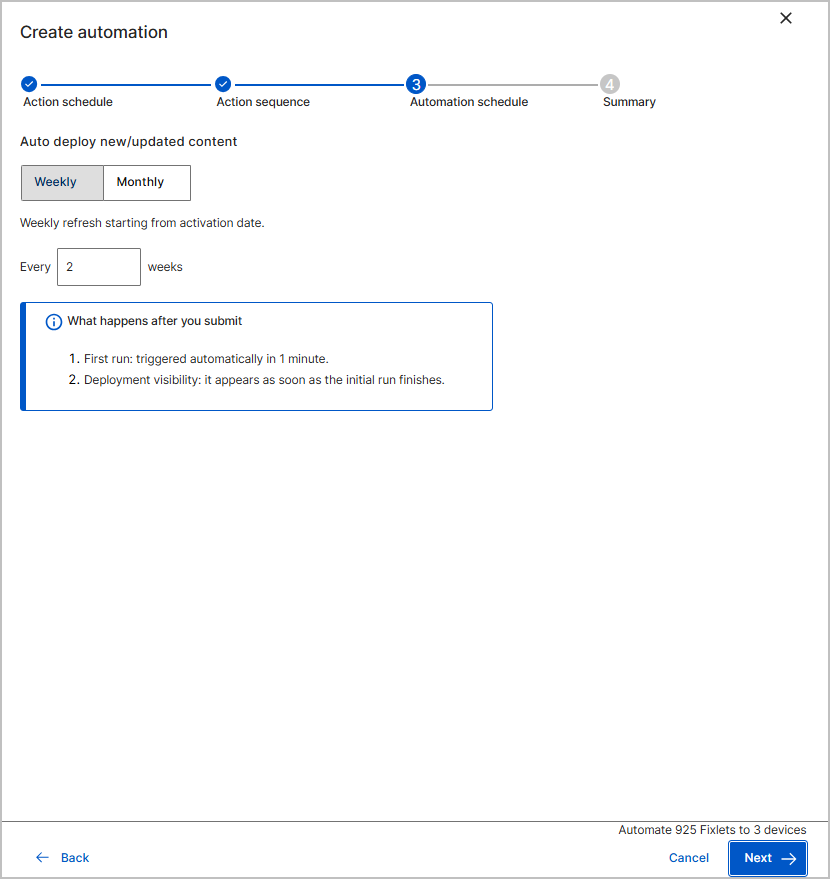
On the Automation schedule step, under Auto
deploy new/updated content, set how often the stream picks up new
and updated Fixlets.
Select Weekly or Monthly, and then set the interval. Both schedules start from the activation date.
-
Weekly: In the Every field, enter the number of weeks between refreshes, for example 2 weeks.
-
Monthly: Refresh by a specific date or a specific day of the month. Select one of the following options:
- On the [date] of the month: Select the day of the month, for example the 2nd.
- On [occurrence] [weekday]: Select the occurrence and the weekday, for example the second Sunday.
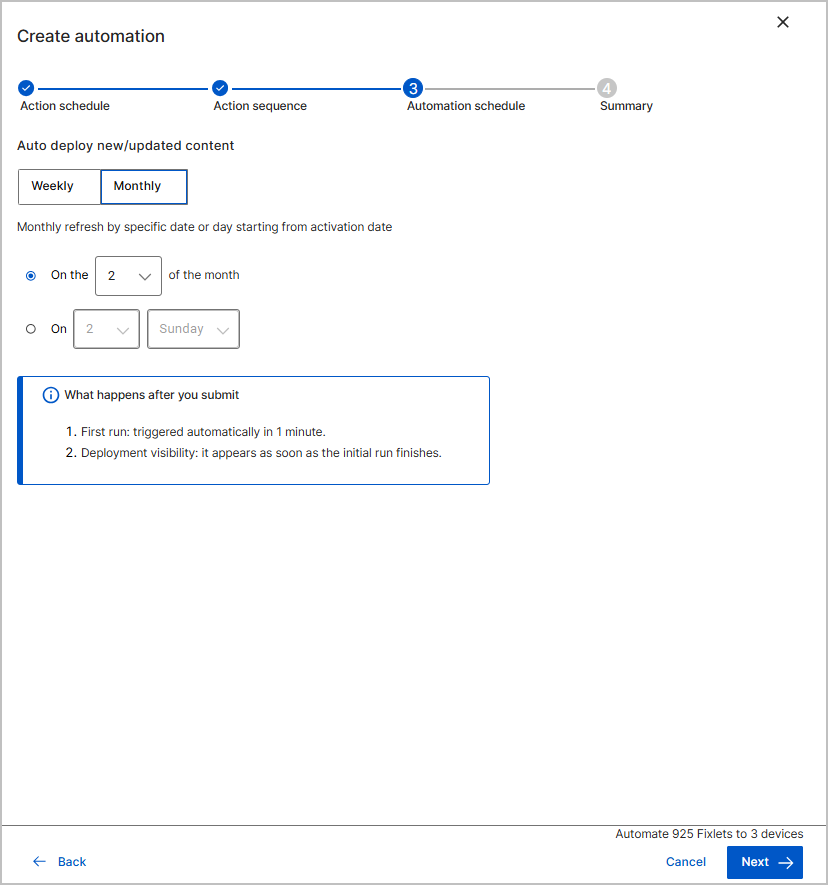
Note:The What happens after you submit panel explains how the automation starts:
- The first run is triggered automatically in 1 minute.
- When the automation runs, BigFix creates an action in the BigFix console, and the deployment appears on the Deployments tab after the action is created. BigFix creates the action only if the Fixlets in the stream are relevant to at least one subscribed device. If none of the subscribed devices needs the Fixlets, the automation still runs, but it finds no targeted devices, so no action and no deployment are created. In that case, the Deployments tab stays empty, and the reason is recorded only in the orchestration log.
-
-
Click Next.
The Summary step opens.
-
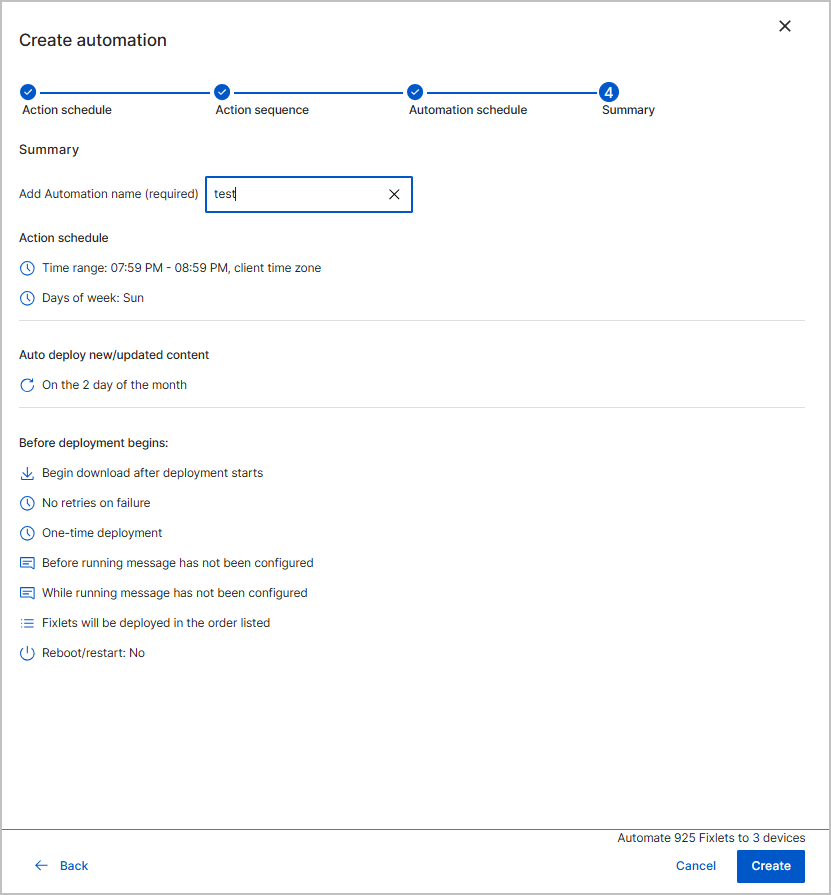
On the Summary step, in Add Automation
name, enter a name for the automation. This field is
required.
-
Review the settings that the summary reports.
- Action schedule: The maintenance window option or the custom constraints that you set, reported as a time range and the days of the week, for example Time range: 07:59 PM - 08:59 PM, client time zone and Days of week: Sun.
- Auto deploy new/updated content: The refresh interval, for example On the 2 day of the month.
- Before deployment begins: The download, retry, reapply, message, order, and reboot settings, for example Begin download after deployment starts, No retries on failure, One-time deployment, Fixlets will be deployed in the order listed, and Reboot/restart: No.
To correct a setting, click Back until you reach the relevant step.
-
Click Create.
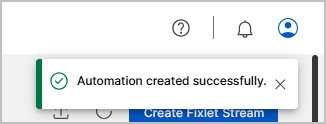
The message Automation created successfully appears, and the stream status changes to Active. The card action changes to Edit automation.
Results
- The first run is triggered automatically about 1 minute after you submit.
- Fixlets deploy to the subscribed devices on the defined schedule.
- New and updated Fixlets that match the stream criteria deploy automatically at the refresh interval.
- Deployment activity appears on the Deployments tab of the stream after BigFix creates an action for the relevant devices. If no subscribed device needs the Fixlets, no deployment appears.
What to do next
- Click the name of the Fixlet Stream to open the Fixlet Stream Details Page, and then monitor compliance on the Overview tab and progress on the Deployments tab.
- To change the schedule, activate the stream, or deactivate it, see Managing Fixlet Streams.