Setting session permissions for unregistered targets
A target that participates in a broker session receives session policies from the server. These policies are resolved from the user and target group permission links that the user and target in the session are associated with. An on-demand target participates in broker remote control sessions. However, it is not registered with the server and does not belong to regular target groups. An unregistered target can also be a computer that you install the target software on, configure it with correct broker settings, and the target property Managed set to no. You can define session permissions for unregistered targets by using the Set Permissions for Unregistered Targets function.
About this task
To set policies for sessions with unregistered targets, select a user group that the controller user belongs to. Using this group, policies are resolved in the same way as for managed sessions. The policies that are defined for the user groups that the controller user belongs to are combined with the policies selected for unregistered target sessions.
To define policies for a remote control session with an unregistered target, complete the following steps:Procedure
- Log on to the Remote Control server with a valid admin ID and password.
- Run a report to display the user groups.You can also use the search function.
- Select a user group.
- Select Set Permissions for Unregistered Targets.
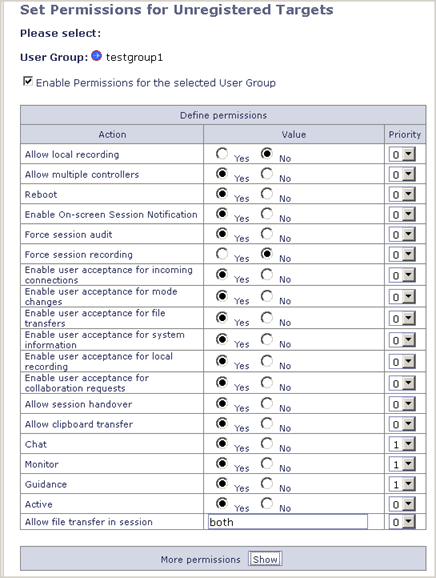
The Set Permissions for Unregistered Targets panel is displayed.

- Click the icon to select a different user group, if required.
- To enable the policies, click Enable Permissions
for the selected User Group.Note: If you clear Enable Permissions for the selected User Group and click Submit, no policies are set for this user group and unregistered targets.
-
Set values for the policies or keep the default values that are selected.
You can also set a priority value for the policy. If the controller user is a member of multiple user groups, select a higher priority for policies that you want to override.For example, the controller user is a member of group1 and group2. Group2 is linked to a set of unregistered target policies that are defined with Chat = No. Group1 has Chat = Yes and priority 0. When the server gets the two conflicting values for Chat, because the user belongs to both groups, it applies the No value. Therefore, to override the group2 value of No, so that Chat is set to Yes for the session, set Chat = Yes with priority 1 for group1. For information about the policies, see Session policies for unregistered targets.
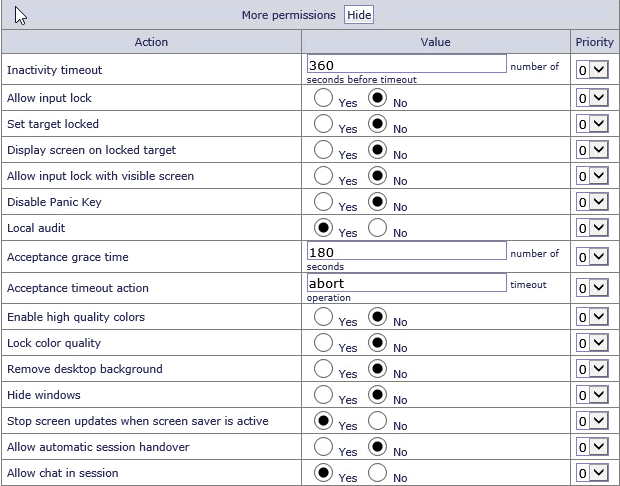
- Click Show in the More permissions section to set
values for extra policies.

- Set a permissions schedule if required.
- To enable the policies now, click Submit. To define when the selected policies are enabled, create a schedule. To create a schedule, go to step 11.
- From the Repeat Schedule list,
select the options and click Submit
- Once Only
- Policies are valid only from the Start date and start time until
the End date and end time.
- Type in a Start date, in the format yyyy-mm-dd, or select the calendar icon to select the date.
- Type in a Start time in the format hh:mm:ss.
- Type in an End date, in the format yyyy-mm-dd, or select the calendar icon to select the date.
- Type in an End time in the format hh:mm:ss.
- Daily
- Policies are valid every day between the selected Start time and
the End time from the Start date until the End date.
- Type in a Start date, in the format yyyy-mm-dd, or select the calendar icon to select the date.
- Type in an End date, in the format yyyy-mm-dd, or select the calendar icon to select the date.
- Type in a Start time in the format hh:mm:ss.
- Type in an End time in the format hh:mm:ss.
- Weekly
- Policies are valid every week on the selected days, between the
selected Start time and End time from the Start date until the End
date.
- Type in a Start date, in the format yyyy-mm-dd, or select the calendar icon to select the date.
- Type in a Start time in the format hh:mm:ss
- Type in an End date, in the format yyyy-mm-dd, or select the calendar icon to select the date.
- Type in an End time in the format hh:mm:ss.
- Select the days.
- Click Submit.