Before starting to install Clara, you must check the following system prerequisites:
Verify that Docker and Docker Compose are installed, configured, and ready to use. For the required version, see: System Requirements.
If you don't have Docker and Docker Compose already installed, see: Installing Docker and Docker Compose.
Clara requires some values to be set for ulimit parameter, for Linux OS. See: How to verify and set ulimit parameter.
Verify the available virtual memory. See: How to verify and set the available virtual memory.
If you are installing Clara on RHEL or CentOS distros, SELinux must be set to Permissive or Disabled. See: How to set SELinux to permissive.
To install and configure Clara, run the following procedure.
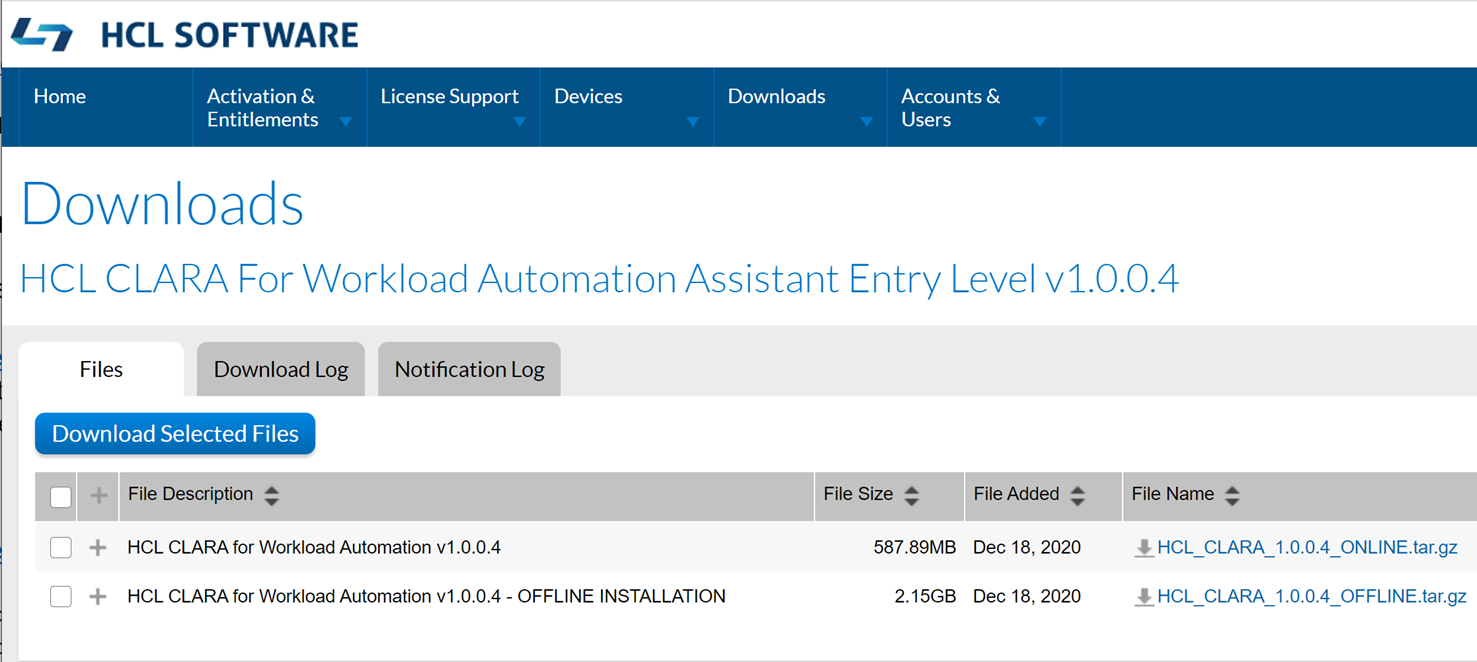
From HCL License Portal download the appropriate Clara installation package. Depending on your license type, you have two different options:
HCL CLARA for Workload Automation Assistant Standard Level v1.0.0.4
HCL CLARA for Workload Automation Assistant Entry Level v1.0.0.4
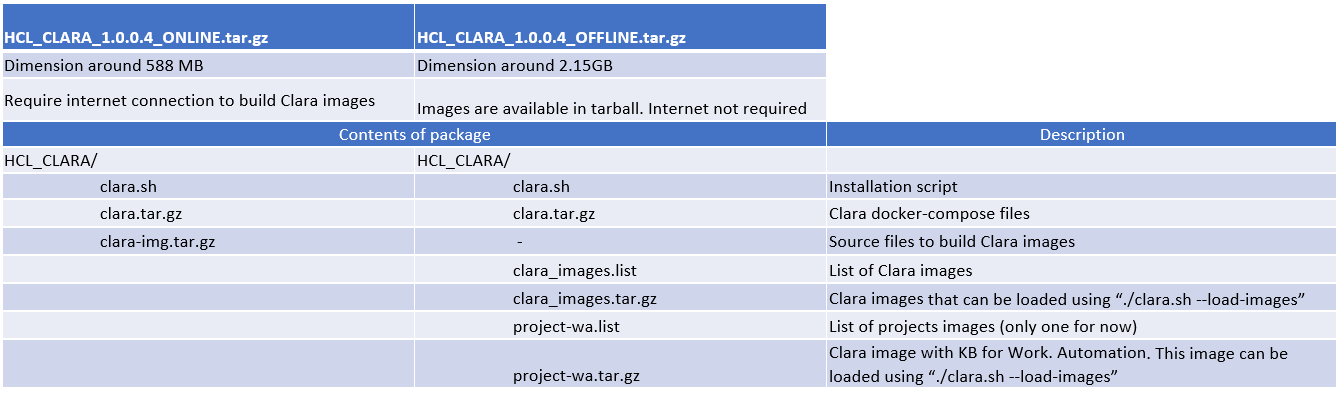
Each option is available with 2 different types of installation packages: online and offline.
Use the online installation package to build Clara images directly on your machines. This type of package requires a working Internet connection.
Use the offline installation package if the machine does not have an Internet connection or if you do not want to build Clara.
The following table summarizes the content of the 2 different types of packages:
Extract the content of the tar.gz file into <BUILD_DIR>, a directory of your choice using one of the extraction tools available on your system or downloadable from the Internet. The tool you use must be able to keep the file permissions on the extracted files.
To enable Clara interaction with your Workload Automation environment, you must properly customize the <BUILD_DIR>/clara/config/Clara-WA.env.TEMPLATE file. See below the section about Customizing environment files. If you want to enable Clara interaction with multiple Workload Automation environments, see Managing multiple Workload Automation environments. You might decide to skip this step: in this case, the installation script will ask you to provide the required customization information during the installation process.
If you want to change default Clara credentials before building in Docker, see Customizing Clara credentials.
To install Clara on Linux operating system, the user must have read and write permissions for the <BUILD_DIR> directory. Also, the user must have execute permission for Docker commands. This means that the user must be a member of sudoers group or Docker group. If the user is a member of sudoers group but not of Docker group, the installation script must be run with sudo.
Open a bash shell and get ready to install Clara.
If it is the first time you install Clara, or you need to update Clara images, you must first build Clara images. You can skip this step if you are not installing Clara for the first time or the images are locally available.
Change the directory to <BUILD_DIR> and extract the content of clara-img.tar.gz file:
cd <BUILD_DIR>
tar xvfz clara-img.tar.gz
Build Clara images by running the command:
clara-img/clara-build.sh -p -i ALL 2>&1 | tee clara-build.log
Note: To run the above command, an active internet connection is required. In case this is not possible, you can build Clara images on a different Linux server with Docker and an internet connection. See Building Clara images on a different server.
If you have built images locally, you can skip directly to the next step.
If you have built images on a remote server, ensure all required tar.gz files have been copied locally under <BUILD_DIR> directory and run the following command:
./clara.sh --load-images
Proceed with Clara installation. See Clara.sh command usage if you want to skip license check, OS prerequisites check, all variable prompts and use defaults (defaults will be loaded from .env file if present in the installation or local path). For example, if you pass the following parameters to the installation script:
--skip-check-prereq --skip-var-prompts
and a valid .env file if present in the installation or local path, the installation will be completely unattended. Otherwise:
If the Autobot License File is not yet available, run the following steps:
From the <BUILD_DIR> directory, run the command:
clara.sh --install --install-path <install_path>
where <install_path> is the installation directory of your choice (default value is /opt/hcl).
For a detailed description of the command, see clara.sh command.
If Clara is successfully installed, the installation process generates a UID.
Contact HCL Solutions Team (HCLSolutionsSupport@hcl.com) with the UID to get a valid Autobot license (license.properties file).
Copy the license.properties file in the Clara installation directory.
From the installation directory, activate and configure Clara by running the following command:
./clara.sh --load-project <prj> --license license.properties
where <prj> can be:
IWA IBM Workload Automation
HWA HCL Workload Automation
IWAz IBM Workload Automation for z
If you already have a valid Autobot License File, run the following steps:
From the <BUILD_DIR> directory, install Clara by running the following command:
./clara.sh --install --install-path <install_path> --license ./license.properties
From the installation directory, activate and configure Clara by running the following command:
./clara.sh --load-project <prj>
If you are reinstalling Clara and the persistent Clara volume is still available, you can reuse the license already cached in the volume. Run the following steps:
From the <BUILD_DIR> directory, install Clara by running the following command:
./clara.sh --install --install-path <install_path> --license CONTAINER
From the installation directory, activate and configure Clara by running the following command:
./clara.sh --load-project <prj>
As the installation script starts, if you haven't previously customized the <BUILD_DIR>/clara/config/Clara-WA.env.TEMPLATE file (see step 3), you are required to provide information to enable Clara interaction with your target environment. Press Enter to accept the proposed default values (see step 3).
The installation script checks the prerequisites (unless you have specified the --skip-check-prereq parameter), runs the installation process, and verifies its successful completion.
When the installation is completed, you can access Clara web interface at the following link https://<IP:PORT>/Clara/ where:
IP is the IP address of Clara machine
PORT is the port of Clara machine. You can skip it if you use the default port (443)
The installation script generates two Clara users:
userid solutions, password Hclsolutions00, with user role
userid admin, password Hclsolutions00, with administrator role
As you start chatting with Clara, you must define credentials for the product environments you want to manage with Clara. The User Credential Manager component will help you map your product environment credentials with your Clara credentials (each Clara user can manage his own Workload Automation credentials). For additional details, see Managing User Credentials.
Use the Keycloak administration console to define new Clara users, new roles, or change default passwords. You can access Keycloak administration console https://<IP:PORT>/keycloak/auth/admin by using the following default credentials:
userid=admin
password=Hclsolutions00
If you want, you can change Keycloak default password. For details about using Keycloak, see Configuring Security.
For security reasons, you are recommended to generate a custom Keycloak Client Secret, in place of the default one provided in you environment TEMPLATE file. See How to set a custom Client Secret.
After installing Clara, to enable Clara interaction with multiple Workload Automation environments, see: Managing multiple Workload Automation environments.
You can also interact with Clara by using messaging tools such as Slack and Sametime. For the required configuration steps, see Installing Adapters for Messaging Tools.
To start/stop Clara containers and to start/stop Clara services, see clara.sh command options below.
Both for Workload Automation and Workload Automation for z, customize the <BUILD_DIR>/clara/config/Clara-WA.env.TEMPLATE file by providing the following information:
Common properties |
|
NGINX_PORT |
TCP/IP Port to use with Clara [Default: 443] |
NGINX_CERTS |
Path where nginx certificates for Clara are stored [Default: ./nginx] |
CLIENT_SECRET |
Client Secret to access Keycloak [Default: 214c76c5-f726-482b-92b6-2f5586c7bbe1] |
Workload Automation properties |
|
PROJECT |
HWA for HCL Workload Automation IWA for IBM Workload Automation HWAz for HCL Workload Automation for z IWAz for IBM Workload Automation for z |
WA_ENV_NAME |
Mnemonic name of the Workload Automation environment [Default: WA-PROD] |
WA_SERVER_NAME |
Only for WA: hostname of the Workload Automation server (MDM) [Default: wa-server]. You can skip this settings if you are configuring Workload Automation for z |
WA_SERVER_PORT |
Only for WA: HTTPS port where WA server (MDM) is listening [Default: 31116]. You can skip this settings if you are configuring Workload Automation for z |
WA_CONSOLE_NAME |
Hostname of the Workload Automation Web console [Default: wa-console] |
WA_CONSOLE_PORT |
HTTPS port of the Workload Automation Web console [Default: 16311] |
WA_ENGINE_NAME |
Name of the engine definition within Workload Automation [Default: engine] |
WA_LIC_SERVER_NAME |
Hostname of the License Service provided by HCL [Default: https://hclsoftware.compliance.flexnetoperations.com/instances/] |
WA_LIC_ID |
Unique ID (License Server ID) of the device your Clara license entitlement has been associated with |
WA_TKT_URL |
Url to the Service Platform for Ticketing [Default: https://servicenow.com] |
THREADPULL_SIZE |
The number of monitoring processes that Clara can manage simultaneously [Default: 50] - Optional parameter |
SMTP_HOST |
Fully qualified hostname of the SMTP Server that will be used by Clara to send email notifications [Example: smtp.gmail.com] |
SMTP_SENDER |
Used to send email to the recipient specified in Clara Credential Manager [Example: username@gmail.com] |
SMTP_SENDER_PASSWORD |
Used to authenticate the SMTP_SENDER |
SMTP_AUTH_PROTOCOL |
The authentication type defined in the SMTP_HOST server. Can be TLS or SSL [Default:TLS] |
SMTP_PORT |
The port of the SMTP mail server [Example: 465 for gmail] |
Properties for HERO integration |
|
HERO_IP |
HERO server IP address. For WA users only (not WAz). |
HERO_PORT |
HERO server Port. For WA users only (not WAz). |
HERO_SECRET |
HERO client secret to connect: "CLIENT-SECRET-CONFIG". For WA users only (not WAz). |
HERO_CLIENT_ID |
HERO nginx client ID: "nginx". For WA users only (not WAz). |
HERO_REALM |
HERO realm info for the connection: "hero". For WA users only (not WAz). |
HERO_URL |
Landing page of HERO if not installed: https://www.hcltechsw.com/products/hero/offerings/hero-workload-automation. For WA users only (not WAz). |
Properties for source docker images |
|
IMG_PREFIX |
Clara docker image repo prefix when images are not available locally, like: example.com/ |
TAG |
Clara docker image tag based on Clara version, optional [Default: latest] |
If a re-configuration is done on dynamic files, such as settings.properties or nginx.conf, restart docker-compose by running the following commands:
docker-compose stop
docker-compose start
or, you can restart just the involved container, for example clara-autobot for settings.properties, or clara-nginx for nginx.conf and certificates.
If the configuration is on the client, try to delete the cache on browser.
If the configuration is on the docker-compose.yml, then rebuild the entire application by running the following command:
docker-compose up -d –build
To build Clara images on a different server, run the following steps:
Move clara-img.tar.gz file, available under <BUILD_DIR> directory, on a Linux server with Docker and an active Internet connection.
Extract the content of the file clara-img.tar.gz
tar xvfz clara-img.tar.gz
Build Clara images running the command:
clara-img/clara-build.sh -p -i ALL 2>&1 | tee clara-build.log
Create the archive file with all required docker images that can be imported later.
To build the archive, run the following command:
clara-img/clara-build.sh -s 2>&1 | tee clara-save.log
The following files will be generated:
clara_images.tar.gz Clara images
clara_images.list Clara images list (to build correct names)
project-iwa.tar.gz IBM Workload Automation Clara project
or
project-iwaz.tar.gz IBM Workload Automation for z Clara project
project-hwa.tar.gz HCL Workload Automation Clara project
or
project-hwaz.tar.gz HCL Workload Automation for z Clara project
Move the above files under the directory <BUILD_DIR> on the server where Clara will be installed
Remove the clara-img directory, the clara-img.tar.gz file and any file produced. You can also remove the images from docker using the command “docker rmi <name>”.
If you want to change default Clara credentials before building in Docker, you can edit them inside the following files:
Default admin credentials can be changed inside the “docker-compose.yml” file, in the root docker installation folder.
The username can be changed by editing the field KEYCLOAK_USER under the keycloak container section.
The password can be changed by editing the field KEYCLOAK_PASSWORD
Default test credentials inside Clara Realm can be edited in the ./keycloak/Dockerfile where you find a reference to add-user-keycloak.sh file, customizing the following two parameters:
--user for the user
--password for the password
You can interact with Clara by using Slack and Sametime messaging tools.
To install the required adapters, run the following procedure:
From the <BUILD_DIR> directory where you extracted Clara installation package, build the adapter image for the adapter that you want to install. Run the command:
For Slack: clara-img/clara-build.sh -p -i slAdapter
For Sametime: clara-img/clara-build.sh -p -i stAdapter
If you want to install the adapter on the same machine where Clara is installed, run the following steps:
Properly configure the config.properties file containing the adapter properties, located in the following directory:
For Slack: <BUILD_DIR>/Adapters/SlackAdapter/resources. For details see: Configuration file for Slack adapter
For Sametime: <BUILD_DIR>/Adapters/SametimeAdapter/resources. For details see: Configuration file for Sametime adapter
Start the adapter:
For Slack: from <BUILD_DIR>/Adapters/SlackAdapter, run the command:
docker run --env-file resources/config.properties --name clara-slackadapter -d clara-slackadapter:latest
For Sametime: from <BUILD_DIR>/Adapters/SametimeAdapter, run the command:
docker run --env-file resources/config.properties --name clara-sametimeadapter -d clara-sametimeadapter:latest
If you want to install the adapter on a different machine, run the following steps:
Save the adapter image to a file by running the following command:
For Slack: docker save clara-slackadapter:latest | gzip > clara-slackadapter.tar.gz
For Sametime: docker save clara-sametimeadapter:latest | gzip > clara-sametimeadapter.tar.gz
Locate the configuration file containing the adapter properties:
For Slack: <BUILD_DIR>/Adapters/SlackAdapter/resources/config.properties
For Sametime: <BUILD_DIR>/Adapters/SametimeAdapter/resources/config.properties
Copy the tar.gz file containing the adapter image and the configuration file to the machine where you want to install the adapter.
Properly configure the config.properties file. For details see:
For Slack: Configuration file for Slack adapter
For Sametime: Configuration file for Sametime adapter
From the machine where you want to install the adapter, load the image from the file by running the following command:
For Slack: docker load --input clara-slackadapter.tar.gz
For Sametime: docker load --input clara-sametimeadapter.tar.gz
From the folder where you loaded the adapter image, start the adapter by running the following command:
For Slack: docker run --env-file <PATH>/config.properties --name clara-slackadapter -d clara-slackadapter:latest
For Sametime: docker run --env-file <PATH>/config.properties --name clara-sametimeadapter -d clara-sametimeadapter:latest
where <PATH> is the folder containing the config.properties.file
Configuration file for Slack adapter
auth_token |
The token generated by Slack bot |
client_secret |
The client secret requested to access Keycloak, as defined in the .env environment configuration file for Clara |
bot_url |
In the format <IP>:<PORT>. IP address and Port of the machine where Clara is installed (if Port is 443, it can be omitted) |
bot_project |
Specify WA if the Clara project specified during the installation is HWA or IWA. Specify WAz if Clara project is HWAz or IWAz. |
timeout_interval |
The time (in milliseconds) that the Slack session should stay active while chatting with Clara (default: 200000) |
Configuration file for Sametime adapter
sametime_password |
Password for Clara Sametime account |
sametime_username |
Username for Clara Sametime account |
is_encrypted=false |
Encryption flag for Sametime account password. Initial default: false. After the first connection the password is automatically encrypted and the flag will turn on true |
sametime_community_hostname |
Sametime community server host name |
bot_host |
In the format <IP>:<PORT>. IP address and Port of the machine where Clara is installed (if Port is 443, it can be omitted) |
client_secret |
The client secret requested to access Keycloak, as defined in the .env environment configuration file for Clara |
bot_project |
Specify WA if the Clara project specified during the installation is HWA or IWA. Specify WAz if Clara project is HWAz or IWAz |
bot_language=en |
The Sametime language |
is_secured=true |
Set it to true for HTTPS connection, false for HTTP |
auth=true |
Keycloak enablement flag. Set to false if you want to disable Keycloak. |
clara.sh [options]
OPTIONS:
Help:
-h Help
To control Clara services:
--up [up options] Create and start Clara container
where [up options] can be:
[--nc] Specify --nc to get the new configuration from the .env file
[--noauth] Specify --noauth to disable authentication
[--auth] Specify --auth to enable authentication
--down [--vol] Stop and remove Clara containers and network
Specify --vol to remove also persistent volumes
--start Start Clara services
--stop Stop Clara services
--join-net Link Clara network to Workload Automation network when they are both running in the same network
--remove Print commands to clean-up Clara containers, persistent volumes and network manually
--print-urls Print Clara URLS
Examples:
First Clara start-up
./clara.sh --up
Stop Clara containers
./clara.sh --stop
To add a custom Knowledge Base to Clara:
--kb <CSV_file> Integrate Clara KB with the provided Q&A
<CSV_file> The CSV file with the KB (use absolute path)
To backup and restore Clara persistent volumes:
--backup-volumes Create a backup file for each Clara persistent volume
--restore <vol_name> --from-dir <backup_directory>
Restore the volume <vol_name> from the backup stored in
the directory <backup_directory> (use absolute path)
Examples:
Backup all clara volumes
clara.sh --backup-volumes
Restore the clara-Etc_data volume taken on 2020-12-09-1439-734236800
clara.sh --restore clara-Etc_data --from-dir /opt/hcl/clara/backups/2020-12-09-1439-734236800
To install Clara:
-c, --prereq Check Prerequisites (skip any other option if present)
--load-images Load Clara images from clara_images.tar.gz(in the same path as this script)
--install Install or upgrade Clara
--install-path <path> Modify install path (default is /opt/hcl)
--load-project <prj> Install the specified Clara project
Possible values for <prj> are:
IWA IBM Workload Automation
HWA HCL Workload Automation
IWAz IBM Workload Automation for z
HWAz HCL Workload Automation for z
--license <lic_file> Import Clara license
<lic_file> fully qualified path to the license file
Use CONTAINER if Clara was already enabled in the past and
the persistent storage is available
--migrate-data Migrate data from Clara V1.0.0.2 or V1.0.0.3 to V1.0.0.4 or above
--skip-lic-check Pass this parameter to skip license check
--skip-check-prereq Pass this parameter to skip all OS prereq checks
--skip-var-prompts Pass this parameter to skip all var prompts except prereq checks and use defaults
Defaults will be loaded from .env file if present in the installation or local path.
--remote-hostname <name> Specify Clara hostname, i.e. can be the hostname for Clara external access
Steps:
Check Clara prerequisites
./clara.sh -c
Load Clara images (run only of you need to import new images)
./clara.sh --load-images
Install or upgrade Clara. Select one of the following cases:
First time installation (if you don't have a valid license.properties file), run:
./clara.sh --install --install-path /opt/hcl
Communicate the generated UID to the HCL Solutions Team (HCLSolutionsSupport@hcl.com) to get a valid license.properties.file.
If you have a valid license.properties file, run:
./clara.sh --install --install-path /opt/hcl --license ./license.properties
If Clara is already installed and activated and the persistent Clara volume is available, you can re-use the license already cached. Run:
./clara.sh --install --install-path /opt/hcl --license CONTAINER
Configure Clara for Workload Automation. From the installation directory, run:
cd /opt/hcl/clara
./clara.sh --load-project HWA
Note: This step will overwrite the existing Clara Knowledge Base and Smart Actions. If you previously modified the Knowledge Base and don't want to lose your changes, see: Upgrading Clara.
If you are upgrading Clara from 1.0.0.2 or 1.0.0.3 to V1.0.0.4 or above, run:
cd /opt/hcl/clara
./clara.sh --migrate-data
For unattended installations, add the following
options to the above commands:
--skip-check-prereq --skip-var-prompts