Installing and configuring Docker
Docker is a full development platform for creating containerized applications. Instead of reading through the system requirements list, you can now deploy the Docker containers on any computer and get started with testing. You can install and configure Docker on the same system where HCL OneTest™ API is running.
Before you begin
You must have completed the tasks in Creating and running a stub. You must use the stub that you created in that task.
You must learn about testing with Docker before you start this task. See Testing with Docker.
Procedure
- You must prepare your system to use Docker. See Preparing to use Docker.
- Install Docker.
What to do next
You must return to HCL OneTest™ API and configure the pass-through behavior of the stub. See Configuring the pass-through behavior of the stub.
Configuring the pass-through behavior of the stub
You must configure the pass-through behavior of the stub. By configuring the pass-through behavior, you can enable the stub to determine whether it can handle a received request if it is matching or, when possible, send the traffic to the real system that is, if the received request does not match.
Procedure
- Open the Pass-Through window on the Properties tab of the Stub Editor.
- Enable the stub to use pass-through action.
- Save the stub.
What to do next
You must publish the stubs to a Dockerfile. See Publishing the stub to Docker.
Publishing the stub to Docker
You can publish stubs that are created in HCL OneTest™ API to a Dockerfile and build context if the stub is based on a supported transport.
Before you begin
About this task
Procedure
-
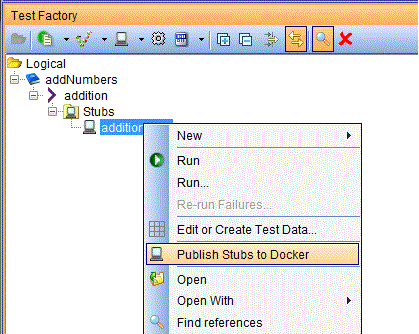
In the Test Factory perspective, right-click the stub and click
Publish Stubs to Docker.
-
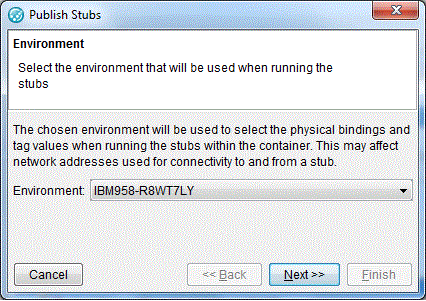
Select an environment for HCL OneTest™ API to use
while running the stubs.
- Click Next.
-
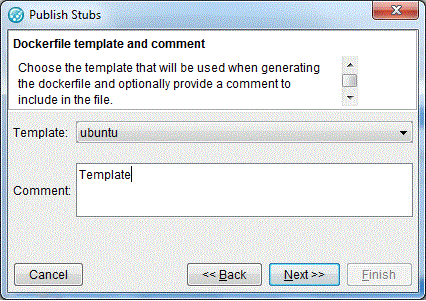
Select a template.
By default, HCL OneTest™ API provides a template, which is based on Ubuntu. This template provides the runtime and files that are necessary to run the stub. Optionally, you can provide a comment.
- Click Next.
-
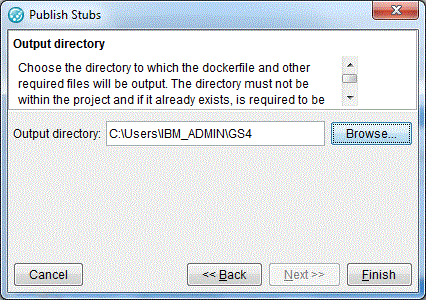
In the Output Directory dialog, click Browse to
select an empty folder to publish the Dockerfile and the other supporting files.
If the folder does not exist already, HCL OneTest™ API creates it.
-
Click Finish.
A status message informs you that the Docker artifacts were published to the output directory specified.
-
Click OK.
For more details about the contents of the directory to which the stub was published, see Verifying publication of stubs.
Results
You have published stubs to a Dockerfile.
What to do next
You must build a Docker image of the published stub. See Building a Docker image of the stub.
Building a Docker image of the stub
About this task
You will learn how to build a Docker image of the stub from the files in the output directory.
Procedure
- Open the Docker Quickstart Terminal.
-
Run the following command:
docker build -t gs4stub c:\Users\IBM_ADMIN\GS4
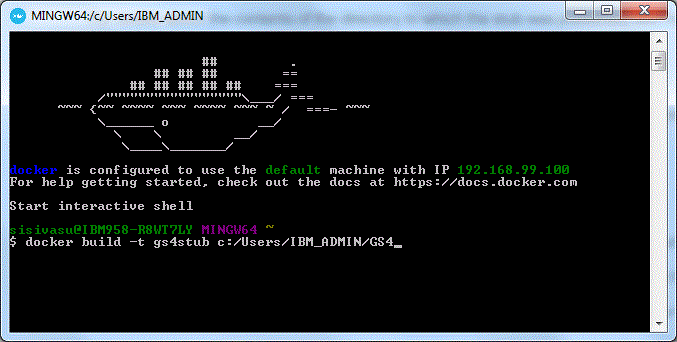
If the image is built successfully, you can see a message similar to the following at the end of the status message: Successfully built 914d41372c5e
-
To verify that the Docker image of the stub is successfully built, run the following
command:docker images
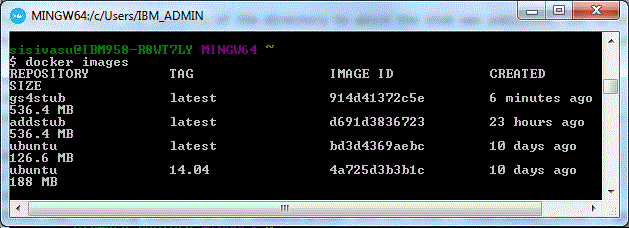
- Optional:
To verify that it is the additionStub that has been built into the
gs4stub image, run the following command:docker run
--entrypoint cat gs4stub /stubs.info
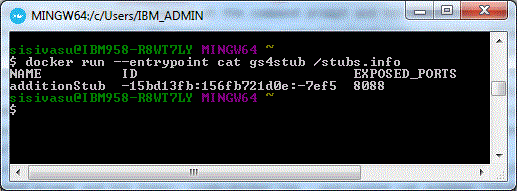
Results
You have built a Docker image of the published stub.
What to do next
You must run the published stub that is in a Docker container. See Running the stub in a Docker container.
Running the stub in a Docker container
Before you begin
Procedure
-
Run the following command:docker run --name stub1 -dP
gs4stub

The long string that is displayed is the unique ID that Docker has assigned to the container in which the stub is running.
-
To verify that the stub is running, run the following command:docker
ps
Note down the port specified under the PORTS column. You need it later.
- Optional: To check the logs while the stub is running, run the following command:docker logs -f stub1
Results
You have run the stub in a Docker container.
What to do next
You must verify if the stub running the in the Docker container is called by the client you used, in this example it is the Add Numbers client. See Verifying that the Add Numbers client is calling the stub.
Verifying that the Add Numbers client is calling the stub
Before you begin
You must have successfully completed running the stubs in a Docker container.
Procedure
-
Find the IP address of the Docker machine on which the stub is running. To do so, run the
following command:docker-machine ip.
Note down the IP address, for example, 192.168.99.100.
- Open the Add Numbers client.
- In the Host Address field, enter the IP address you noted down in Step 1.
- In the Port Number field, enter the port number you have noted down in Step 2 of Running the stub in a Docker container, for example, 32768.
-
Click the equal sign to run the add operation and verify the result.
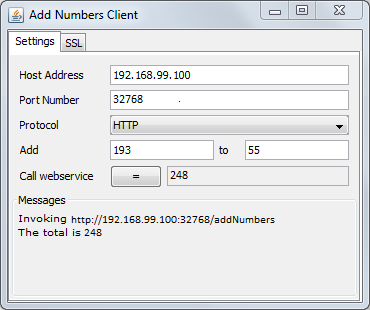
Results
You have verified that the Add Numbers client is calling the stub running in the Docker container.
What to do next
You must stop the running stub and remove the Docker container. See Stopping the stub and remove the Docker container.
Stopping the stub and remove the Docker container
Procedure
-
To stop the stub, run the following command: docker stop
stub1

-
To remove the Docker container, run the following command:docker rm
stub1

Results
You have stopped the stub running in the Docker container and also removed the Docker container.
What to do next
You can run the stub in Docker containers on a private or public cloud. See Running the stub in Docker containers on private or public cloud.
Running the stub in Docker containers on private or public cloud
You can also run the stub in Docker containers on a private cloud or public cloud. After you configure Docker on cloud, you can use publish and run the stubs in the Docker cloud.
Before you begin
You must have set up and configured Docker on a public or private cloud. For details, see Introducing Docker Cloud.
Procedure
- Configure the stub to connect to the services that are running in the enterprise and the stub is running on the public cloud. For details, see Configuring stubs to connect to HCL® Quality Server and the HTTP proxy.
- Publish the stub to the Docker cloud following the steps in Publishing the stub to Docker.
- Run the stub in the Docker cloud following the steps in Running the stub in a Docker container.
- Verified that the Add Numbers client is calling the stub running in the Docker cloud following the steps in Verifying that the Add Numbers client is calling the stub.
Results
You have configured a Docker cloud and published and run a stub in the Docker cloud.
What to do next
For more information about working with stubs in Docker, use the following resources:
- For help with using Docker, see Docker documentation.
- For details about how to publish stubs to Docker, see Publishing stubs.
- For details about how to run stubs in a Docker container and the various options that you can use with the docker run command when you run an image that contains published stubs, see Running stubs in a Docker container.
- For help with using Docker, see Query Docker container logs.
- For troubleshooting tips, see Troubleshooting stubs.