Deploy DX CF192 and later release Containers to Amazon EKS | HCL Digital Experience
This section describes how to deploy HCL Digital Experience 9.5 CF192 and later release containers, along with the Ambassador, to Kubernetes as verified in Amazon Elastic Kubernetes Service (Amazon EKS).
Prerequisites
Prior to using the following procedures, it is assumed that the HCL DX Administrator is generally experienced in using Kubernetes. Additionally, the DX Administrator must have the appropriate access to the target environment. If not, the following are some preliminary steps that must be taken.
- Setup
KUBECONFIGto refer to the target server. This ensures anykubectlcommands executed locally affect the target environment. - Amazon EKS Cluster
- The following tools must be installed on a machine other than the Portal server:
- Docker
- AWS Command Line Interface (CLI) - used to get image details.
- dxctl tool - If deploying Digital Experience Container Update CF192 or later,
the dcxtl tool is used to install and configure the deployment.
- Documentation resource: Deploy DX Container to Microsoft Azure Kubernetes Service (AKS)
- Volume requirement:
- Requires an AccessMode of ReadWriteMany
- Requires a minimum of 40 GB, with the default request set to 100 GB
- RECLAIM POLICY = Retain
- For DAM, additional volume is needed. For more details on storage class and volume,
see Sample
storage class and volume .Note: HCL Digital Experience is input-output (I/O) intensive which requires a high performing file system for optimization; NFS is an option for this.
- Hardware:
- 4 cores / 7 GB - - - 5 cores / 9 GB
- Amazon Elastic Container Registry (ECR) or any container registry access, for tagging and pushing.
- See the support topic for the HCL Digital Experience detailed system requirements.
- Download and extract the contents of the HCL DX 9.5 package to the local file system.
This can be a local workstation or a local cloud platform. Note: Reference the latest HCL DX 9.5 Container Release and Update file listings in the Docker deployment topic.
If deploying HCL Digital Experience 9.5 Container Update CF192 release, the image and package names are as follows:
CF192-core.zipfiles:HCL DX notices V9.5 CF192.txtdxclient_v1.2.0_20210305-1758.ziphcl-dx-ambassador-image-154.tar.gzhcl-dx-cloud-operator-image-v95_CF192_20210305-2309.tar.gzhcl-dx-cloud-scripts-v95_CF192_20210305-2309.ziphcl-dx-content-composer-image-v1.6.0_20210305-1756.tar.gzhcl-dx-core-image-v95_CF192_20210305-1758.tar.gzhcl-dx-digital-asset-management-operator-image-v95_CF192_20210305-1757.tar.gzhcl-dx-digital-asset-manager-image-v1.6.0_20210305-1802.tar.gzhcl-dx-experience-api-sample-ui-v0.2.0.20210305-1805.ziphcl-dx-image-processor-image-v1.6.0_20210305-1758.tar.gzhcl-dx-openldap-image-v1.0.0-master_20210305_1614986151.tar.gzhcl-dx-postgres-image-v1.6.0_20210305-1800.tar.gz hcl-dx-redis-image-5.0.1.tar.gzhcl-dx-remote-search-image-v95_CF192_20210305-1758.tar.gzhcl-dx-ringapi-image-v1.6.0_20210305-1802.tar.gz
Note: Images included in the ‘other’ package released with CF192 are optional (in addition to HCL DX 9.5 core Portal and Web Content Manager) and are used to support the use of OpenLDAP, Remote Search, the Experience API, Content Composer, and Digital Asset Management components and services.
About this task
Follow these steps to deploy HCL Digital Experience 9.5 CF192 and later container release, along with Ambassador to Kubernetes, as verified in Amazon Elastic Kubernetes Service (Amazon EKS). This deployment relies heavily on Kubernetes Operators for full functionality. If deploying a Container Update CF191 or earlier, view the instructions to deploy using script-based commands, instead of the dxctl tool commands used in this section.
DX Container Management
Follow these steps to deploy the HCL Digital Experience 9.5 CF192 and later container release in Amazon EKS
- Change directory
Open a terminal window and change to the root directory of the extracted package.
-
Docker load
Load the containers into your Docker repository:
-
docker load < hcl-dx-core-image-v95_CF192_20210225-004909.tar.gz -
docker load < hcl-dx-ambassador-image-154.tar.gz -
docker load < hcl-dx-cloud-operator-image-v95_CF192_20210225-0546.tar.gz -
docker load < hcl-dx-image-processor-image-v1.6.0_20210226-0014.tar.gz -
docker load < hcl-dx-digital-asset-management-operator-image-v95_CF192_20210226-0040.tar.gz -
docker load < hcl-dx-postgres-image-v1.6.0_20210226-0009.tar.gz -
docker load < hcl-dx-ringapi-image-v1.6.0_20210226-0055.tar.gz -
docker load < hcl-dx-redis-image-5.0.1.tar.gz
Note: Either-ior<works for the load command. In case you encounter an error when using one, try running the command using the other. -
-
Docker tag and push
Get the Docker images in your local Docker repository to your target Kubernetes system by tagging and pushing them appropriately. If you used
docker loadto get your images on the target environment, proceed to the next step.-
docker tag <local image:tag or image id> <destination image:tag> -
docker push <image:tag>
-
Persistence volume
- Set the Persistent volume
Create (or have the Kubernetes Administrator create) a persistent volume and storage class where the AccessMode must be ReadWriteMany and the persistent volume reclaim policy must be Retain.
Figure 1. Persistent volumes 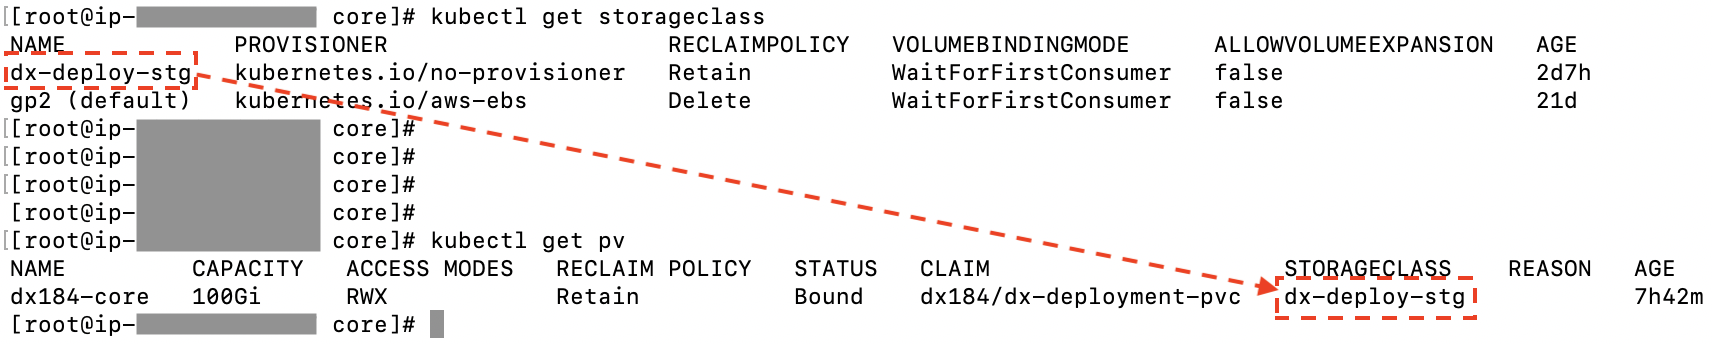
For more details on storage class and volume, see Sample storage class and volume
-
NFS server
Provide the HCL DX 9.5 CF192 and later Docker image access to the volume mount created in order to copy the profile. There are various ways to do this and NFS is one option. If NFS is used, following are the parameters that are tested to work:
-
rw,(Default) -
sync, (Default after NFS 1.0, means that the server does not reply until after the commit) -
insecure,** (Requires requests originate on ports less than 1024) -
root_squash,** (Map requests to the nobody user). -
hard,** (Required because this means the system will keep trying to write until it works.) -
nfsvers=4.1, -
rsize=8388608, (Avoids dropped packages, default 8192) -
wsize=8388608, (Avoids dropped packages, default 8192) -
timeo=600, (60 seconds) -
retrans=2, (Number of retries after a time out) -
noresvport** (Tells the NFS client to use a new Transmission Control Protocol (TCP) source port when a network connection is reestablished. Doing this helps make sure that the EFS file system has uninterrupted availability after a network recovery event.)Note: Those marked with ** are critical and, in many cases, it is recommended to have thersizeandwsizeset to 8388608.
-
- Login to the Kubernetes cluster
Before using the dxctl tool to deploy, you must be logged in to the targeted cluster using the cloud platform-specific CLI (Red Hat OpenShift, Amazon EKS, Microsoft Azure AKS, or Google GKE).
Example:aws eks update-kubeconfig --name <eks_cluster> --region <region>
Configure and deploy
Configure and deploy using HCL DX dxctl tool.
- Change directoryChange to the extracted files directory:
cd hcl-dx-cloud-scriptsUsing DX Container Update CF192 and later, the directory structure appears as follows:Figure 2. Directory structure 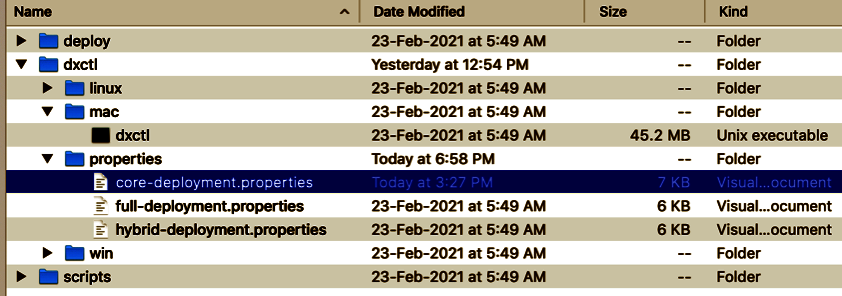
- Configure dxctlConfigure the dxctl properties for the HCL DX Container CF192 and later deployment.
- Copy one of the provided properties files to further modify for your deployment.
- The modified properties file can be used for the deployment and the same file must
be used for further
updates.
mkdir -p /home/$USER/deployments/cp dxctl/properties/full-deployment.properties /home/$USER/deployments/myfirst_deployment.properties - Update the dxctl properties file values. See the following sample values:
-
dx.namespace: kube-eg-cf192-0225 -
dx.image: dxen -
dx.tag: v95_CF192_20210225-035822_xxxxxxx_95_CF192_60374773dx.storageclass:dx-deploy-stg -
dx.volume: kube-eg-d2-core-pv -
dx.volume.size:60 -
remote.search.enabled:false -
openldap.enabled:false -
api.enabled: false -
composer.enabled: false -
dam.enabled: false -
ingress.image:dx-build-output/common/ambassador -
ingress.tag:1.5.4 -
ingress.redis.image:redis -
ingress.redis.tag:5.0.1 -
dx.operator.image: dx-build-output/hcldx-cloud-operator/hcldx-cloud-operator -
dx.operator.tag: v95_CF192_20210225-0546_xxxxxxxxx_95_CF192
Important: With HCL DX 9.5 Container Update CF197 and later, dam.features in full-deployment properties is added for use in a future container update release, and should not be modified except with direct guidance from HCL Support.Note: With HCL DX 9.5 Container Update CF193 and later, persist.force.read in full-deployment properties is added to enable a read-only Postgres pod for Digital Asset Management. This enables a failover capability for the Postgres service supporting DAM. Another option to enable a read-only pod is to set the persist.minreplicas: option set to greater than 1.Example:
-
- Deploy using dxctl tool
Run the dxctl command to deploy the HCL DX 9.5 CF192 and later release to Amazon EKS.
For Windows:./win/dxctl --deploy -p /home/$USER/deployments/myfirst_deployment.propertiesFigure 3. Deploy example 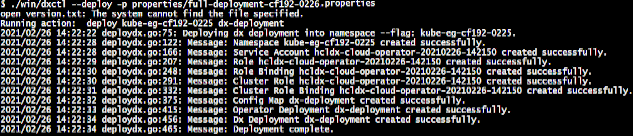 For Linux:
./linux/dxctl --deploy -p /home/$USER/deployments/myfirst_deployment.propertiesFor Mac:./mac/dxctl -–update -p /home/$USER/deployments/myfirst_deployment.propertiesNote: These steps create the DX 9.5 CF192 and later deployment.
Generate TLS Certificate
Create a TLS certification to be used by the deployment:- For development purposes:
- Using OpenSSL, you can create a private
key:
openssl genrsa -out my-key.pem 2048 - Using OpenSSL, you can create a certificate signed by the private key:
openssl req -x509 -key my-key.pem -out my-cert.pem -days 365 -subj '/CN=my-cert
- Using OpenSSL, you can create a private
key:
- Create a TLS
certification:
kubectl create secret tls dx-tls-cert --cert=my-cert.pem --key=my-key.pem -n aws-mynamespaceNote: The default name is thedx-tls-certthis can be changed in the configuration.aws-mynamespaceis your Kubernetes namespace. You can set your preferred namespace but you must consistently use this namespace in subsequent commands. See Customizing the Kubernetes deployment.
Access the deployment
Obtain the external IP from the platform load balancer as shown in following example to access the HCL DX 9.5 CF192 and later deployment:
$ kubectl get all -n NAMESPACEExample:
The deployed system can be accessed at:
https://external-ip/wps/portal
Update
- If using HCL DX 9.5 Container Update CF191 and earlier release, update the deployment
properties file with new image values and run the
Updatecommand.Example:
- On
Mac:
./mac/dxctl -–update -p properties/myfirst_deployment.properties - On
Windows:
.\win\dxctl --update -p properties\myfirst_deployment.properties - On
Linux:
./linux/dxctl -–update -p properties/myfirst_deployment.properties
- On
Mac:
- Note: If using HCL DX 9.5 Container Update CF192 or later, the dxctl tool can be used to Update the deployment.The dxctl tool does not deploy or update the DxDeployment custom resource definition. Prior to running an Update process, administrators should check the DxDeployment custom resource definition (
hcl-dx-cloud-scripts/deploy/crds/git.cwp.pnp-hcl.com_dxdeployments_crd.yaml) for changes and update accordingly:- Kubernetes command:
kubectl delete crd dxdeployments.git.cwp.pnp-hcl.comCAUTION: Sincecrdis a cluster-wide resource, the use ofkubectl delete crd dxdeployments.git.cwp.pnp-hcl.comcauses a service outage for all the dx-deployment across the cluster. - Kubernetes command:
kubectl create -f deploy/crds/git.cwp.pnp-hcl.com_dxdeployments_crd.yaml
- Kubernetes command:
Delete
To delete the deployment, follow either of these methods:
Method 1:
Remove the deployment but allow for redeployment with the same volumes:
../linux/dxctl --destroy -p properties/myfirst_deployment.propertiesMethod 2:
Remove the entire namespace/project:
./linux/dxctl --destroy -p properties/myfirst_deployment.properties -all true
kubectl patch services $(kubectl get services -n $NAMESPACE | grep -v "NAME" |awk '{print $1}') -p '{"metadata":{"finalizers":null}}' -n $NAMESPACE