Deploying DX CF19 and CF191 release Containers to Google Kubernetes Engine (GKE)
Learn how to deploy HCL Digital Experience (DX) 9.5 CF19 and CF191 release containers along with Ambassador to Kubernetes, as verified in Google Kubernetes Engine (GKE).
About this task
Prerequisites
- The following installed on your system:
- Setup
KUBECONFIGto refer to the target server. This will ensure anykubectlcommands executed locally affect the target environment. - Use
kubectl get {pods, pv, storageclass}to get appropriate information from the artifacts running in the target Kubernetes environment.Figure 1. Running kubectl get 
- Volume requirement:
- Requires an AccessMode of ReadWriteMany
- Requires a minimum of 40 GB, with the default request set to 100 GB
- RECLAIM POLICY = RetainNote: HCL Digital Experience is input-output (I/O) intensive and requires a high performing file system for optimization.
Download containers
- Download files to your localDownload and extract the contents of the HCL DX 9.5 CF19 package to the local file system.
Figure 2. Download and extract example 
- Change directory
Open a terminal window and change to the root directory of the extracted package.
- Docker loadLoad the containers into your Docker repository:
-
docker load < hcl-dx-core-image-v95_xxxxxxxx-xxxx.tar.gz -
docker load < hcl-dx-ambassador-image-v95_xxxxxxxx-xxxx.tar.gz -
docker load -i hcl-dx-cloud-operator-image-v95_xxxxxxxx-xxxx.tar.gz -
docker load -i hcl-dx-redis-image-xxx.tar.gzNote: Either-ior<works for the load command. In case you encounter an error when using one, try running the command using the other.Figure 3. Loading containers into your Docker repository 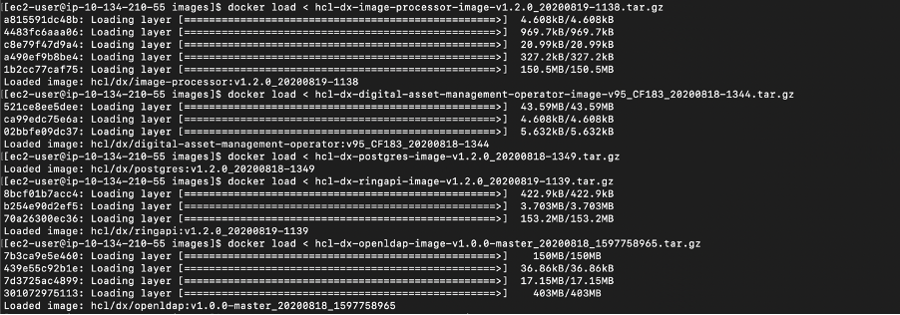
-
- Docker tag and push
Get the Docker images in your local Docker repository to your target Kubernetes system by tagging and pushing them appropriately. If you used
docker loadto get your images on the target environment, proceed to the next step.Syntax for tagging:docker tag <local image:tag or image id> <destination image:tag>Syntax for pushing:docker push <image:tag>
Deployment
- Unzip and extractExtract the HCL DX deployment scripts onto your environment as follows:
unzip hcl-dx-cloud-scripts-v95_CFxxx_xxxxxxxx-xxxx.zipFigure 4. Extracting the deployment scripts 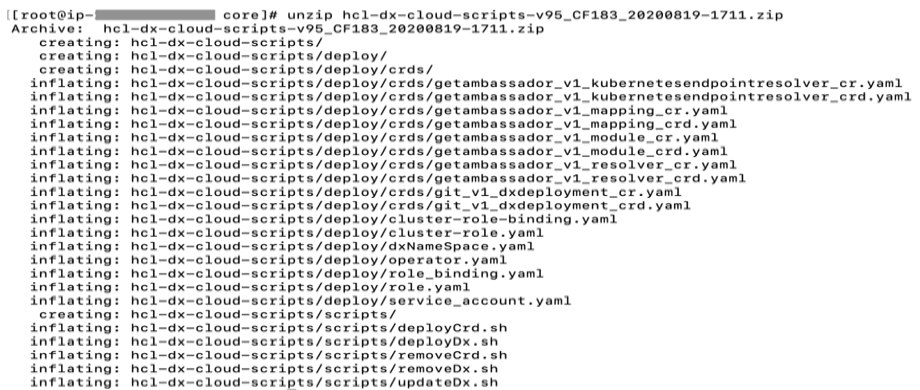
- Change directory
Change to the extracted files directory, ./hcl-dx-cloud-scripts.
[root]$ cd ./ hcl-dx-cloud-scripts - Modify deploy/operator.yaml
Modify deploy/operator.yaml and update the configuration based on your repository image and tag.
Figure 5. Modify operator.yaml 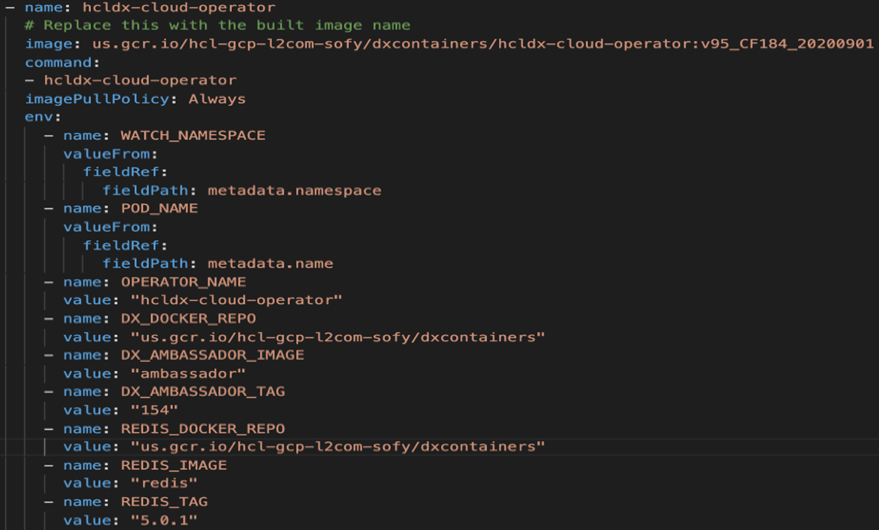 Note: For deployment of DX 9.5 CF183 and higher, ensure the operator.yaml is updated with names and tags used in your private repository: cloud operator image name, cloud operator tag, Redis repo, Redis image name, and Redis tag.
- # Replace this with the built image
name
...image:REPOSITORY_NAME/cloud-operator:95_184 -
name:REDIS_DOCKER_REPOvalue:"myrepo.dx.com" -
name:REDIS_IMAGEvalue:"ambassador-redis" -
name:REDIS_TAGvalue:"95_184"
- # Replace this with the built image
name
- Custom resource definition
Install the DxDeployment custom resource definition.
Notes:Use either of the following commands:- Do not modify the git_v1_dxdeployment_crd.yaml file.
- Customize the ./deploy/crds/git_v1_dxdeployment_cr.yaml file, if required.
-
kubectl create -f hcl-dx-cloud-scripts/deploy/crds/git_v1_dxdeployment_crd.yaml -
./scripts/deployCrd.sh
- Persistence volume
Create (or have the Kubernetes Administrator create) a persistent volume and storage class where the AccessMode must be ReadWriteMany and the persistent volume reclaim policy must be Retain.
Figure 6. Persistent volume and storage class 
- Deploy
Execute the
deployDx.shscript to create the namespace, install the project scoped service account, role, role binding, operator, and deployment, run the deployDx.sh script../scripts/deployDx.sh NAMESPACE REPLICAS REPOSITORY IMAGENAME IMAGETAG VOLUMENAME STORAGECLASS DBTYPE INGRESSIMAGE INGRESSTAG- NAMESPACE - the project or the namespace to create or use for deployment. This namespace will be used in subsequent commands.
- REPLICAS - the number of initial instances for the deployment.
- REPOSITORY - your local repository, the repository used by Kubernetes.
- IMAGENAME - the name of the dxCore image, as added to the repository above.
- IMAGETAG - the tag for the target image as added to the repository above.
- VOLUMENAME - the volume to be used by the deployment for persistence, this must use AccessMode ReadWriteMany.
- STORAGECLASS - the storage class name used to create the persistent volume.
- DBTYPE - the database type. By default, and initially, this is Derby. HCL DX
9.5 uses Apache Derby, Oracle Database, IBM DB2, or Microsoft SQL Server. Acceptable
values are
derby,oracle,db2, ormsSql. - INGRESSIMAGE - The image name to use for ambassador (Native K8s).
- INGRESSTAG - The image tag to use for ambassador (Native K8s)For example:
$ ./scripts/customer/deployDx.sh dx11 1 us.gcr.io/dx-gcp-l2com/dxcontainer dxen v95_CF183_20200819 dx-pv11 standard derby ambassador 154Figure 7. Sample deployment run 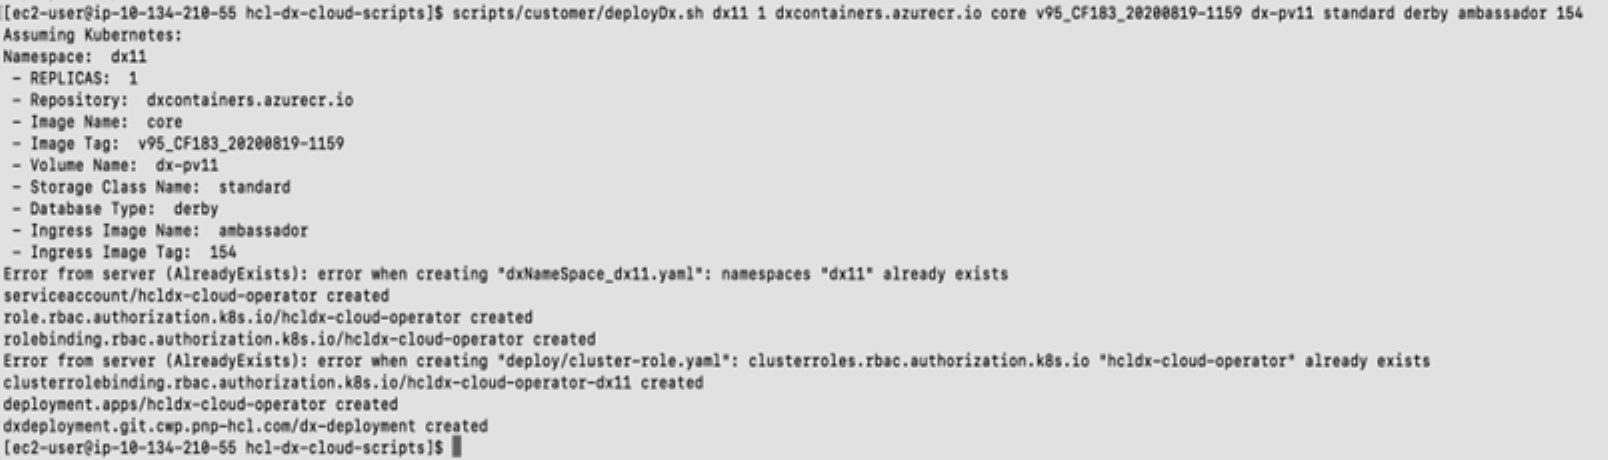
Generate a TLS Certificate
- Create a TLS certification to be used by the deployment:
- For development purposes:
- Using OpenSSL, you can create a private
key:
'openssl genrsa -out my-key.pem 2048' - Using OpenSSL, you can create a certificate signed by the private
key:
'openssl req -x509 -key my-key.pem -out my-cert.pem -days 365 -subj '/CN=my-cert'
- Using OpenSSL, you can create a private
key:
- Create a TLS
certification:
$ kubectl create secret tls dx-tls-cert --cert=my-cert.pem --key=my-key.pem -n dx11Note: The default name is thedx-tls-certthis can be changed in the configuration. In the example,dx11is the Kubernetes namespace. You can set your preferred namespace, but you must consistently use this namespace in subsequent commands. See the Customizing your Container deployment topic for more information on customizing your deployment.
- For development purposes:
Check the deployment status
- Check the status of the deployment. The following command can be used from the external
IP from the Google GKE load balancer to access the
deployment.
$ kubectl get all -n <your name space>Figure 8. Check status of deployment 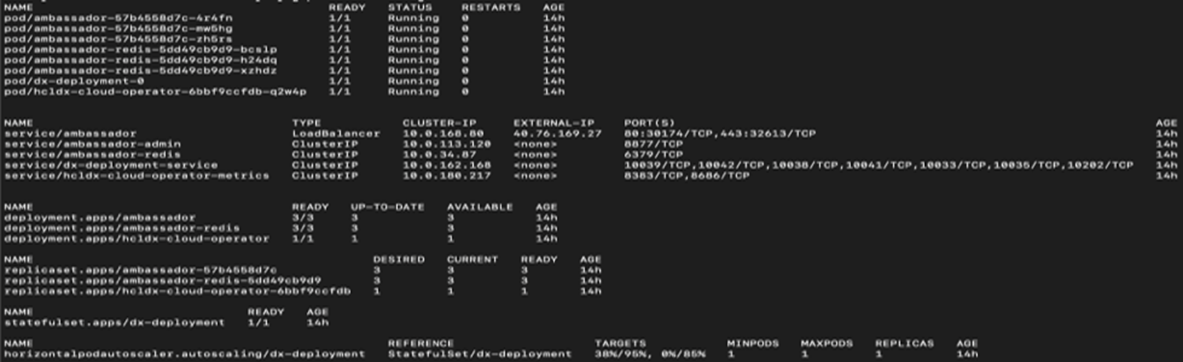 The deployed system will be available at
https://external-ip/wps/portal. For example,https://40.76.169.27/wps/portal/Figure 9. External IP 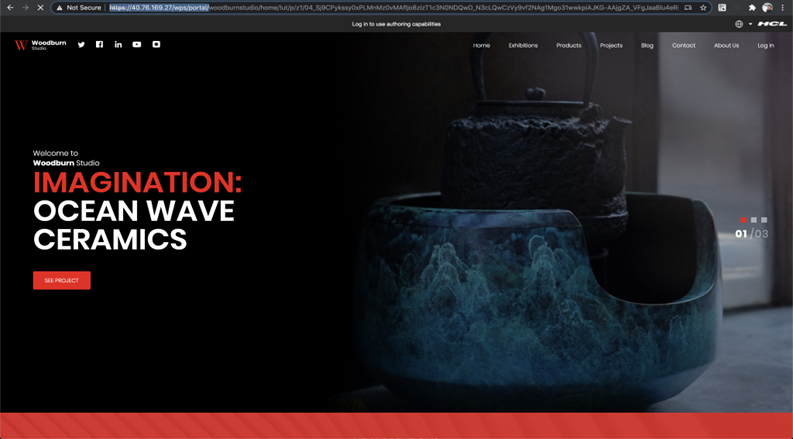
Install the Experience API, Content Composer, and Digital Asset Management components to GKE
- Create a config map with the same name as the
dx statefulset. By default, thedx statefulsetisdx-deployment, as shown in this example:kubectl create configmap dx-deployment -n dx11Figure 10. Create configmap 
- Edit the configmap, add the following data,
and update the values based on your image
tags:
data:
  dx.deploy.openldap.enabled: 'true'
  dx.deploy.openldap.tag: dx-183
  dx.deploy.openldap.image: dx-openldap
  dx.deploy.experienceapi.enabled: 'true'
  dx.deploy.experienceapi.tag: dx-183
  dx.deploy.experienceapi.image: ring-api
  dx.deploy.contentui.enabled: 'true'
  dx.deploy.contentui.tag: dx-183
  dx.deploy.contentui.image: content-ui
  dx.deploy.dam.enabled: 'true'
  dx.deploy.dam.volume: releaseml
  dx.deploy.dam.storageclass: dx-deploy-stg
  dx.deploy.dam.persistence.tag: dx-183
  dx.deploy.dam.persistence.image: persist
  dx.deploy.dam.imgprocessor.tag: dx-183
  dx.deploy.dam.imgprocessor.image: image-processor
  dx.deploy.dam.tag: dx-183
  dx.deploy.dam.image: dam
  dx.deploy.dam.operator.tag: dx-183
  dx.deploy.dam.operator.image: hcl-dam-operator
  dx.deploy.host.override: “false”
Note: The Digital Asset Manager container requires one volume (specified in the configmap underdx.deploy.dam.volume). The Digital Asset Manager persistence containers require one self-provisioned volume per pod which by default are set to minimum of 2 minimum and a maximum of 5 pods.You can also create the config map in a YAML file and deploy it with the following instructions (example):
.kubectl create -f my_config_map.yaml -n dx11 - After creating the config map, deployment will go into ‘init’ mode, and restart a
couple of times after the new options are configured. You can check the status via the
command line using the command
(example):
kubectl get pods -n dx11Figure 11. get pods 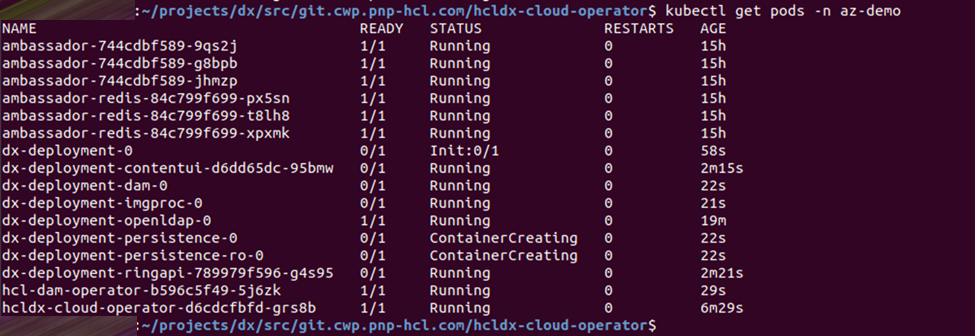
Update the HCL Digital Experience 9.5 GKE deployment
- To update the deployment, run the
updateDx.shscript with updated values:./scripts/updateDx.sh NAMESPACE REPLICAS REPOSITORY IMAGENAME IMAGETAG VOLUMENAME STORAGECLASS DBTYPE INGRESSIMAGE INGRESSTAG- NAMESPACE - the project or the namespace to create or use for deployment.
- REPLICAS - the number of initial instances for the deployment.
- REPOSITORY - your local repository, the repository used by Kubernetes.
- IMAGENAME - the name of the dxCore image, as added to the repository above.
- IMAGETAG - the tag for the target image as added to the repository above.
- VOLUMENAME - the volume to be used by the deployment for persistence, this must use AccessMode ReadWriteMany.
- STORAGECLASS - the storage class name used to create the persistent volume.
- DBTYPE - the database type. By default, and initially, this is Derby. HCL DX
9.5 uses Apache Derby, Oracle Database, IBM DB2, or Microsoft SQL Server. Acceptable
values are
derby,oracle,db2, ormsSql. - INGRESSIMAGE - The image name to use for Ambassador (Native K8s).
- INGRESSTAG - The image tag to use for Ambassador (Native K8s).For example:
$ ./scripts/updateDx.sh test-mynamespace 1 REPO_NAME dxen v95_CF183_20200818-1342 dx-pv-11 dx-deploy-stg derby ambassador 154
-
Once the database is transferred, the DBTYPE will need to be updated so you can scale the instances higher. Additionally, once the database is transferred, the number of replicas could be increased.
See Customizing your Container deployment for more information on customizing your deployment.
Delete the HCL Digital Experience 9.5 GKE deployment
- Removing the entire deployment requires several steps, this is by design.
- To remove the deployment in a specific namespace, run the
removeDx.shscript:./scripts/removeDx.sh NAMESPACE- NAMESPACE - the project or the namespace created or used for deployment.
- To remove the deployment in a specific namespace, run the
- To remove a namespace, use any of the following commands:
- Kubernetes
command:
where NAMESPACE is the namespace to be removed'kubectl delete -f dxNameSpace_NAMESPACE.yaml'
- Kubernetes
command:
- The persistent volume associated to the deployment needs to be cleaned up by your
Administrator. To reuse a persistent volume, see the following steps:
- Open the persistent volume in a visual editor (vi) using the
- Kubernetes command:
kubectl edit pv your_volume
- Kubernetes command:
- Remove the
claimRefsection:claimRef: apiVersion: v1 kind: PersistentVolumeClaim name: dx-deploy-pvc namespace: your_namespace resourceVersion: "488931120" uid: ebd58361-0e2a-11ea-b02e-02f8fe687954 - Ensure you get the
'persistentvolume/your_volume edited'message. - You may need to manually remove any data remaining from the previous deployment.
- Open the persistent volume in a visual editor (vi) using the