Installing and registering DevOps Test Runtime agents
When you want to run Web UI tests authored in HCL DevOps Test Hub (Test Hub) on a Linux, Mac, or Windows system using an agent, you must first install and register the system as an agent by downloading and running the DevOps Test Runtime agent.
Before you begin
- Ensured that you are a Team Space Owner, Project Owner, or Member with a Tester role to create or edit a test resource.
- Generated, copied, and then saved an offline token in a secure location.
Procedure
-
Log in to Test Hub on the system
that you want to register as an agent.
The Projects page of the initial team space is displayed.
-
Click .
The Agents and Intercepts page is displayed.
-
Click .
The Download DevOps Test Runtime pop-up is displayed.
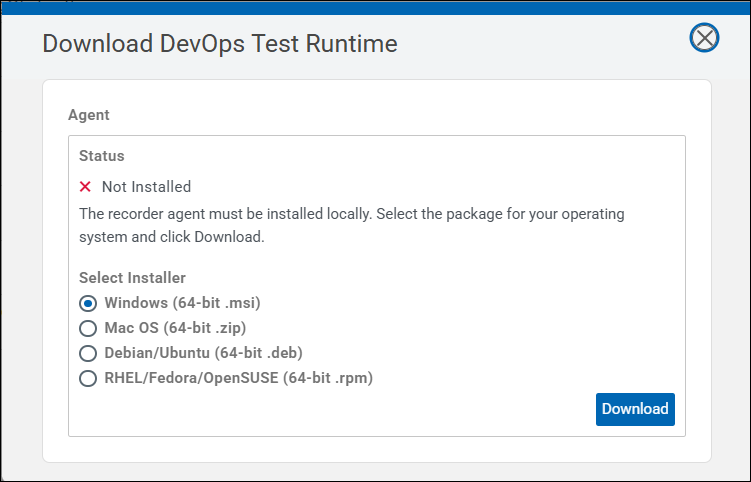
-
Perform the following steps depending on the operating system:
Operating System Action Windows (64-bit) Perform the following steps to install the agent on Windows: - Click Download to download the recording agent
installer.
The devops-test-runtime.msi file is downloaded.
- Double-click the .msi file to install the
agent.
The installation window with the progress bar is displayed.
- Click Proceed to accept the download of the proprietary certificate if prompted.
- Click Verify to confirm the agent installation.
A confirmation message is displayed after verification is complete.
- Click Done.
Go to step 5.
Mac OS (64-bit) Perform the following steps to install the agent on Mac: - Click Download to download the recording agent
installer.
The devops-test-runtime.zip file is downloaded.
- Extract the contents of the .zip
file:
unzip devops-test-runtime.zip
- Quarantine the installer:
xattr -dr com.apple.quarantine ./*
- Run the installer:
./install.sh
- Click Verify to confirm the agent installation.
A confirmation message is displayed after verification is complete.
- Click Done.
Go to step 5.
Debian/Ubuntu (64-bit) Perform the following steps to install the agent on Ubuntu: - Click Download to download the recording agent
installer.
The devops-test-runtime_11.0.8_amd64.deb file is downloaded.
- Navigate to the directory where the installer is downloaded:
cd <download-directory>
- Run the installer:
sudo apt install ./devops-test-runtime_11.0.8_amd64.deb
- Click Verify to confirm the agent installation.
A confirmation message is displayed after verification is complete.
- Click Done.
Go to step 5.
RHEL/Fedora/OpenSUSE (64-bit) Perform the following steps to install the agent on Linux: - Click Download to download the recording agent
installer.
The devops-test-runtime-11.0.8-1.x86_64.rpm file is downloaded.
- Navigate to the directory where the installer is downloaded:
cd <download-directory>
- Run the following command:
INGRESS_DOMAIN=<domain_name> dnf
localinstall ./devops-test-runtime-11.0.8-1.x86_64.rpm
- Click Verify to confirm the agent installation.
A confirmation message is displayed after verification is complete.
- Click Done.
Go to step 5.
- Click Download to download the recording agent
installer.
-
Perform the following steps to register the system as an agent in Test Hub:
You must provide the following details to register the system as an agent in Test Hub:
-
<dth_url>: The URL of Test Hub. For example, https://10.0.2.15.nip.io/test. -
<project_id>: The ID of a project in Test Hub to which the agent must be associated. For example, 2600 is the project ID in https://10.0.2.15.nip.io/test/#/Initial/project/2600. -
<offline_token>: An offline token generated from Test Hub for the logged-in user who is registering the agent to run tests. -
<agent_name>: The name of the agent to be displayed in Test Hub. The name must be unique and must conform to the DNS name format, however, it need not be a real hostname. For example, my-agent.
Operating System Action Windows (64-bit .msi) Perform the following steps: - Navigate to the C:Users\<user_name>\AppData\HCL\devops-test-runtime directory where the runtime script is located.
- Run the following
commands:
set DEVOPS_TEST_HUB_URL=<dth_url>
set DEVOPS_TEST_PROJECT_ID=<project_id>
set DEVOPS_TEST_OFFLINE_TOKEN=<offline_token>
set DEVOPS_TEST_AGENT_NAME=<agent_name>
.\devops-test-runtime.exe agent
Confirmation messages about the agent starting and registering are displayed. Go to step 6.
Mac OS (64-bit .zip) Perform the following steps: - Navigate to the ~/Applications/devops-test-runtime.app/Contents/Resources directory where the runtime script is located.
- Run the following
commands:
export DEVOPS_TEST_HUB_URL=<dth_url>
export DEVOPS_TEST_PROJECT_ID=<project_id>
export DEVOPS_TEST_OFFLINE_TOKEN=<offline_token>
export DEVOPS_TEST_AGENT_NAME=<agent_name>
./devops-test-runtime agent
Confirmation messages about the agent starting and registering are displayed. Go to step 6.
Debian/Ubuntu (64-bit .deb) Perform the following steps: - Navigate to the /opt/hcl/devops-test directory where the runtime script is located.
- Run the following
commands:
export DEVOPS_TEST_HUB_URL=<dth_url>
export DEVOPS_TEST_PROJECT_ID=<project_id>
export DEVOPS_TEST_OFFLINE_TOKEN=<offline_token>
export DEVOPS_TEST_AGENT_NAME=<agent_name>
./devops-test-runtime agent
Confirmation messages about the agent starting and registering are displayed. Go to step 6.
RHEL/Fedora/OpenSUSE (64-bit .rpm) Perform the following steps: - Navigate to the /opt/hcl/devops-test directory where the runtime script is located.
- Run the following
commands:
export DEVOPS_TEST_HUB_URL=<dth_url>
export DEVOPS_TEST_PROJECT_ID=<project_id>
export DEVOPS_TEST_OFFLINE_TOKEN=<offline_token>
export DEVOPS_TEST_AGENT_NAME=<agent_name>
./devops-test-runtime agent
Confirmation messages about the agent starting and registering are displayed. Go to step 6.
-
- Log in to Test Hub and navigate to to view the agent details that you registered.
Results
What to do next
You can run the test and view the results. See Running server test assets on an agent.