Each tool within Management Center provides a set of features and functionality for
managing a specific set of objects. Management Center provides multiple tools for managing
different sets of business objects. As a developer, you can also create custom Management Center tools for business users to use to manage objects and tasks that are not managed with the default
provided tools.
Each Management Center tool is a Business Object Editor widget, which is the main type of
widget in the Management Center framework. The Business Object Editor widget
includes the various low-level widgets that make up the framework. The Business Object
Editor widget is defined in the BusinessObjectEditor.xml definition
file. This widget includes the following elements:
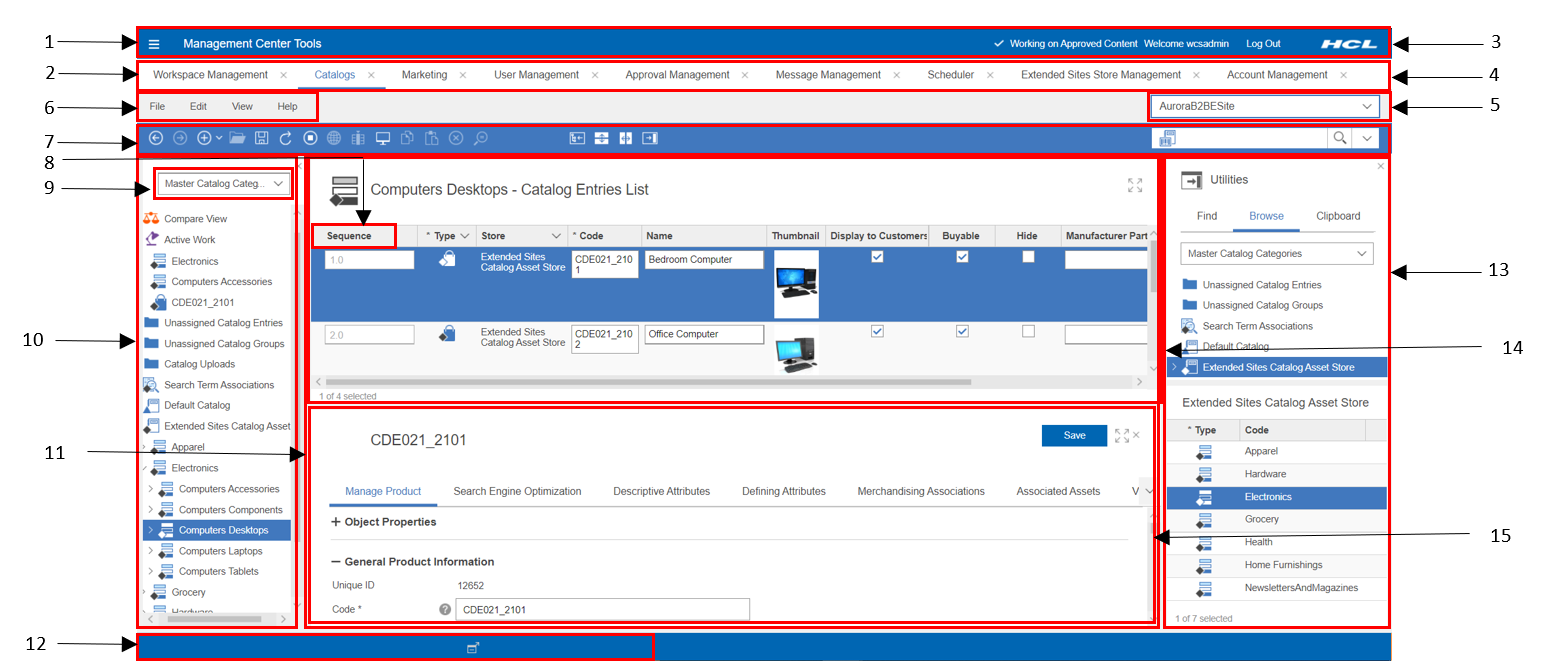
1Management Center Tools menu
Use this menu to open the following Management Center tools:
Catalogs tool
Promotions tool
Marketing tool
Attachments tool
Installments tool
Store Management tool
Catalog Filter and Pricing tool
Workspace Management tool
Commerce Composer tool
Analytics
Catalogs
Marketing
Promotions
Attachments
Manage Accounts
Installments
Commerce Composer
Manage Stores
Store Management
Extended Site Stores
Shipping
Shipping Jurisdictions
Shipping Codes
Shipping Modes
Tax
Tax Jurisdictions
Tax Codes
Tax Categories
Manage Organizations
Member Groups
Organizations
Users
Approvals
Workspace Management
System Administration
Transports
Message Types
Messages
Scheduler
Registries
Security Policies
Getting started
Aha Portal (Click here to submit an Idea)
Preferences
You can also open the
Preferences dialog and access the
Getting Started information from here.
2 Tool tabs
Each Management Center tool opens in a separate tab.
3 Banner
The banner is the top area or header of the user interface, and identifies
the Management Center user, the log out link, and the branding logo.
This area also displays the names of the task and workspace when you are
working on a task or content.
4 Store list
Use this drop-down list to switch to another store. This list also contains
a search option, which you can use to find a store.
5 Find area
Use this entry field to search for objects by typing a keyword and selecting
the object type to search for from a list. You can also select the advanced
search option to refine your search.
6 Menu bar
Management Center includes four menus within the menu bar: File, Edit,
View, and Help. All actions that are supported by Management Center
are within the menu bar.
7 Toolbar
Click a button on the toolbar to quickly perform a task. The toolbar actions
are a subset of the most common tasks you can perform with the Management Center.
8 Column heading
A column heading within a list view. You can also reorder, hide, or show
columns for the table.
9 Explorer filter
Use this list to filter the explorer view to display the specific top-level
object or objects and any child objects. For example, this image of the
Catalogs tool shows the explorer filter, which is filtered
to show only master catalog categories.
10 Explorer view
Use the explorer view to navigate to the objects that which you want to
work. The entire frame is the explorer view. You can expand and collapse the
nodes in the explorer view to view and work with objects. For example, you
can expand a catalog until you reach the SKU level. The selected node in the
explorer view controls what displays in the main work area. For example, if
you click a product for the catalog in the explorer view, a list of SKUs for
the product displays in the main work area. The explorer view always
includes the Search Results node, which you can use
to return to a list of results at any time. The explorer view also always
includes the Active Work node to show the objects
that you currently have open.
11 Main work area
The Management Center main work area is controlled by what you select
in the explorer view and is displayed in the middle (largest) area of the
user interface. The main work area can display information in three views:
list view, properties view, or calendar view. You can also split the main
work area (horizontally or vertically) so that you can see two views at
once.
12 Status bar
The status bar is the bottom area or footer of the user interface, and
includes messages, access to the message console, and a progress
indicator.
13 Utilities view
You can use the utilities view to locate business objects that you want
to reference or use with the object that you are currently working with
without changing the display of the main work area. For example, you can
use the utilities view to search for a merchandise association item to
include as a cross-sell item for the product that you are currently
editing. Then, you can drag the item from the utilities view into the
merchandising association tab of the product that you are editing in the
main work area. The utilities view includes three functions:
Find to search for objects by using a
system search.
Browse to find objects by looking through
a directory structure or hierarchy.
Clipboard, which is a container to hold
objects for later use.
14 List view
One of the three views that can display in the main work area. A list view
lists objects in the form of a table. You can view the list and then select
a specific row to see more details. You can also reorder, hide, or show
columns for the table. If the information in a table cell is editable, you
can click the cell and edit the information. To make multiple changes
throughout a table more efficiently, you can update several cells in the
same column at once with the same value.
15 Properties view
One of the three views that can display in the main work area. A properties
view shows details about an object. You can use this view of an object to
edit the properties for the object. The properties view can contain entry
fields, check boxes, radio buttons, lists, tables, pull-down sections, and
tabs. You access the properties view from either selecting to create an
instance of an object, or by selecting to open an existing object.