
Replacing Eclipse Modeling Framework Service Data Objects with Eclipselink and the Java Persistence API
Prior to Version 9.1.14, physical Service Data Objects (SDOs) used in the Business Object Document (BOD) service required the IBM JDBCMediator to read and persist the data to the database. The EMF SDO has been replaced with the EclipseLink SDO and the persistence layer replaced with the Java Persistence API (JPA).
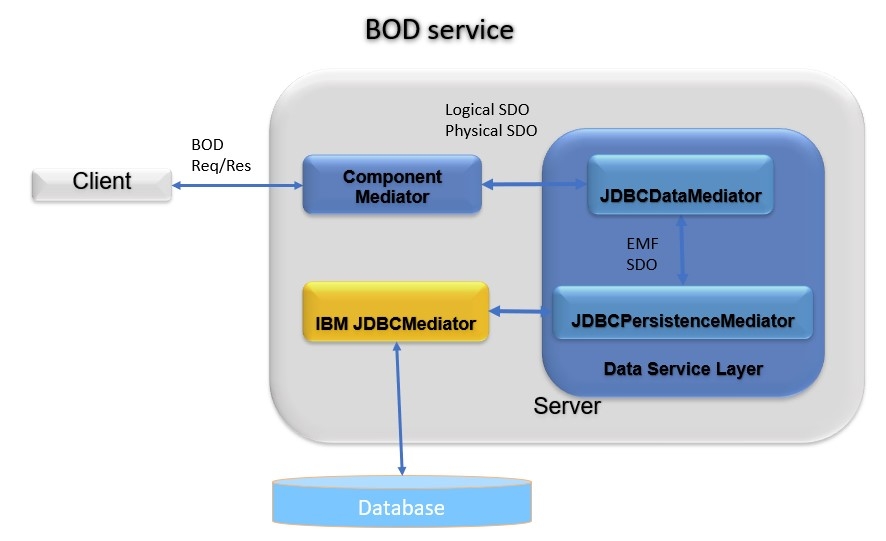
The HCL Commerce BOD service prior to Version 9.1.14
When a client sends a BOD process or change request to the server, the server BOD service framework passes it as a Service Data Object (SDO) to the corresponding component mediator. The mediator converts it to a list of physical SDOs, and the Data Service Layer (DSL) JDBCMediator sends these physical SDOs to the IBM JDBCMediator to persist. Read requests are passed to the DSL as an XPath and access profile. The DSL will obtain the relevant SQLs and the JDBCMediator in HCL Commerce before sending the SQLs to the IBM JDBCMediator to retrieve the database's contents. The IBM JDBCMediator will build a physical SDO graph based on the query result provided from the database and then return this graph to the JDBCMediator. When the component mediator gets the physical SDO graph, it will convert it back to the logical SDO and the BOD service framework will build a BOD and send it back to the client.
HCL Commerce BOD service
EclipseLink provides an open-source Java persistence solution. It includes support for the JPA and SDO. In EclipseLink, each SDO is linked to a JPA object. Changes in the SDO are reflected in the linked JPA, and the JPA entity manager persists it. You can generate an SDO and JPA using an XML schema definition (XSD) file that defines the SDO interfaces. For more information, see EclipseLink/Examples/SDO/JPA.
The following diagrams illustrate the new workflow for the BOD service:
- The original BOD service using the EMF SDO:
- The BOD service using the Eclipselink SDO:
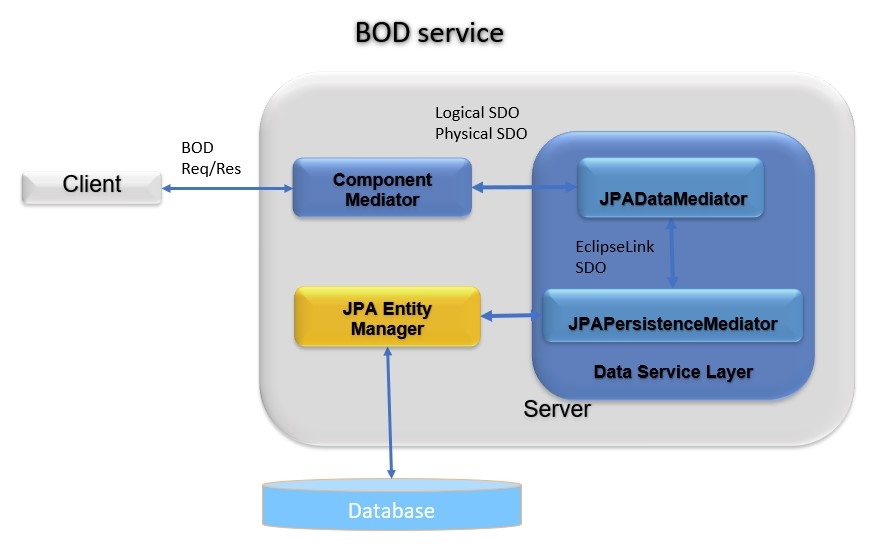
The JDBCMediator has been replaced with the JPADataMediator, and the IBM JDBCMediator has been replaced with JPA entity manager.
Enabling all components to use JPA mediator
Edit the file wc-server.xml in the
xml\configdirectory. Add an attribute
DataServiceMediatorType to the Instance
element.
<Instance
   ...
   DataServiceMediatorType="JPA" />
Accepted values for the data mediator type are JPA or
JDBC. Any other values are ignored.
Customizing the service
As an example, if you wanted to make a customization based on the Warranty Tutorial to extend the catalog tool in the management center, before enabling the new EclipseLink SDO linked with JPA, you would first migrate your customization to the new environment. You would also migrate your custom EMF SDOs to the EclipseLink SDO linked with JPA.
- The component ID. For example, the component ID for the catalog component is com.ibm.commerce.catalog.
- The output directory where the EclipseLink SDO and JPA files are generated. For example, \output.
Perform the following steps:
- Run the following
command:
generateCustomSdoJpa.bat com.ibm.commerce.catalog \outputThe SDO and JPA source files are created in the \output directory. It also generates an XSD file catalog-ext.xsd in the WC/xml/config/com.ibm.commerce.catalog-ext directory.
- Copy the source files generated in the \output to the
WebSphereCommerceServerExtensionsData project in the
workspace, i.e. the
WebSphereCommerceServerExtensionsData/ejbModule
directory.
To fix compilation errors for the generated custom SDO and JPA, add the following jar in the Java build path: WC/Foundation-SDO-JPA.jar.
Now you can test your customization with the eclipselink SDO and JPA enabled in your toolkit.
You can also deploy your customization to the ts-app docker container to confirm that the customization also works in the ts-app docker container with the EclipseLink SDO and JPA enabled. To deploy it to the ts-app docker container, package the WebSphereCommerceServerExtensionsData.jar to the ts-app docker container. Also deploy the catalog-ext.xsd to the ts-app docker container by copying the file to the following directory: /opt/WebSphere/AppServer/profiles/default/installedApps/localhost/ts.ear/xml/config/com.ibm.commerce.catalog-ext
The tool that generates the EclipseLink SDO and JPA is also available in the ts-utils docker container. The name of the script file is generateCustomSdoJpa.sh. The parameters of the script are the same as in the toolkit. Before calling the script, copy your existing EMF SDO custom configuration files to the ts-utils docker container in the following directory: /opt/WebSphere/AppServer/profiles/default/installedApps/localhost/ts.ear/xml/config/com.ibm.commerce.catalog-ext
Database migration for custom tables
-
UPDATE XWARRANTY SET OPTCOUNTER = 0 WHERE OPTCOUNTER IS NULL; -
UPDATE XCAREINSTRUCTION SET OPTCOUNTER = 0 WHERE OPTCOUNTER IS NULL;
For more information on OPTCOUNTER, see Optimistic locking.