Using the PowerVM Add disk to a Logical Partition
(LPAR) task, you can add a disk to an existing logical
partition (LPAR).
Before you begin
You must activate the following analyses:
- PowerVM® HMC Overview
- PowerVM LPAR Overview
- PowerVM Managed System
Overview
- PowerVM VIOS Overview
To activate the analyses, navigate to the Domain Panel of the
Server Automation domain and select and select PowerVM HMC Overview. In the Analysis: PowerVM HMC Overview pane,
select Activate. Repeat this action for the PowerVM Managed System Overview, PowerVM LPAR Overview, and PowerVM VIOS Overview analyses.For information about how to disable validation on certain parameters
in the task, see Turning off validation in a task.
Procedure
- Open the Server Automation domain.
- From the Domain Panel, select and
select PowerVM Add disk to a Logical Partition (LPAR).
- In the Partitions section, enter
the following parameters to select the LPAR to which you want to add
a disk:
- HMC
- Select the Hardware Management Console on which the LPAR to which
you want to add a disk is located.
- Managed System
- Select the managed system on which the LPAR to which you want
to add a disk is located.
- Partition Name
- Select the name of the LPAR to which you want to add a disk. To
override the validation that is provided on the parameter, select OFF in the Validation column to
the left of the parameter. For more information, see Turning off validation in a task.
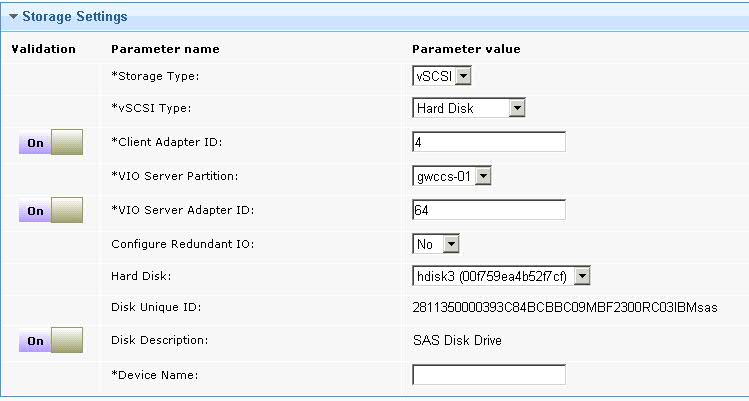
- In the Storage Settings section,
enter the storage values for the new LPAR. From the Storage
Type list, select whether you want Virtual Small Computer
System Interface (vSCSI) or Node Port ID Virtualization
(NPIV) storage type for the new LPAR.
- If you select vSCSI, enter values
for the following parameters.

- vSCSI Type
- Select whether you want to add a Hard Disk or Logical Volume storage for the new disk
of the LPAR. Depending on your selection, the task displays different
parameters. If you select Hard Disk, you must
enter values for the following parameters: Configure Redundant
IO, Hard Disk, parameters. If you
select Logical volume, you must enter the values
for the following parameters: Logical Volume Group, Logical Volume Size (GB), and Logical
Volume Name.
- Client Adapter ID
- Enter the ID of the LPAR client adapter that you want to use for
the new disk. To override the validation that is provided on the parameter,
select OFF in the Validation column to the left of the parameter. For more information, see Turning off validation in a task.
- VIO Server Partition
- Select the name of the virtual input/output server (VIOS) to which
you want to add the adapter ID.
- VIO Server Adapter ID
- Enter the adapter ID that you want to use on the VIOS for the
new disk. To override the validation that is provided on the parameter,
select OFF in the Validation column to the left of the parameter. For more information, see Turning off validation in a task.
- Configure Redundant IO
- Select whether you want to configure an alternative path for multi-path
input/output (MPIO) redundancy. If you select YES, you must enter the values for the following parameters: Redundant Client Adapter ID, Redundant Server
Partition, and Redundant Server Adapter ID. The Hard Disk list is filtered and displays
only hard disks that are configured for MPIO.
- Redundant Client Adapter ID
- Enter the ID of the redundant LPAR client adapter that you want
to use.
- Redundant Server Partition
- Select the Redundant VIO Server that you want to configure to
enable multi-path for the new disk.
- Redundant Server Adapter ID
- Enter the redundant VIO server adapter ID that you want to use
on the redundant VIO server for the new disk.
- Hard Disk
- Select the physical disk to which you want to attach to the vSCSI
adapter. Hard disks that are associated to volume groups or LPARs
are not listed. Hard disks without a valid physical volume ID (PVID)
are not listed.
- Disk Unique ID
- View the unique ID of the hard disk that you selected.
- Disk Description
- View the description of the hard disk. To override the validation
that is provided on the parameter, select OFF in the Validation column to the left of the
parameter. For more information, see Turning off validation in a task.
- Logical Volume Group
- Select the logical volume group from which you want to create
storage for the new SCSI disk.
- Logical Volume Size (GB)
- Enter the size, in gigabytes, that you want to allocate to the
new SCSI disk.
- Logical Volume Name
- Enter a name for the logical volume.
- Device Name
- Enter a virtual target name that the VIO server associates with
the hard disk.
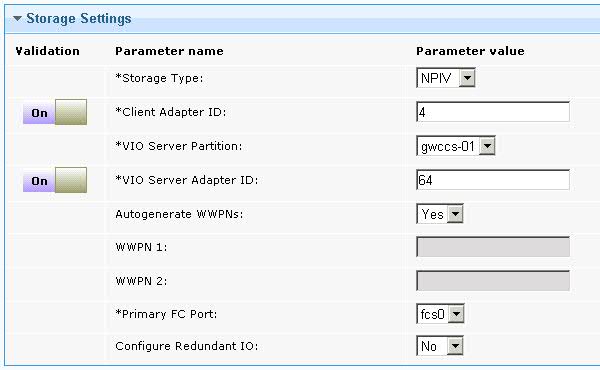
- If you select NPIV, enter the
values for following parameters:

- Client Adapter ID
- Enter the ID of the LPAR client adapter that you want to use for
the new disk.
- VIO Server Partition
- Select the name of the VIOS to which you want to add the adapter
for the new disk.
- VIO Server Adapter ID
- Enter the adapter ID that you want to use on the VIOS for the
new disk.
- Autogenerate WWPNs
- Select whether you want to automatically generate worldwide port
names (WWPN) for the client adapter. The default setting is Yes. If you select No, you must
enter port name in the WWPN 1 and WWPN
2 fields. If you you select No and
are configuring MPIO, you must also enter values for the Redundant WWPN 1 and Redundant WWPN 2 parameters.
- WWPN 1
- Enter the first WWPN for the client adapter.
- WWPN 2
- Enter the second WWPN for the client adapter.
- Primary FC Port
- Select the Fibre Channel port that you want to use as the primary
port.
- Configure Redundant IO
- Select whether you want to configure an alternative path for multi-path
input/output (MPIO) redundancy. If you select YES, the following parameters become visible: Redundant Client
Adapter ID, Redundant Server Partition, Redundant Server Adapter ID, Redundant
WWPN 1, Redundant WWPN 2, and Secondary FC Port.
- Redundant Client Adapter ID
- Enter the unique ID of the redundant LPAR client adapter that
you want to use.
- Redundant VIO Server Partition
- Select the name of the redundant server to which you want to add
the redundant client adapter ID.
- Redundant Server Adapter ID
- Enter the redundant adapter ID of the Virtual I/O Server that
you want to use.
- Redundant WWPN 1
- Enter the first redundant WWPN for the client adapter.
- Redundant WWPN 2
- Enter the second redundant WWPN for the client adapter.
- Secondary FC Port
- Select a secondary Fibre Channel port.
- Click Take Action, and in the Take Action dialog box, select the LPAR to which you
want to add a disk, and click OK.
Results
In the Action: PowerVM Add disk to a Logical Partition
(LPAR) window, you can view the progress of the task.
When the Status changes to Complete, the disk is added to the LPAR.
What to do next
You must activate and deactivate the LPAR for the new disk
to be discovered by the operating system. You can also run the command cfgmgr on the AIX® operating system on the LPAR


