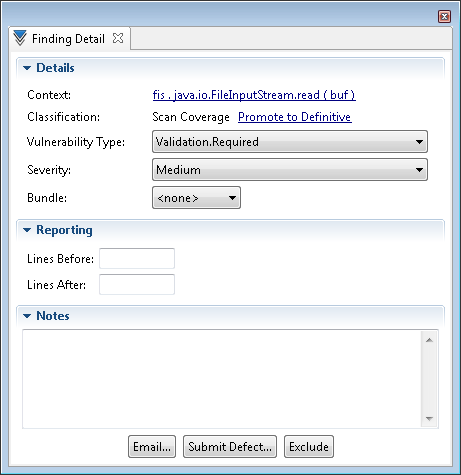
Finding Detail view
When you select a finding, the Finding Detail view displays and allows you to modify its properties. With this view, you can modify an individual finding.

- Details section
- Reporting section (available in AppScan Source for Analysis and AppScan Source for Development (Eclipse plug-in) only)
- Notes Section
- Finding Detail view actions
- Finding Detail view for custom findings (available in AppScan Source for Analysis only)
Details section
- Context: Snippet of code that surrounds the vulnerability
- Classification: Definitive or Suspect security findings - or Scan Coverage findings - with a link to promote the finding to Definitive or revert to the original value if the classification was changed
- Vulnerability Type
- Severity: High, medium, low, or info
- Bundle: Name of the bundle that contains the findings (not available in AppScan® Source for Development (Visual Studio plug-in))
Reporting section (available in AppScan Source for Analysis and AppScan Source for Development (Eclipse plug-in) only)
Specify the number of lines of code to include before and/or after the finding in reports.
Notes® Section
Annotate the finding.
Finding Detail view actions
- Exclude: Click Exclude to exclude (remove) the finding from the findings table. To view excluded findings, open the Excluded Findings view.
- Available in AppScan Source
for
Analysis only:
- Email: If you have configured email preferences,
you can email a finding bundle directly to developers to advise them
of potential defects found after a scan. The email includes a bundle
attachment that contains the findings, and the email text describes
the findings.
- To email the current finding in the Finding Detail view, click Email.
- In the Attachment File Name dialog box, specify a name for the finding bundle that will be attached to the email. For example, specifying my_finding in the Attachment File Name field causes a bundle with file name my_finding.ozbdl to be attached to the email.
- Click OK to open the Email Findings dialog box. By default, the Mail To field in the Email Findings dialog box will populate with the To Address that is specified in the email preferences - however, it can easily be changed when preparing the email. In this dialog box, review the contents of the email and then click OK to send the email.
- Submit Defect: To submit the finding as
a defect, click Submit Defect. This opens the
Select Defect Tracking System dialog box.
- If you select ClearQuest and click OK, the Attachment File Name dialog box opens. In it, specify a name for the finding bundle that will be attached to the defect and then click OK. Log in to Rational® ClearQuest® and submit the findings.
- If you select Quality Center and click OK, the Login dialog box opens, allowing you to log in to Quality Center to submit the findings.
- If you select either Team Foundation Server option, a dialog box opens, prompting you to log into the defect tracking system and provide other configuration details.
Note: Rational Team Concert™ is the only supported defect tracking system on macOS.
- Email: If you have configured email preferences,
you can email a finding bundle directly to developers to advise them
of potential defects found after a scan. The email includes a bundle
attachment that contains the findings, and the email text describes
the findings.
Finding Detail view for custom findings (available in AppScan Source for Analysis only)
The Finding Detail view for custom findings provides additional information that you can edit:
- File
- Line
- Column
- API
In addition, the method by which you edit the Details section is different than standard findings for some fields (for example, the classifications for custom findings appear in a list).
