Ensure that Sametime® Connect and Embedded
clients can connect to the Sametime Community Server using
SAML by adding the new trusted audience URL to the client preferences before installing or updating
the clients.
Before you begin
Enable SAML authentication for the deployment as explained in Enabling SAML authentication on the Sametime Community Server.
This task only applies to the Sametime Connect and
Embedded clients; it does not affect web or mobile clients. During SAML login, Sametime redirects client connections from the initial IdP
URL. If the redirected URL is not listed as a trusted site, Sametime stops loading the page and generates the following
error message in the log: URL redirected_url is not in the trusted
sites list.
About this task
Ensure that Sametime Connect and Embedded clients can
connect using SAML by adding the trusted site's URL to the client preferences before installing or
updating the clients. This is the URL that you assigned in the
STSAML_TRUSTED_AUDIENCES setting, as explained in Configuration settings related to SAML authentication. For more information on configuring client
installation packages, see Configuring Sametime Connect client preferences with the Expeditor
managed settings framework.
Alternatively, users can enable SAML authentication themselves by modifying settings in the
client. For more information, see Enabling SAML authentication in installed clients
Procedure
-
Determine your company's SAML IdP URL.
The IdP URL is based on your Sametime Community Server
host name, and provides the HTML page with at least 3 <input> tags for the User
name, Password, and Submit fields. Upon a submit action, the URL might redirect to one or more URLs
and receive the SAML token in response.
-
Decide whether you want to use
form or browser as the IdP
log-in type.
If you want to log in to your company's authentication server by typing a user name and password
in a Sametime dialog box, use form as the
idp.type; otherwise use browser.
-
Determine your company's SAML authentication settings by completing the following steps.
-
Browse to your IdP URL, view the HTML source of the log-in form, and collect the following
values.
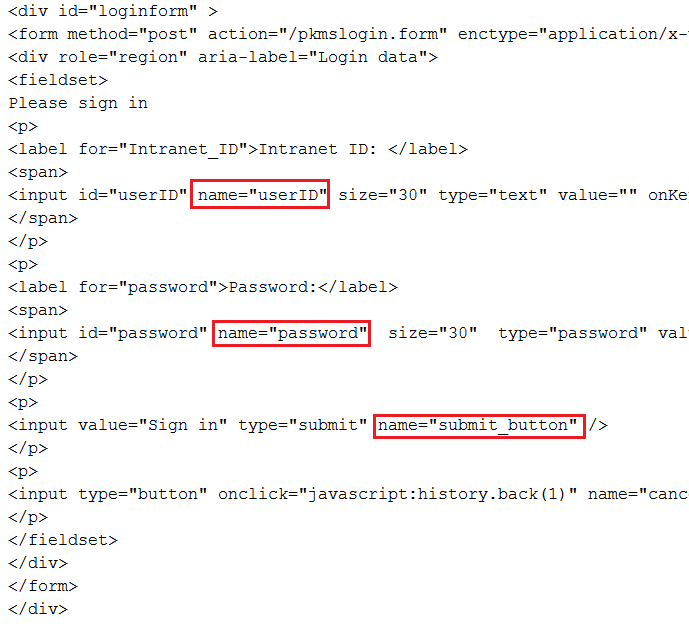
idp.form.username.tag is the value in the name attribute of
the Intranet ID label's input statement; this value is userIDidp.form.password.tag is the value in the name attribute of
the Password label's input statement; this value is passwordidp.form.submit.tag is the value in the name attribute of the
"Sign in" input statement; this value is submit
For example, if you browse to the example Community Server IdP URL, the following graphic shows
where the values appear in the sample HTML source.
-
Add the information collected in the previous steps to the Sametime
plugin_customization.ini file by completing the following steps.
-
Open the plugin_customization.ini file.
- Windows™: the file is located inside the client installation package, in the deploy directory
- Mac: the file is located separately from the client installation package
-
Set the
samlTrustedSites preference to the list all of the redirecting URLs
used by your IdP; separate multiple URLs with a comma (,). If you have multiple SAML communities,
include all of the redirectling URLs used by all of the SAML communities. If your IdP does not use
redirecting URLs, leave this setting blank.
Each URL can be as simple as https://host_name, or you
can include a path as in
https://host_name/path as shown in the
following example..
com.ibm.collaboration.realtime.community/samlTrustedSites=https://host1,https://host2/path
-
Set the
samlCommunities preference to the list of fully qualified host names
of all of your SAML communities; separate multiple host names with a semicolon (;).
-
Set the
sametime.example.com.idp to the IdP URL that you determined in Step
1.
For example, if the Community Server's host name is sametime.example.com,
then the appropriate setting is the IdP URL determined in the example from Step 1, and shown in the
following statement:
com.ibm.collaboration.realtime.community/sametime.example.com.idp=https://www.example.com/FIM/sps/SAML20/logininitial?TARGET=https://sametime.example.com&PROTOCOL=POST
-
Add the log-in type that you selected in Step 2 to the
idp.type setting.
-
Add the tag settings that you collected from the login page's HTML source in Step 3 to the
following settings:
idp.form.username.tagidp.form.password.tagidp.form.submit.tag
The following example shows completed settings using a log-in type of form and
the tag settings from the sample HTML source shown in Step 2:
com.ibm.collaboration.realtime.community/sametime.example.com.idp.type=form
com.ibm.collaboration.realtime.community/sametime.example.com.idp.form.username.tag=userID
com.ibm.collaboration.realtime.community/sametime.example.com.idp.form.password.tag=password
com.ibm.collaboration.realtime.community/sametime.example.com.idp.form.submit.tag=submit_button
-
Save and close the file.
-
(Mac clients only): If you can install clients with the
plugin_customization.ini file located outside of the client package, skip to
step 5. If your deployment mechanism requires a single file, add the
plugin_customization.ini file to the client installation package as explained
in the following steps.
-
Expand the client installation package.
-
Add the plugin_customization.ini file.
-
Compress the revised package.
-
Email the revised package to support@collabserv.com and request that IBM sign the package and return it to you.
-
Distribute the updated installation packages to your users.
The SAML configuration information is automatically populated when your users install
the client.