Installing Additional Windows Servers (DSA)
Before proceeding with this section, determine your authentication method and complete the appropriate steps in Authenticating Additional Servers.
For each additional server that you want to add to your deployment, make sure it can communicate with the other servers, and then follow these steps:
- Download the BigFix Server installer having the same version as the one installed on the master server or copy it from the BigFix Enterprise\BESInstallers\Server directory of your BigFix Server to the system where you want to install the additional server.
- Replace the masthead.afxm file in the "Server" folder with an updated version. The updated
version can be taken from the BigFix Server directory
C:\Program Files (x86)\BigFix
          Enterprise\BES Server
and it is namedActionSite.afxm, or it can be downloaded from thehttp://servername:port/masthead/masthead.afxmsite. - Copy the
license.pvkfile from the master server to each computer where you intend to install an additional DSA Server. - Each DSA Server must have its own SQL Server database engine, either local or remote. Ensure that each server uses the same SQL Server version. Do not use the same database engine to store the databases of two different DSA servers. Each DSA Server must be able to access its own database engine and also the database engines of the other DSA Servers.
- Use the same authentication method to access all the SQL Server database engines, either Windows authentication or SQL Server authentication. If you chose the Windows authentication method, use the same domain user to access all your database engines. If you chose the SQL Server authentication method, use the same user name and password. Ensure that your database user has sysadmin privileges on all database engines.
- If you are extracting the server installer from the Installation Generator, select
Production Deployment, and I want to install with an existing
masthead. Specify the
masthead.afxmfile from the master server. - On the dialog of the server installer, choose a combination of components that includes the BigFix Server. Do not install the WebUI component on the secondary DSA servers.
- On the Select Database Replication dialog of the server installer, select Replicated Database.
The following steps of the installation procedure differ depending on the BigFix installer version.
Database configuration steps for 11.0.5 and earlier
- In the Select Database dialog, you can choose the Local Database option to host the secondary server's own database locally. When choosing this option, the LocalSystem user will be used to access the local database through Windows authentication. However, this user only exists locally, so you will have to use SQL Server authentication to access the primary server's database. Alternatively, you can choose "Remote Database" and specify the local computer as the host, or an actual remote computer.
- If you chose Local Database, skip this step. In the
Database Server dialog, enter the hostname or IP address of the
computer that will host your secondary server's database, and the credentials of an
account with sysadmin permissions on the database instance. Consider that, if you choose
Windows authentication, you will have to use the same user to access the primary server's
database.

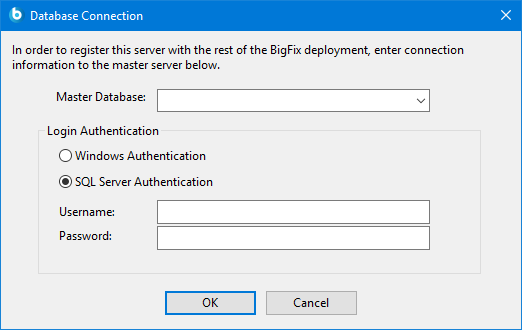
- Proceed through the dialogs until the installation operations begin. At one point during
the setup process, the Database Connection dialog will pop up.
Enter the hostname or IP address of the computer hosting the database of your primary
server. If you chose the Local Database option for the secondary
server's database, you must use SQL Server authentication to access the primary server's
database. If you chose to access the secondary server's database using Windows
authentication, you will have to use the same user to access the primary server's
database.
Database configuration steps for 11.0.6 and newer
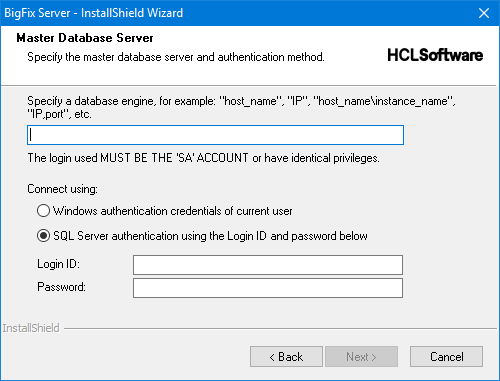
- In the Master Database Server dialog, enter the hostname or IP
address of the computer hosting the database of your primary server's database, and the
credentials of an account with db_owner permissions on the BFEnterprise database. If you
choose Windows authentication, you will have to use the same user to access the secondary
server's database.
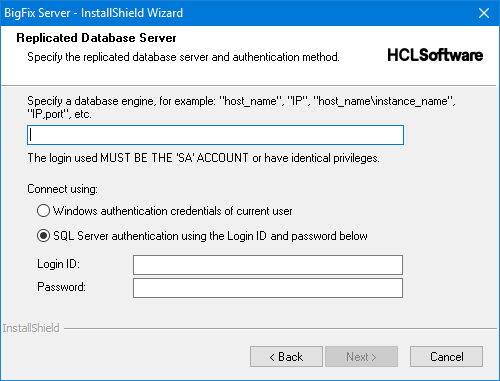
- In the Replicated Database Server dialog, enter the hostname or
IP address of the computer that will host your secondary server's database, and the
credentials of an account with sysadmin permissions on the database instance.
Last installation steps
- The BigFix Administration Tool displays a pop-up dialog containing an error message in red, which describes a failed connection to the database that the server is trying to replicate from. Ignore this error message and click OK.
- If you select the check box Run the BigFix Diagnostic Tool on the last installation dialog, after you click Finish, the BigFix Server Diagnostics displays a pop-up dialog containing several test failures. Ignore this dialog and click Close.
Post installation steps
- Depending on the authentication method used to access the SQL Server database engine:
- If you are using Windows Authentication, ensure that the user running the FillDB service on all DSA servers of your environment is the same Windows domain user. This user must have access to all database engines used by your DSA servers. If needed, change the Log On settings of the FillDB service on all your DSA servers accordingly and then restart the service.
- If you are using SQL Authentication, stop the FillDB service on all your DSA
servers, open the registry key
HKLM\Software\Wow6432Node\BigFix\Enterprise
                Server\FillDB
and add the following string values to all your DSA servers (if they are missing):
Then, restart the FillDB service. Note: For version 11.0.6 and newer, those keys are automatically created on the secondary server, but you still need to manually create them on the primary.ReplicationDatabase = BFEnterprise ReplicationUser = <login name> ReplicationPassword = <password>
- After installing a new DSA server in an environment where the custom CA is already
present, you must also install the custom CA (using the
setcustomcaBESAdmin command) there for the new server to work. - On the master server, run the resign security data command by using the BigFix Administration tool.
For additional information on the command, see BESAdmin Windows Command Line..\BESAdmin.exe /resignsecuritydata - On the newly-installed server, run the BigFix Administration Tool and select
the Replication tab to see the current list of servers and their
replication status. You might need to wait for the next replication period before all
servers show a successful connection. Select the newly-installed server from the drop-down
menu, and verify in the table that it has successfully connected to the primary server.
Then select the primary server from the same menu, and verify that it is connected to the
new server.Note: The initial replication can take several minutes to hours, depending on the size of your database. Wait for the replication to complete before taking any actions from a console connected to the secondary DSA server. Moreover, the replication process might get interrupted. If you experience this problem, you can discuss it with your HCL Software Support.
- Verify that all servers have successfully completed their replication.
- The replication server window shows you the server configuration for your current deployment. By default, your newly-installed server is configured to replicate directly from the primary server's database every 5 minutes. This time interval can be changed to a larger value.